WP Grid Builder Review: How Good is the WordPress Grid Builder?
Build stunning tiles with WP Grid Builder. Depending on which builder or WordPress plugin you use for your website, you’ve already seen a lot. However, all plugins have in common that the pages created with them are built in “grids” and you are – depending on the flexibility of the builder – so more or less limited. WP Grid Builder starts here and offers many features that allow you to customize the content tiles themselves.
WP Grid Builder is a real added value for your website. Especially the easy creation and implementation of the maps and the interaction with tools like Gutenberg, Kadence and WooCommerce make a test almost mandatory.
In this post, we’ll use some screenshots to show you how the plugin is built, why it’s so well-suited even for beginners, and what special features it offers. Stay tuned and learn more about WP GridBuilder!
General information about the Grid Builder plugin
The grids you create with WP Grid Builder can be implemented on your website either directly or via a tool like Elementor. Of course, by combining them with other plugins, you have a lot more features at your disposal – outside of the maps that Grid Builder specializes in.
Our tip: Just give it a try! Feel free to read our Elementor review to learn more about the all-rounder WP plugin!
How much does WP Grid Builder cost?

Grid Builder for WordPress is a paid premium plugin that charges between $49 and $249 per year, depending on the amount of pages you need (one, three or unlimited). In return, however, the builder is compatible with a wide variety of additional plugins such as WooCommerce, Divi and Gutenberg, or even has a standard built-in interface. The WP Grid Builder is compatible with many more external services.
| Basic | Premium | Ultimate | |
|---|---|---|---|
| Websites | 1 | 3 | unlimited |
| All addons included | yes | yes | yes |
| Extension discount | 20 % | 30 % | 40 % |
| $ 49,00 / year | $ 99,00 / year | $ 249.00 / year |
However, you don’t have to jump into the deep end if you want to test Gridbuilderᵂᴾ. On the one hand, there are free demos for the individual functions of the plugin and on the other hand, you can cancel your purchase within 14 days, should you not be as satisfied as initially thought.
The structure of the plugin: Our clicks through the menus
Let’s start with a little tour through the individual menus of WP Grid Builder. First, the plugin needs to be installed – just like any other(How to install a WordPress plugin):
- Purchase the plugin on Grid Builder’s official website.
- You will receive a message in your account as well as to your mail address. Now open the zip file that was sent to you. Put it somewhere where you can find it right away – for example, on your desktop.
- Once in the WordPress interface, select “Plugins” on the left and “Install” or “Add new”. With a click on “Upload Plugin” you can upload and install the zip file.
- Now you have to activate the Grid Builder. You will also find the activation data in the mail you received after your purchase. Select the plugin on the left and click on “Activate Plugin”.
- Grid Builder now appears as a separate plugin in the left menu bar. Enter your data here, i.e. your e-mail address and password. Click on the green button, done!
- WP Grid Builder is installed and activated. Now you can start with the actual setup.
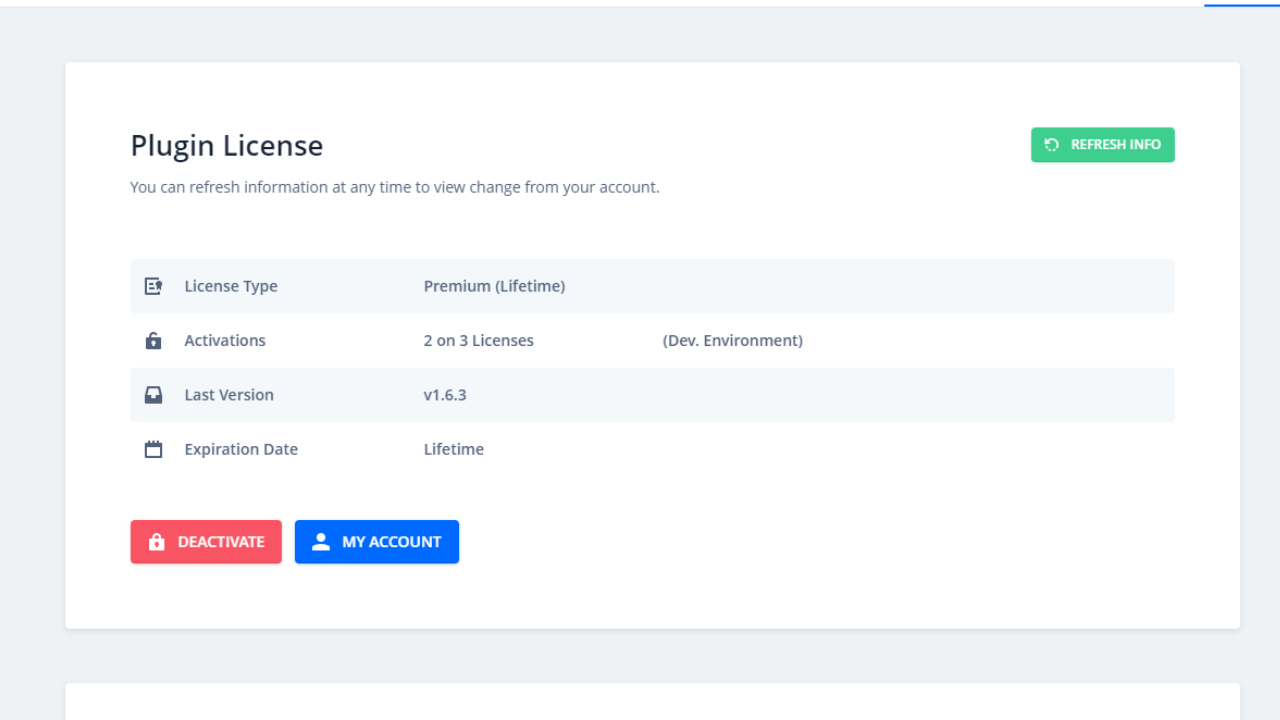
Now you have to connect your installation with the account at the manufacturer, so that you can use the newly installed plugin.
Let’s go!
How to create your first grid: The basic settings
The correct translation of “grid” into German – whether with Netz, Raster or Gitter – is a matter of debate. Therefore, we come directly to the essentials and show you on the basis of some screenshots, how you can create your first blog grid in WP Grid Builder with a few clicks. Let’s start again in the WordPress menu on the left side, where you first select the Gridbuilder WP plugin.
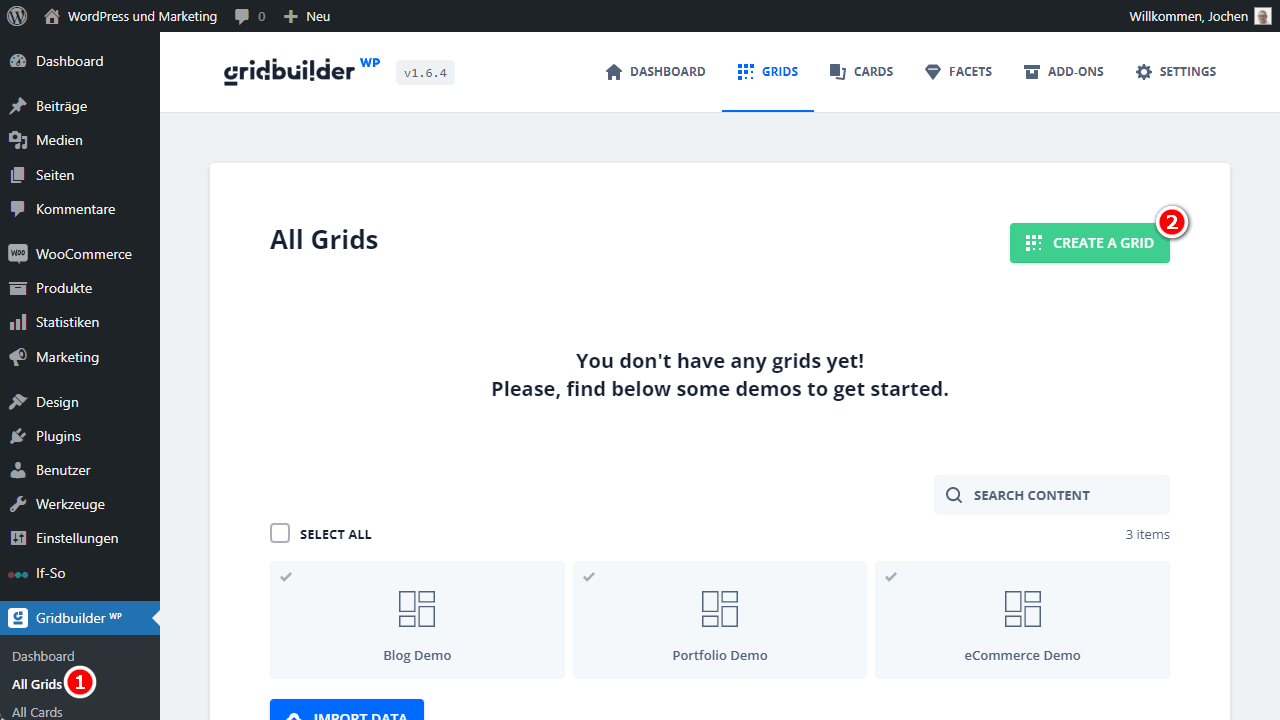
Clicking on “All Grids” will take you to the creation page. Here you can create your grids, customize them and test on demo pages how they will finally look in your blog or store.
Now click on “Create a Grid” in the upper right corner to be redirected to the actual builder. Here you can follow these steps :
- It starts (and continues) simple. First, name your grid and add custom CSS classes if necessary. Also, define error messages that will be displayed to users if they can’t find a post.
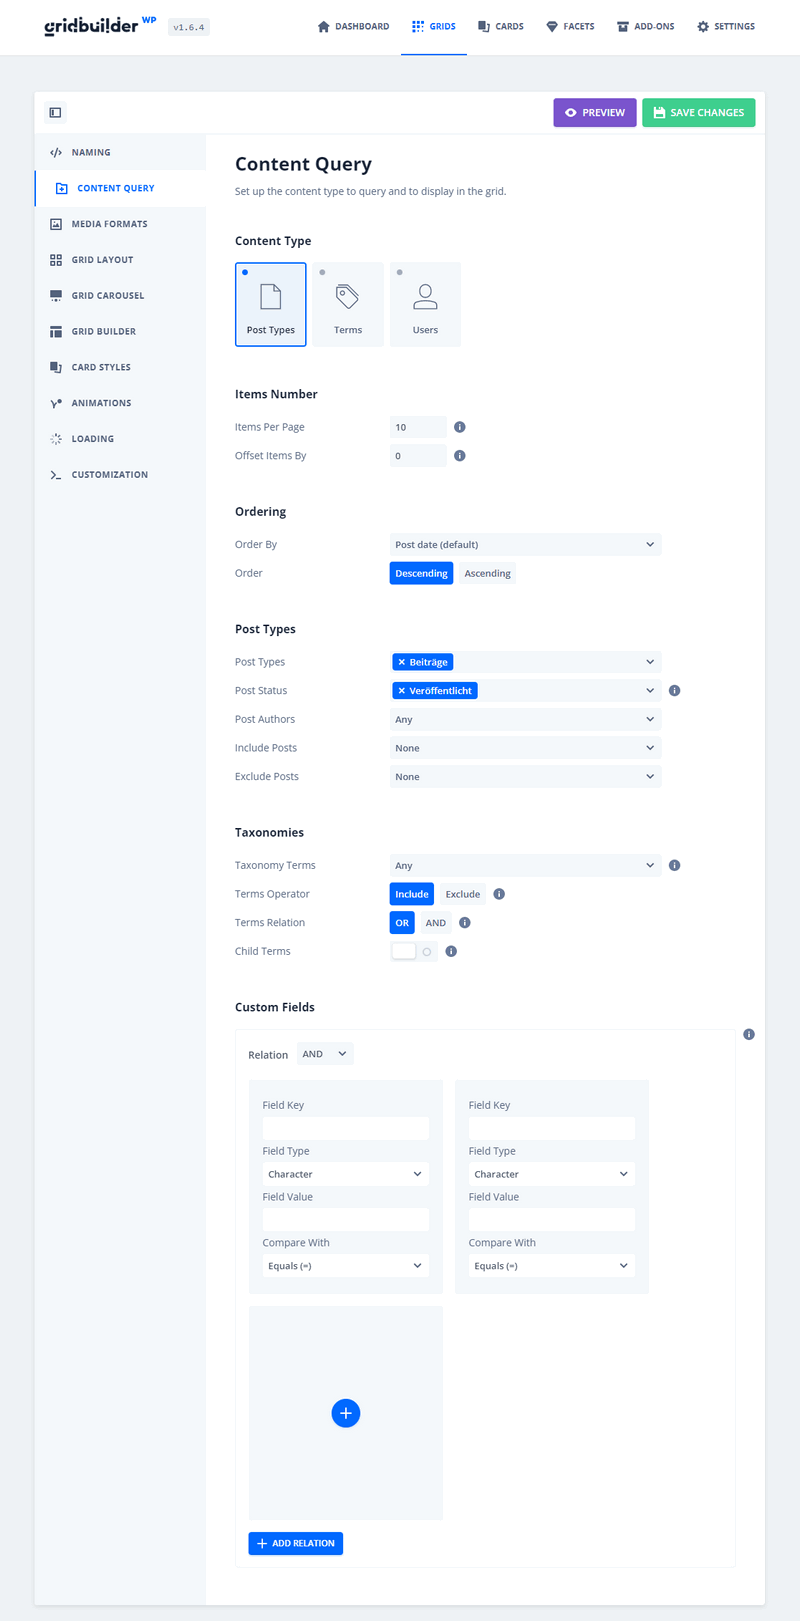
- Now it’s time to add images. Click on the second line, “Content Query”. Now you choose from what kind of source you want to get your content. You can choose from your posts and pages, categories and tag and users. We choose “Post Types”, which is the classic.
- Also, set how many articles are displayed per page. By default this counter is set to 10, if you enter a negative one (-1) WP will show all posts. If you enter a positive number, this number will also be displayed.
- Now you set (we are still in the “Source” menu) what kind of post it is, if the post can be published or have another status and which authors are allowed.
- Next, we’ll get to work on setting the media format. To do this, first select the menu item of the same name on the left side of the Grid Builder editor. All formats of audio files, images and videos are supported.
So much for the basic settings for our grid as far as audio, image and video files are concerned.
The grid creation: This is how it goes on
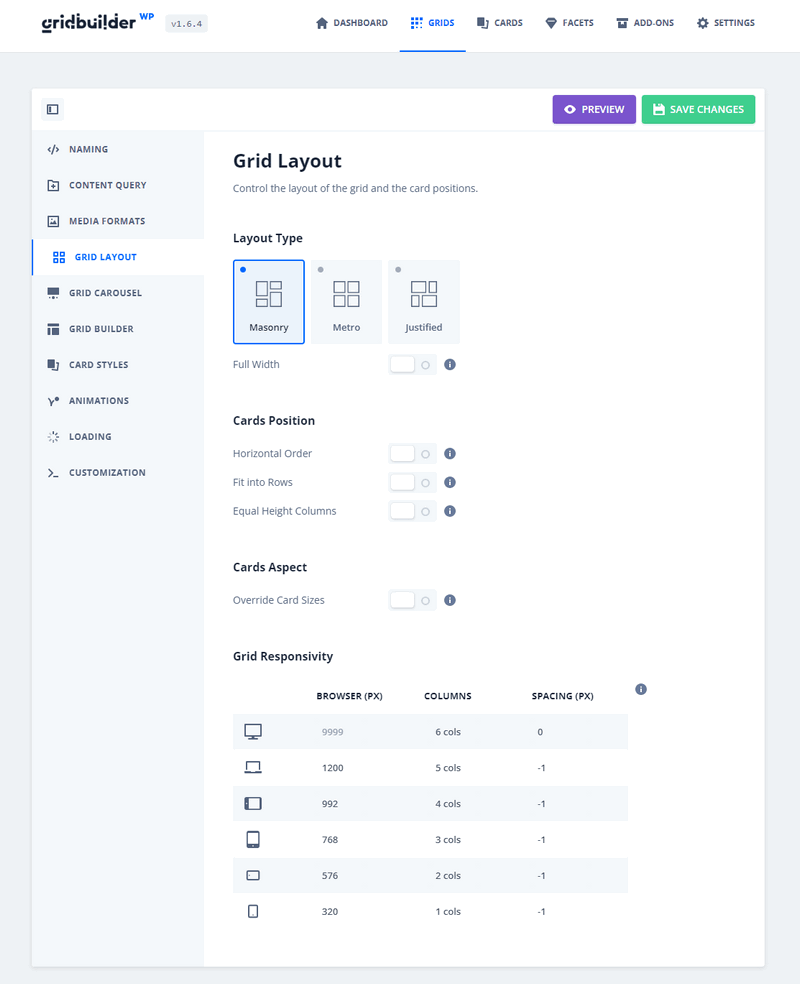
As described in the previous paragraph, nothing changes in our interface at first. We stay in the plugin settings menu and, to create our first grid, proceed as follows:
- Open the “Grid Layout” item. Here you can set the basic style of your grids, such as “all the same size”, “offset” or “across”. Of course you can change the final design as you like during the creation, this somewhat reduced menu only serves as a quick start into the grid editing!
- In addition to the layout type, you can make settings such as the automatic (parallel) alignment of multiple grids or the arrangement of these in a row.
- Important: For security reasons, always click on “Save”!
- Now it’s time for the layout, i.e. the structure of your grids in the “Grid Carousel” menu. Here you have only two options, the “Standard” and the “Carousel” layout. We recommend the standard variant, as it offers a bit more possibilities, but the alternative is cool as well. It’s best to test both and see which one suits your blog or store best.
- The next menu item, “Grid Builder”, allows you to customize your grid with images, filters and much more.
We will talk about this in more detail later in the text, in the demo creation of our first grid.
- In the next sub item we find settings for the style of our maps. By this, Grid Builder WP simply means the individual tiles or fields that make up the entire grid. If you have already created maps, you can import them here – otherwise use the plugin’s demos for now, for testing purposes they are very good.
- One point further, in the animations, you set the same. You can let your maps “fly in” or make them blend in more or less with the background of your website.
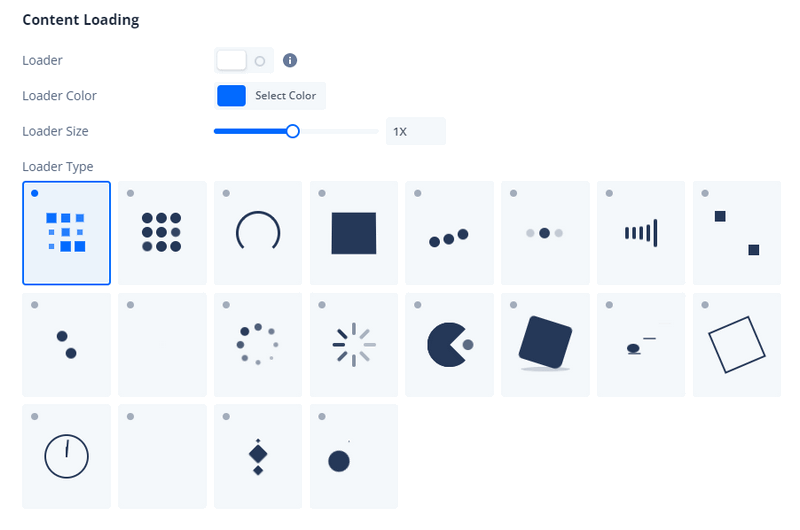
- Now it’s on to the loading settings. Yes, that’s right, Grid Builder WP has a full-fledged menu where you can set the loading behavior of your grids.
Here you can choose whether images and videos should load slower or faster than the rest of your page (lazy load). You can also set the background color and design the “Load…” logo, i.e. the classic circle. You can set the color, size and the basic presence of the icon.
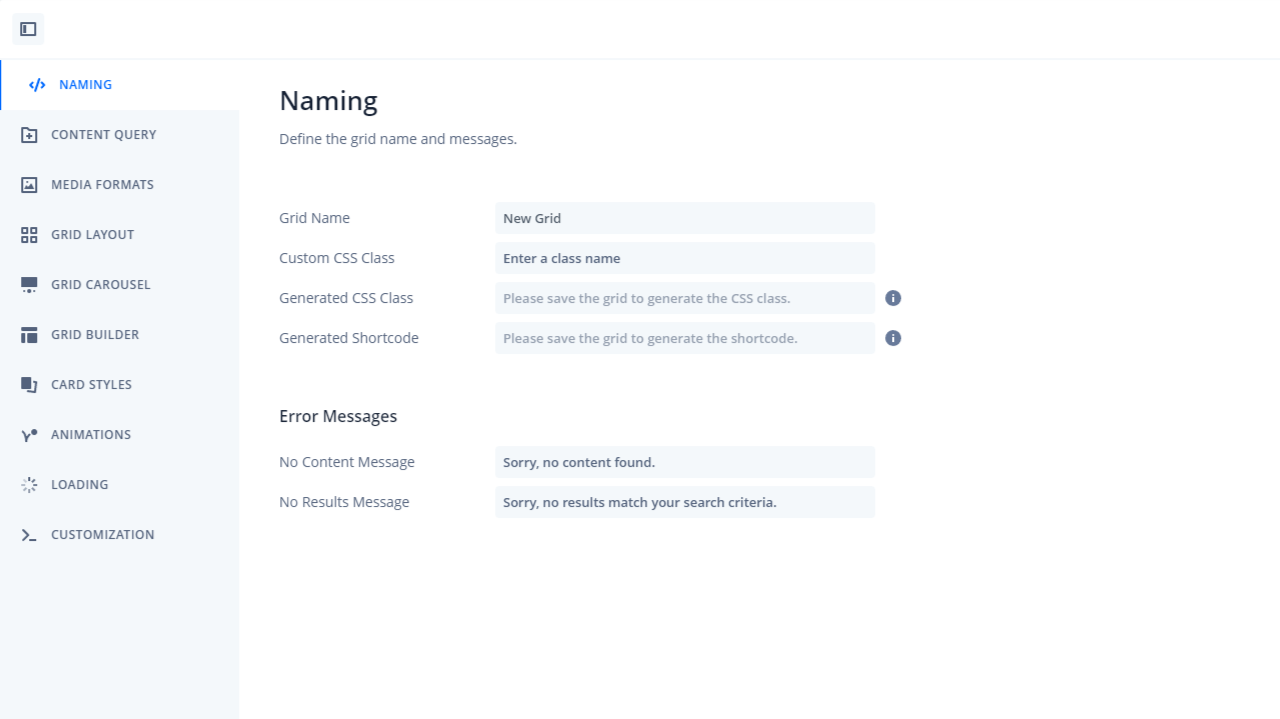
Done it? Congratulations! If you’ve made it this far, you’ve made all the relevant basic settings for your grids and can now get down to the actual design of the maps. So far we have only defined how they should behave, which media sources are available and what the layout basically looks like.
Our first map in WP Grid Builder: Here’s how to go about it!
We decided to introduce the maps in a bit more detail, in addition to the “Grid” menu. Overall, the Grid Builder WP is very logically structured, but the numerous submenus can quickly confuse even experienced users. We therefore recommend that you simply practice for a day or two to get into it faster – after that you should be more than fit at least in the basic functions of the plugin!
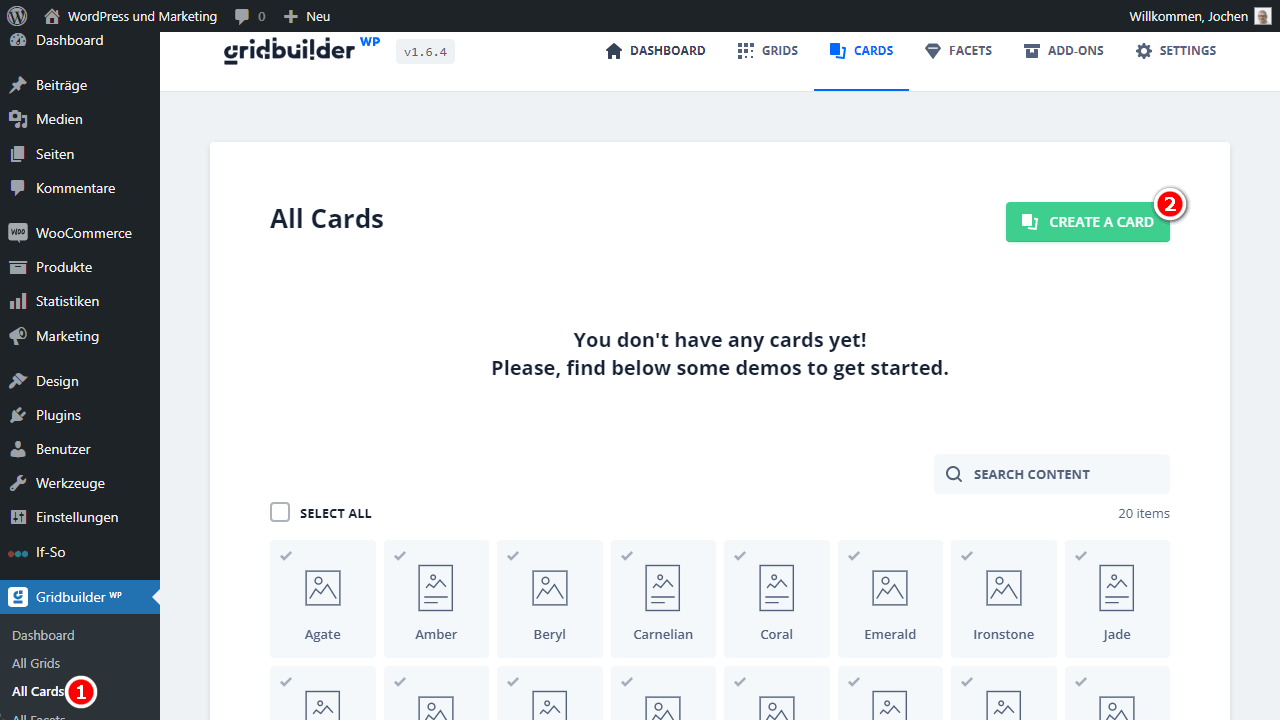
In the menu “All Cards” we now click on “Create a Card” to get started with the creation of the first card.
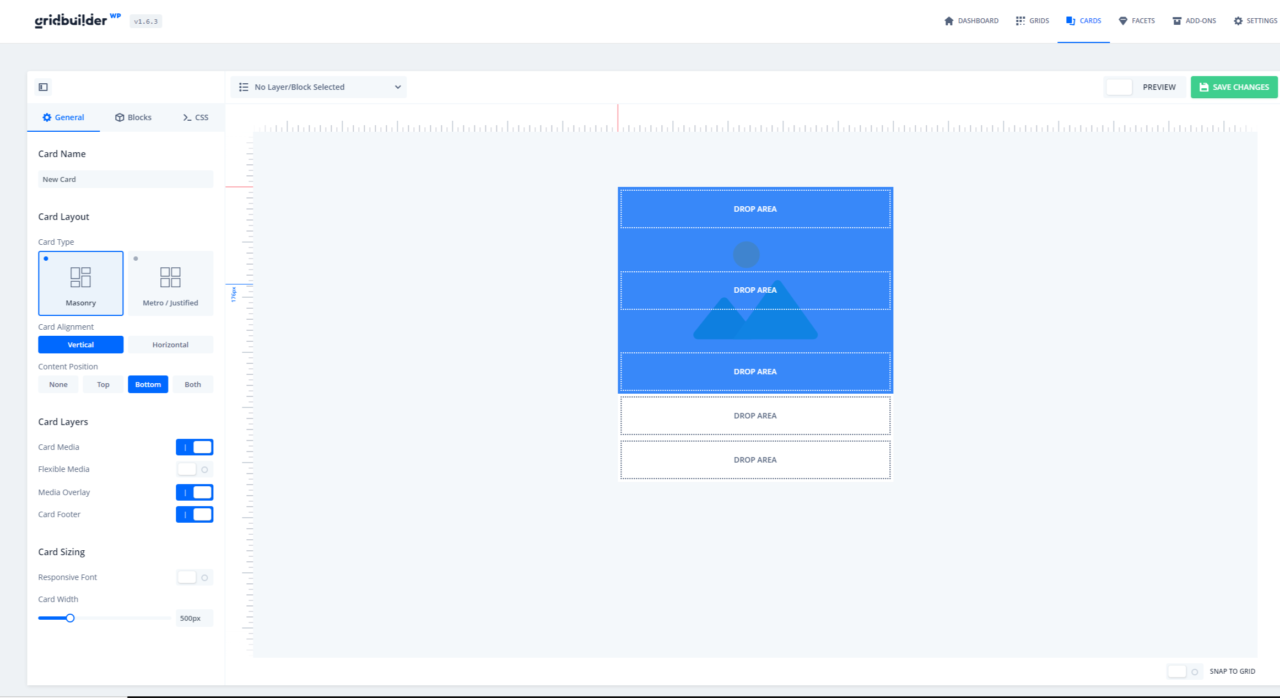
The menu for card editing opens, where some setting options overlap with those already presented. We’ll give you a brief overview of the menu’s structure and show you how to create and customize your grids here!
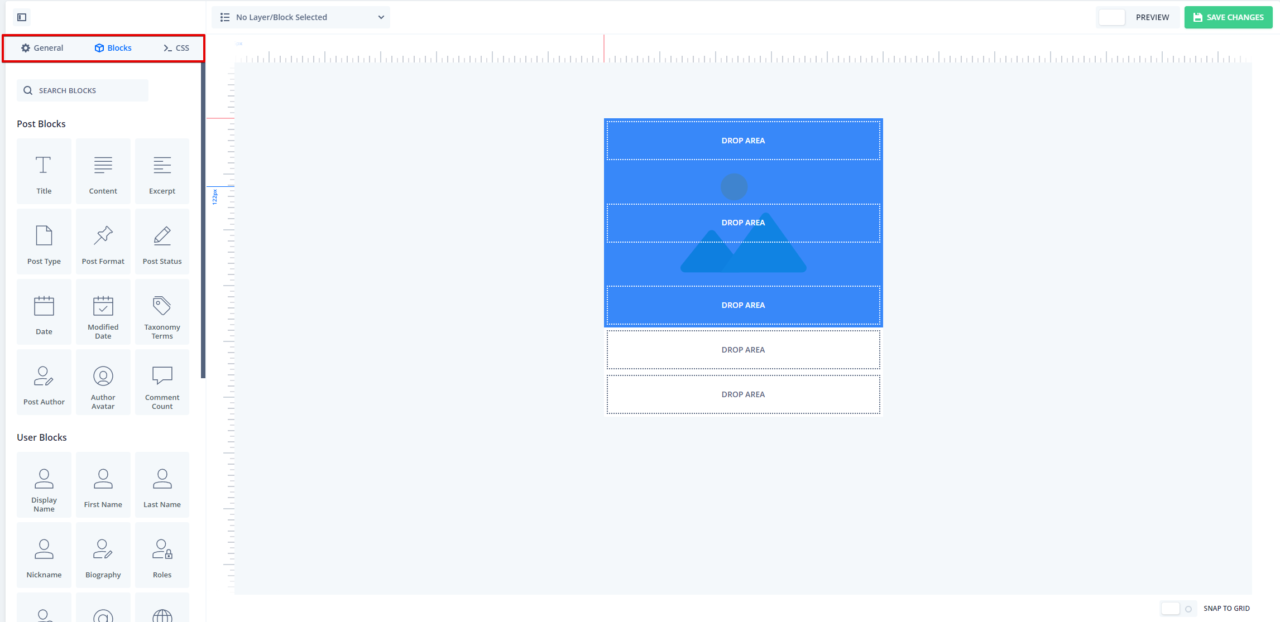
- Submenu “General”: First you select the layout on the left. Also, decide on a horizontal or vertical orientation for your card blocks and choose where to place the content (top, bottom, top and bottom, nowhere). Masonry or Metro.
- Submenu “Blocks”: Here you build your map from the blocks that give it its name. You choose where the content should be located and whether pictures, videos, a calendar or a comment box should be placed on the map. In this way, you create the individual cards step by step, whereby the interface is really easy to use after a short familiarization.
- We stay in the submenu “Blocks”. Now you have to decide what happens when visitors to your site click on the individual blocks. For example, you can insert links and animations. The block editing menu opens when you click on the already inserted block.
Have you experimented a bit or even created your first map? Great – then we can take a quick look at how to implement your designs in the WordPress editor to make them visible on your new or existing website!
Using grids in the WordPress editor: This is the best way to do it!
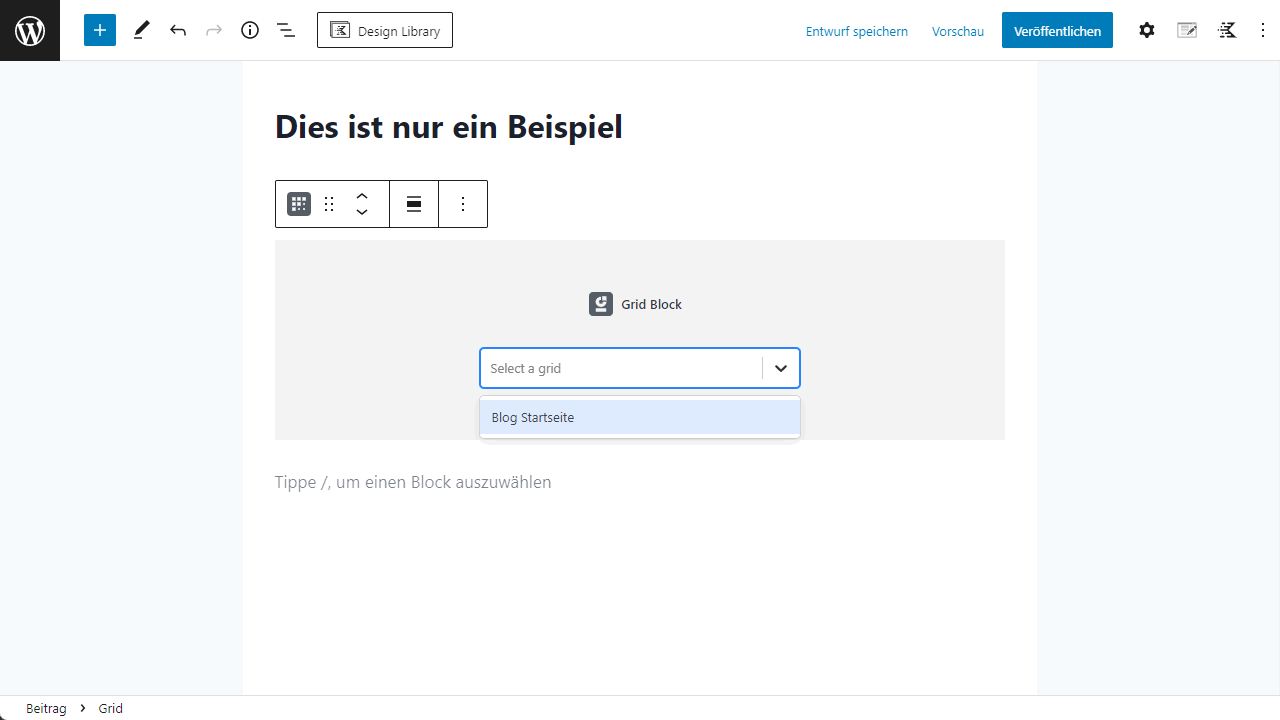
The complicated part of WP Grid Builder is creating the layouts and customizing the maps. Once you’ve completed these steps, it’s just a matter of adding the designs you’ve created to your website correctly. We’ll start here from the Gutenberg editor, since it is after all the most used tool, and see how we implement our created maps on our site.
- Open the WP editor. Think of any title, such as “Sample Page” or something more creative.
- Select “Add block” by clicking on the black plus. If the plugin was installed correctly, you can now select “Grid” here.
- The Grid Builder menu will open, where you can see and select your created grids or, if you click on Cards, the created cards. If you do this, the created cards will be displayed in the editor and in the preview as you have compiled them in the Grid Builder plugin.
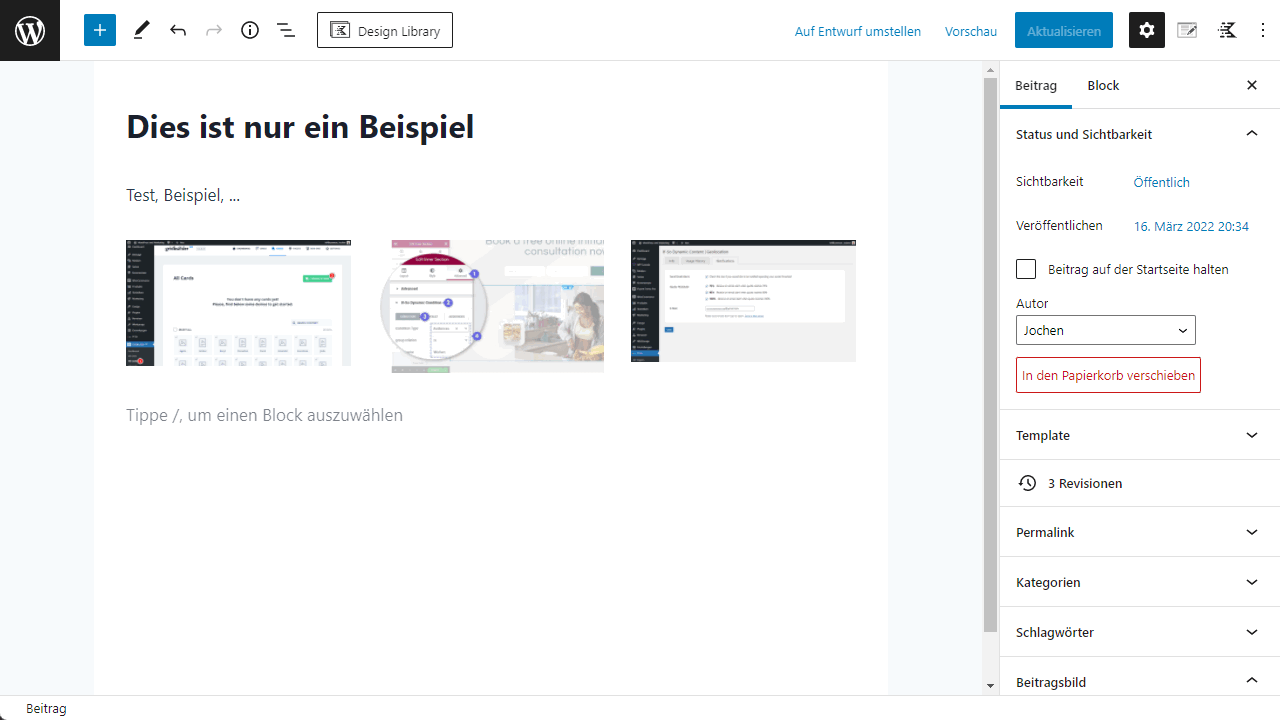
Basically, that’s not it by far – the Grid Builder for WP offers countless features that you can spend nights digging into. However, our goal with this article was to give a brief and conclusive overview of the relevant features for blog and store owners and possibly WordPress newbies. We hope we succeeded in doing that!
We also think it’s cool that Grid Builder itself provides a lot of informative content in the form of videos and articles on its website. Feel free to check it out here and learn more!
Conclusion: WP Grid Builder is a real added value!
In our first test, the Grid Builder for WP could convince all along the line. It allows a very simple and therefore easy web design, which makes the tool suitable for beginners.
However, if you want, you can also create and insert much more sophisticated designs here. In addition, there is the fair pricing model and numerous video tutorials on the official Grid Builder page.
Therefore: Our full recommendation, use the free trial period in any case and the possibility to cancel your contract within 14 days if you are not satisfied!
 We will talk about this in more detail later in the text, in the demo creation of our first grid.
 Here you can choose whether images and videos should load slower or faster than the rest of your page (lazy load). You can also set the background color and design the “Load…” logo, i.e. the classic circle. You can set the color, size and the basic presence of the icon.
The main problem is that this company is not GDPR-compliant. They ignore articles 16 and 19 (right of customers to rectify their data), when you need to update your personal data.