How to create a WooCommerce store with Thrive Theme Builder
WooCommerce and Thrive Theme Builder are the perfect team for an online store. Sure, you still have to take care of all the legal stuff, but the design and store structure is fully under control with Thrive Themes.
WooCommerce is the most popular store plugin for WordPress. Thrive Themes offers full support for visual customization of all store pages and product display. This is taken care of by the WordPress theme called Thrive Theme Builder including a selection of pre-built templates.
With Thrive Theme Builder, you can freely customize all elements of your website without writing a line of program code. The WordPress theme is suitable for home users, self-employed, small and medium businesses, web designers and agencies. In today’s article we will show you how to create your own WooCommerce store using Thrive Theme Builder.
ATTENTION: This howto mainly describes the visual design using Thrive Theme Builder theme. The technical and legal WooCommerce setup is only briefly touched upon.
Let’s go!
The video is unfortunately in English, but it describes all steps exactly.
TIP: The best 5 WooCommerce themes for WordPress
1. Create your website with the Thrive Theme Builder
If you don’t already have one, the first thing you need to do is create a WordPress website with Thrive Theme Builder. This is the advanced WordPress theme from Thrive Themes.
You don’t need any prior knowledge or special tools and you can create a professional looking site on a visual level only. With Thrive Theme Builder, you can customize any WordPress site and change all areas.
The whole thing works just as smoothly with a WooCommerce store, once you’ve enabled the WooCommerce plugin.
If you don’t have a website yet, it’s best to start with my Create Website series. There I explain how to choose a domain and find a provider for your new blog, install WordPress, up to setting up WordPress itself.
2. Integrate the WooCommerce plugin into your WordPress site
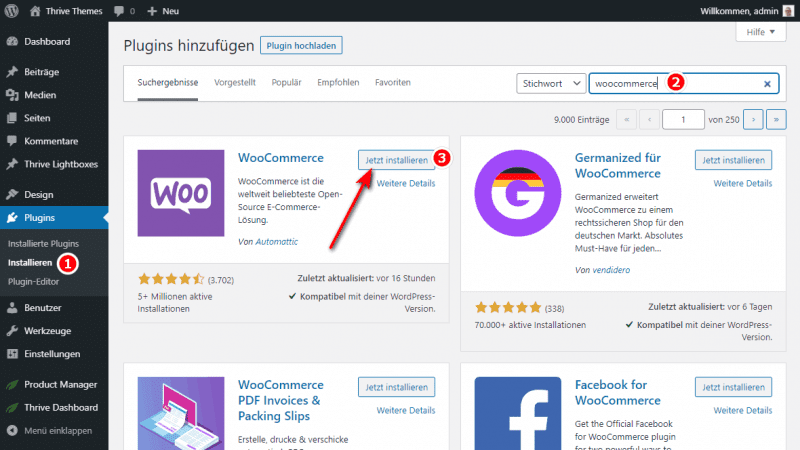
From the WordPress dashboard, click Plugins on the left and search for the WooCommerce plugin in the WordPress plugin library. For the free open source e-commerce solution you need at least WordPress version 5.4, MySQL 5.6 and PHP 7.2. After downloading you can install and activate the plugin within a few moments.
Read my instructions if you have never installed a WordPress plugin before.
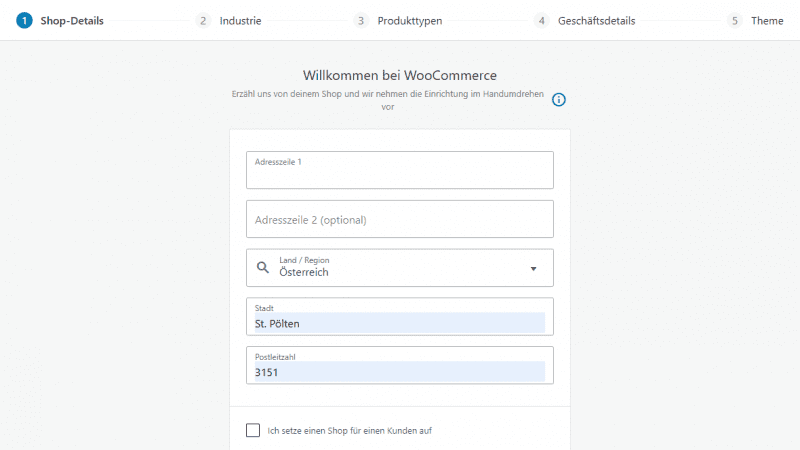
Fill in all the fields at the WooCommerce setup wizard accurately and click Continue each time.
In the fifth step, make sure Thrive Theme Builder is selected and click“Continue with my active theme“.
3. Create 4 new pages and connect them
If everything went right when you set up WooCommerce, the four pages for the store should have been created and connected automatically. If that’s the case for you, you can skip this step entirely.
Create four new pages on your WordPress website. Give the pages the following names
- Checkout
- My account
- Store
- and Shopping Cart
and publish them in your dashboard.
The 4 pages are mandatory for the subsequent link with WooCommerce. You just need to create the pages at this point and not fill them with content yet.
Connect the new pages with WooCommerce
In your WordPress dashboard, navigate to WooCommerce > Settings > Products. Select the store page you created above and connect it to WooCommerce by selecting the page in the dropdown box
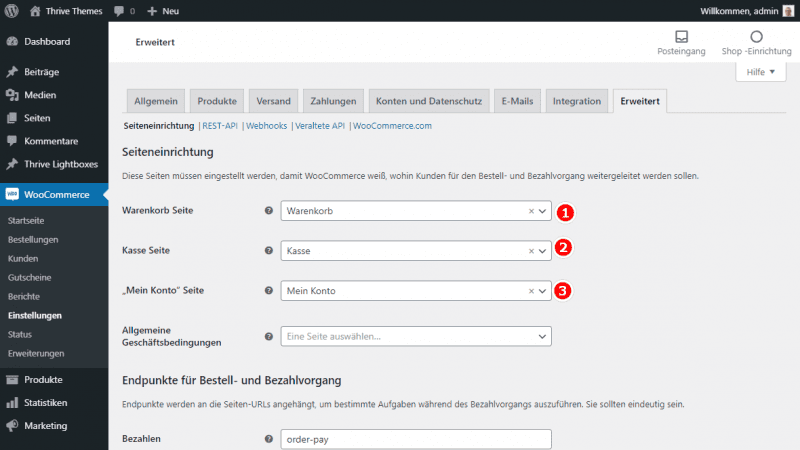
After that switch to Advanced. Now you can connect the 3 remaining pages “Checkout”, “My Account” and “Shopping Cart” to WooCommerce by selecting them in the dropdown boxes.
4. Complete the setup of your WooCommerce site
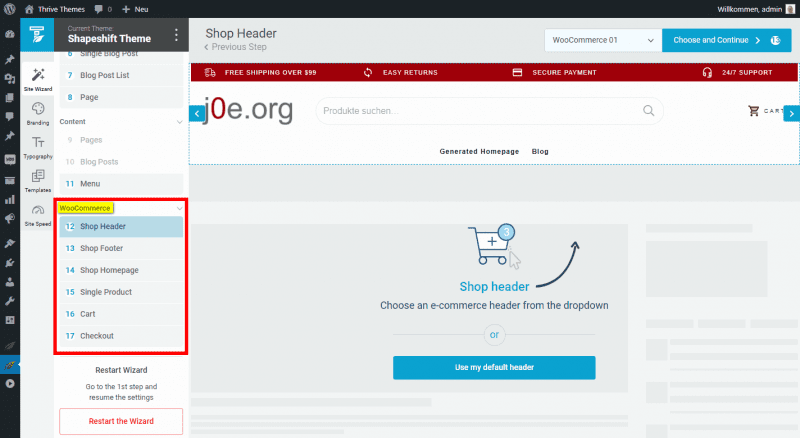
Next, you can access the Thrive Theme Builder setup wizard and finish setting up your WooCommerce site: Thrive Dashboard > Thrive Theme Builder
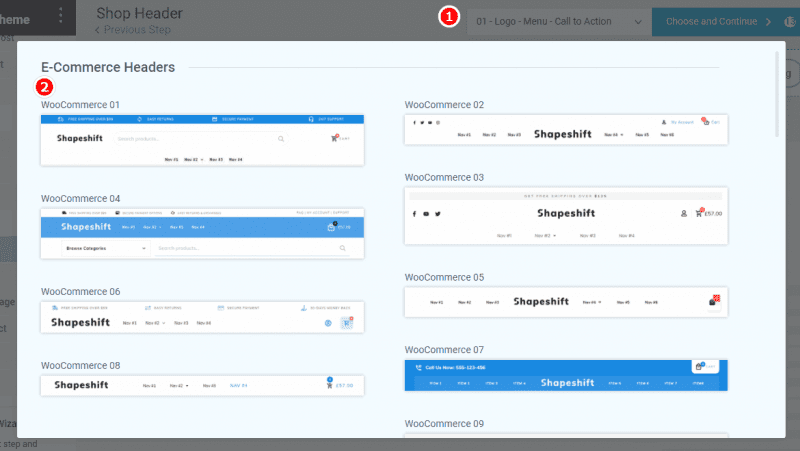
Customize the header, footer, store page, product page template, cart page, and checkout page. Take enough time to set up these pages and let your creativity run wild.
5. Create products and categories in your WooCommerce store
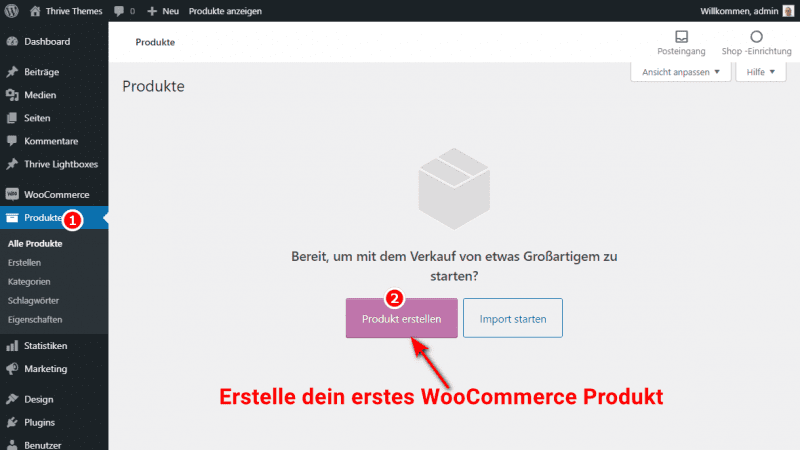
Now you can create your first products and categories. To do so, navigate to Products in the left sidebar of your WordPress dashboard. If this is your first time creating a product in your WooCommerce store, simply select the purple button “Create product” button.
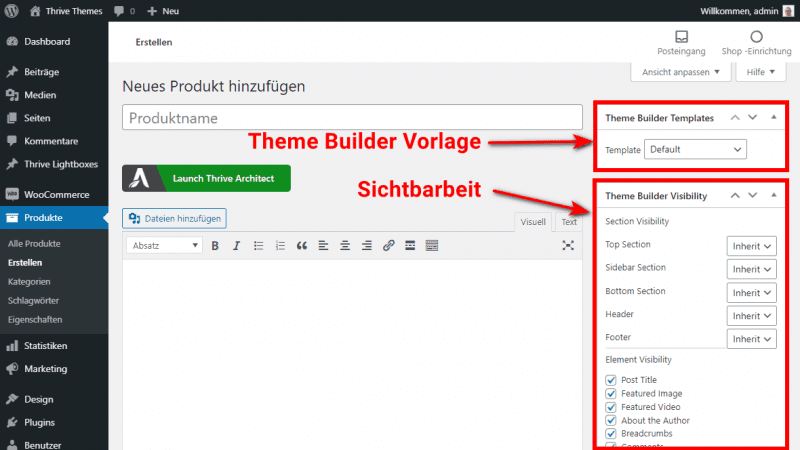
If you’ve already created products before, click the“Add New” button instead. Once you’ve created a product, work your way through the different sections and add all the content that is mandatory to describe the products. Take your time and edit the following content at your leisure:
- the product data
- a short description of a product
- the templates for the Thrive Theme Builder
- the visibility of the Thrive Theme Builder
- the category of the product
- the product tag
- the product image
- the product gallery
6. Choose suitable WooCommerce page templates
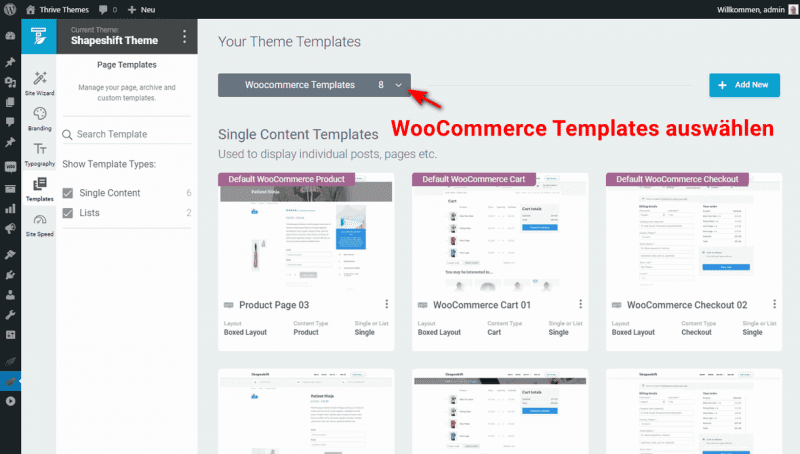
Navigate to your Thrive Theme Builder dashboard and select templates. Here you will find numerous page templates for all popular store pages. Among them are several page templates for your newly created pages.
For me, the special WooCommerce templates were only available after I had selected them at least once before in the Site Wizard. I don’t know if this is a bug or if it’s intentional.
Select appropriate templates for the “Product” “Shop”, “Checkout”, “My Account” and “Shopping Cart” pages from the gray dropdown box at the top of the page.
Thrive Theme Builder provides you with several templates. Your currently selected default templates are easily recognizable by the purple banner. You can change your default template selection if needed by clicking on the icon with 3 dots (located on the thumbnails) and selecting “set as default”.
7. Customize the WooCommerce header and your checkout page
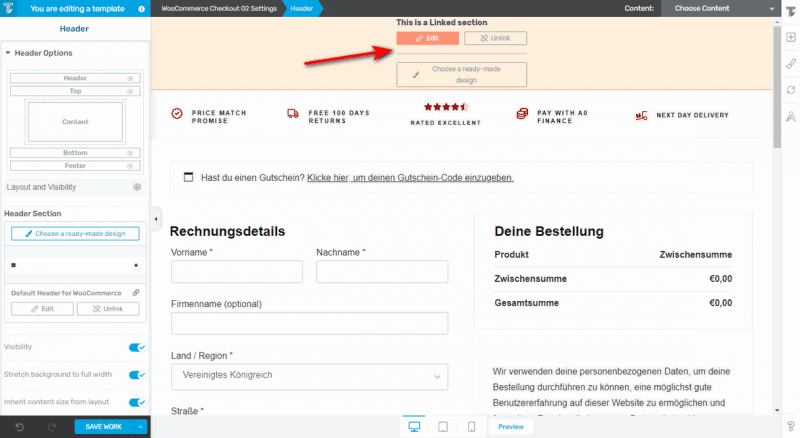
Once you’ve selected a WooCommerce header using the Thrive Theme Builder setup wizard, it will automatically apply to all WooCommerce pages in the future. Of course, you can make customizations that will also apply to all pages by clicking in the header area and then selecting the Edit button.
If instead you want to make customizations that apply exclusively to a selected page, you can simply click on the button Unlink button and then continue with your adjustments. If you want a new header to apply exclusively to a selected page, you can do this by clicking the button Choose a Ready-Made Design button.
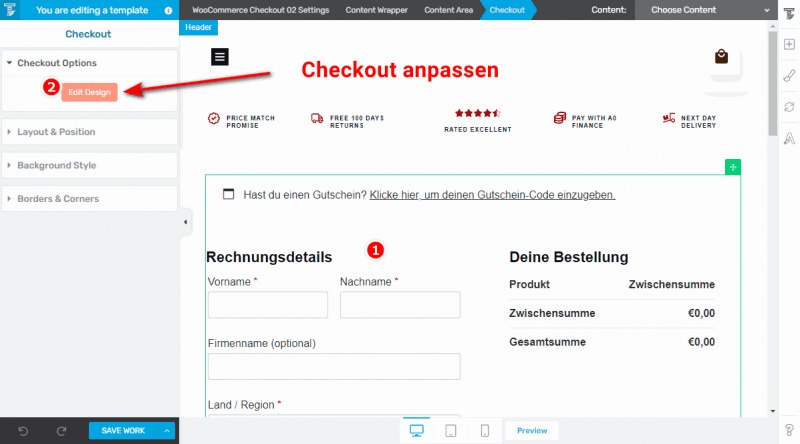
If you want to edit the design of the individual elements on your checkout page, you need to click the mouse in the checkout area so that the checkout icon is highlighted. After that, navigate to the “Checkout Options” and then click on the Edit Design button. All the displayed elements will be automatically grouped by their appearance.
Once you make a change to a selected element, the design of all elements with the same specifications will be changed automatically.
8. Customize the look of the shopping cart page
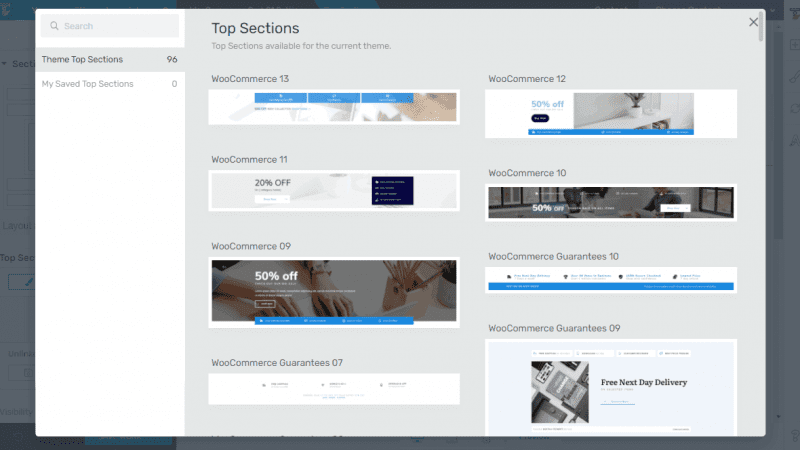
You can replace the topsection of any WooCommerce page and then customize it.
Before you make any changes, make sure that the top section is visibly highlighted. After that, select“Choose a Ready-Made Design” in the options for this section.
In the popup you can then choose one of the ready-made“Top Sections”.
9. Customize your product pages
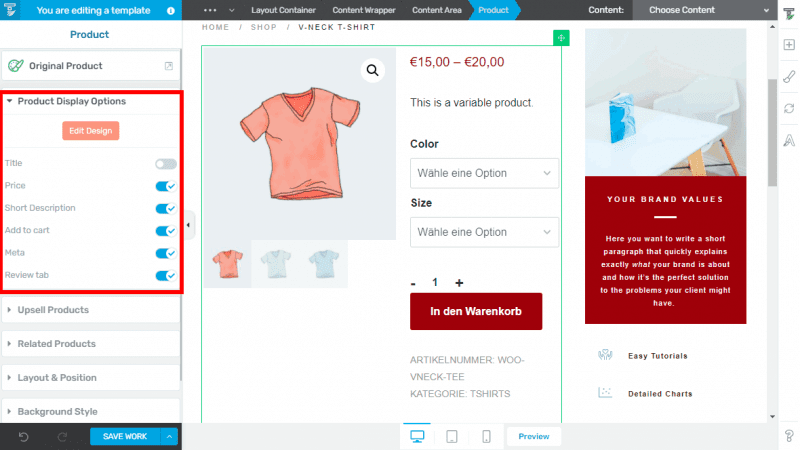
With Thrive Theme Builder, you can customize the template for each product page. You have full control over the particular style. For example, this allows you to use a unique header or show or hide certain product data on the pages. Change all the information on your WooCommerce product pages easily through the product display options.
10. Add more WooCommerce modules
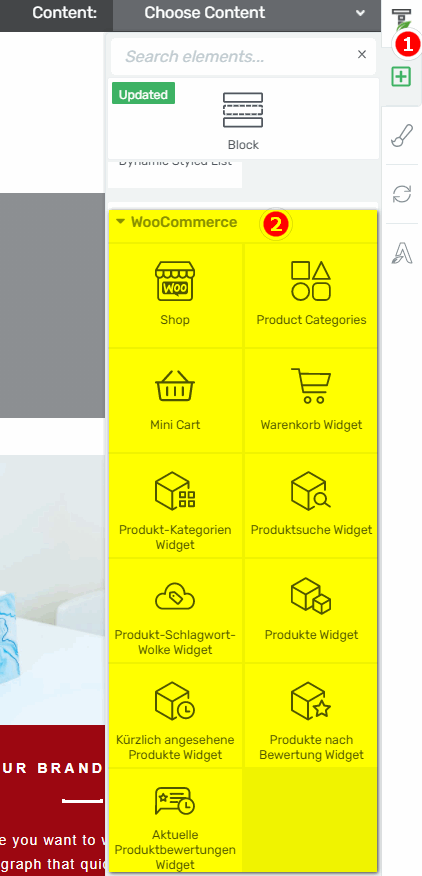
Why not give your customers a helping hand and provide them with helpful WooCommerce widgets? You can use these small and handy helpers on all pages of your WordPress website. WooCommerce modules are especially useful on product pages.
Navigate to the right sidebar in Thrive Theme Builder and click on“Add Element“, which is the green plugs button. There are 11 different WooCommerce elements available to you and they can be easily dragged and dropped into the pages you want. You can use the elements to design Thrive Architect Landing-Pages, Thrive Theme Builder templates, and custom website content.
11. Customize your store page
As before, you can access the store template from the Thrive Dashboard > Thrive Theme Builder > Templates menu. Here you filter by WooCommerce again and select the active store template using the Edit button.
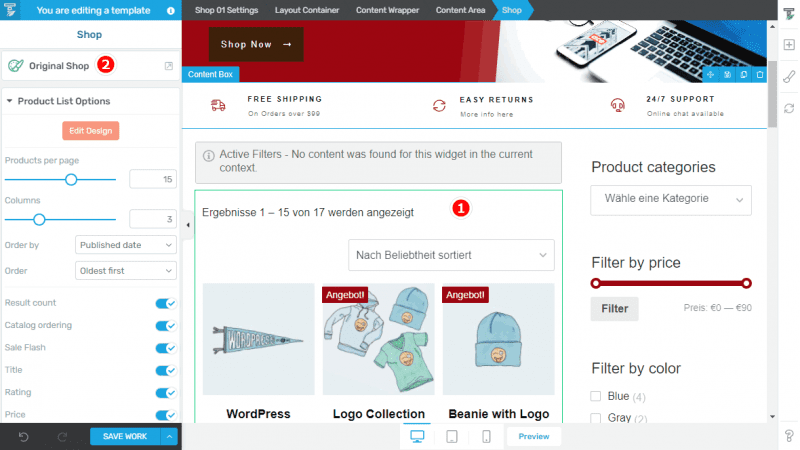
You can customize your store page just like any other WooCommerce page. For example, you can use a new store template or change the color of a product title.
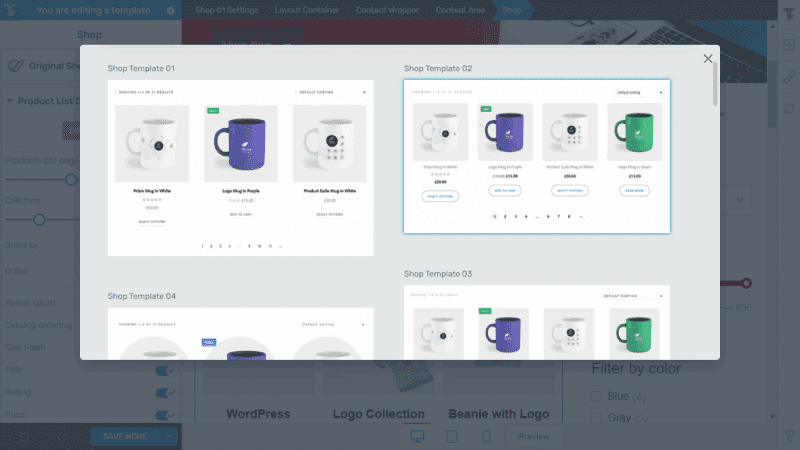
Thanks to the large selection of different store templates, you can customize the look of your page with just a few clicks.
12. Add a sidebar
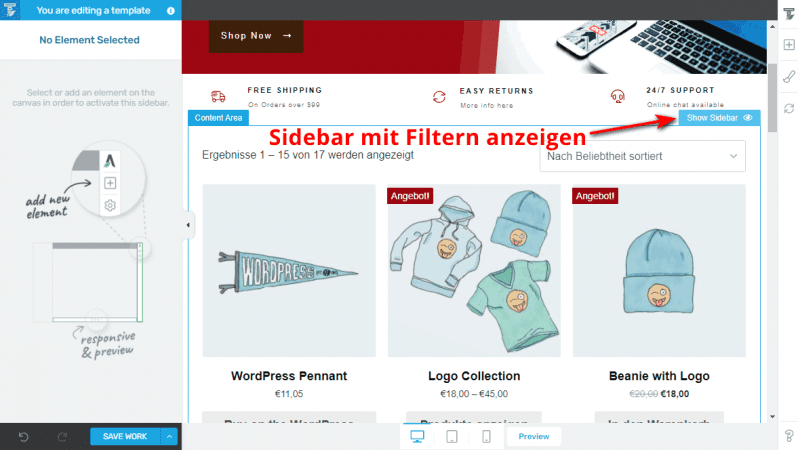
If your preferred store template does not have a sidebar, you can easily change this: Search for the container“Content Area” and click on the button“Show Sidebar” in the right area.
Then you can customize the new sidebar using the WooCommerce widgets.
13. Create and customize product category page templates
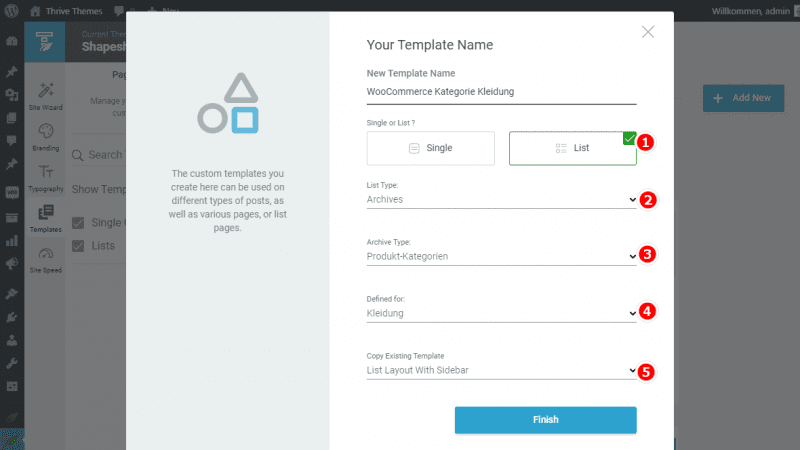
If you use different product categories in your store, you can use Thrive Theme Builder to create a suitable template for each one.
To do this, click on the blue “Add New” button on the right and a new dialog box will appear. Give a name to the template and select as follows:
- List
- Archives
- Product category
- the desired WooCommerce category
- the desired template
Then click on the blue “Finish” button.
You can either create a template for all product categories or an individual template for each product category.
It’s not that easy with any other theme or Page-Builder!
Best WordPress Hosting
Hosting recommendations are usually garbage.
Often extremely cheap hosting packages for $ 3 are recommended, others advertise a $ 100 VPS, because they earn the most as an affiliate thereby. In the end, we all just want the fastest possible web space for as little money as possible.
And optimized for WordPress!
What else is important? The server should be a fast backbone for your website and the support should answer as fast as possible, and preferably in your language.
You can get all this at Cloudways from $ 10,00 / month.
Create a modern and conversion-oriented WooCommerce store
As you can see, with Thrive Theme Builder you can create a professional and visually appealing WooCommerce store without a lot of effort or prior knowledge.
Thrive Theme Builder is specially designed for small business owners and impresses with seamless WooCommerce integration. With the help of my easy-to-follow step-by-step guide, you should be able to create your new WooCommerce store effortlessly and in no time.
Here you can still find the best WooCommerce plugins.
