Set Up the Divi Contact Form Module Correctly (incl. 3 possible alternatives)
The Divi contact form module looks very simple at first glance, but in reality it is quite complex and difficult to implement. On the one hand, the provided contact form should be as simple as possible, but on the other hand, it must not let spam emails through. At the same time, it usually requires some basic technical knowledge to be able to send the emails correctly and not fully cripple your own WordPress hosting in the process.
The Divi contact form is available with the Elegant Themes membership for $89.00 for unlimited websites. The module is integrated directly into the Divi Builder. This is hardwired into the Divi theme and available for other themes via a plugin. One of the best forms for WordPress.
Fortunately, there is the Divi Page-Builder and thank God it not only provides everything to integrate simple contact forms into your website, but also all the other necessary mechanisms. For example, the already mentioned spam protection or the so important checkbox regarding the DSGVO. By law, the latter must not be missing in any contact form, because otherwise this will very quickly lead to a violation of the GDPR and that can be quite expensive.
How this all works and can be implemented, what problems could arise and what is important in a good contact form, all this you will learn here in the article. I’ll show you how to use the Divi contact form module and also introduce you to some useful alternatives at the end, in case you’re looking for something else.
Create contact form with Divi
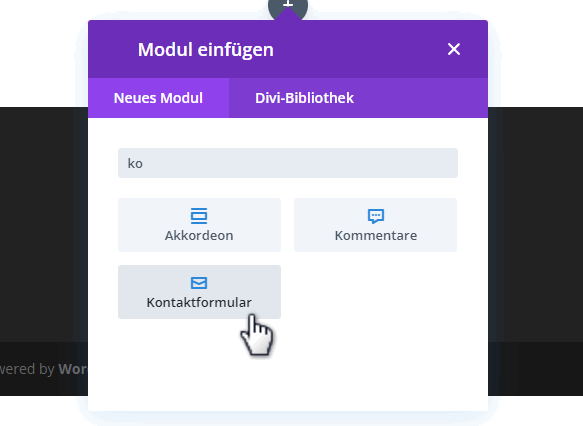
You create the contact form in the Divi theme, just like all other objects. In this case, it’s best to create a new page and not a post, so you can edit it with the Divi Page-Builder. Here you can either choose an existing layout or add a completely new one. It’s up to you to decide, depending on your use case.
Personally, in this case I choose a new layout and add as content the module “Contact Form”, which Divi provides you directly in the Page-Builder. On the left sidebar the further settings open, while on the page itself the actual contact form is already displayed. It actually looks pretty good already, doesn’t it?
So it’s that easy to create a contact form with Divi.
But it wouldn’t be Divi if everything couldn’t still be customized to your own needs in the second step. That’s what the next paragraph is all about. There, it’s all about the actual setup of the form.
Divi contact form setup
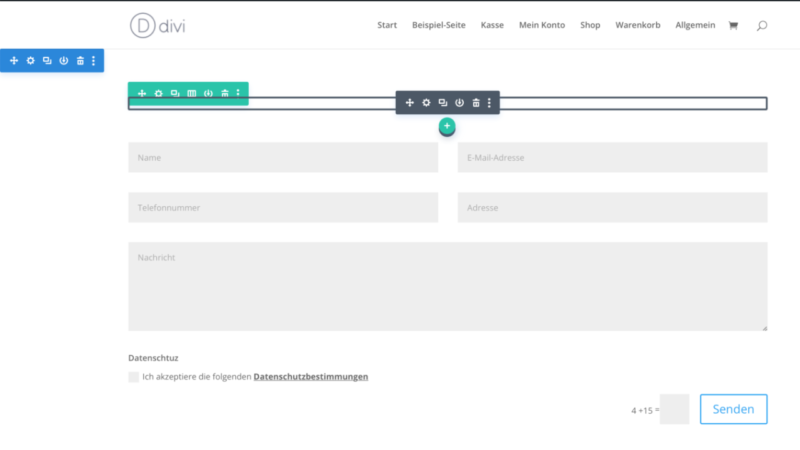
So the contact form is quickly created in Divi, but of course the setup is far from complete. If you want to rename the individual fields, for example, this is easily possible using the gear icon. This is visible in the sidebar and in the field area.
In addition to the pure name and the placeholder, alternative colors and logics can also be stored at this point. A minimum length or allowed symbols can also be selected. As always, Divi is very easy and quick to configure. You can customize each form field again with countless individual options.
In just a few steps, you can have your own contact form up and running with Divi. Just like that and without needing any special prior knowledge. But the Divi contact form can do even more and should be customized to meet your needs. We’ll take care of that now.
Add more fields
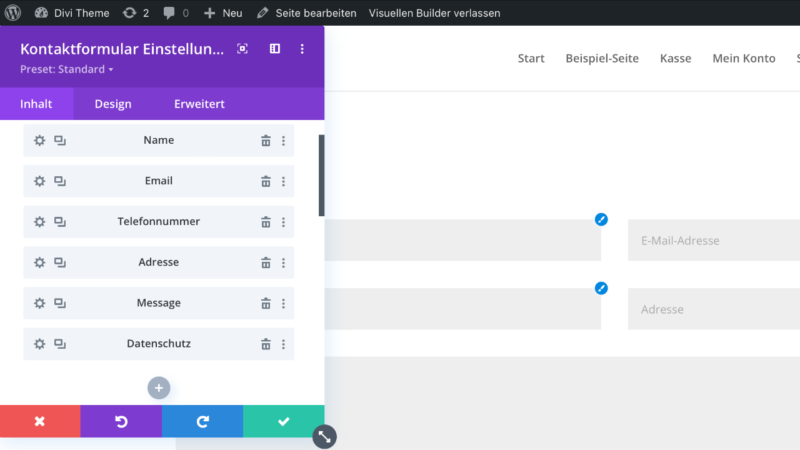
Divi’s contact form can of course provide more than just the standard output with name, email address and message. These fields are just the absolute default and will be displayed when you add the contact form for the first time. However, if you want to display more input fields, this can be easily done using the corresponding menu.
In the settings of the contact form, under “Content” at the top, there is the button “Add new field”. With this button, which by the way has a plus symbol, it is easily possible to add more input fields to the contact form.
In the settings, you can then specify whether the field is mandatory or not. How exactly the form field looks like and whether it should go over the entire width or only represents a small input field, you can also decide freely. All this is possible in a relatively simple way. The best thing to do is to click through the settings. This way you will quickly understand how the contact form display works in Divi.
Configure additional functions
I won’t go into detail here about all the different settings that the Divi Page-Builder provides for the contact form. Most of it is self-explanatory anyway, so an explanation in written form would be downright ridiculous. But there are some parameters that are of great importance and that you might not understand right away.
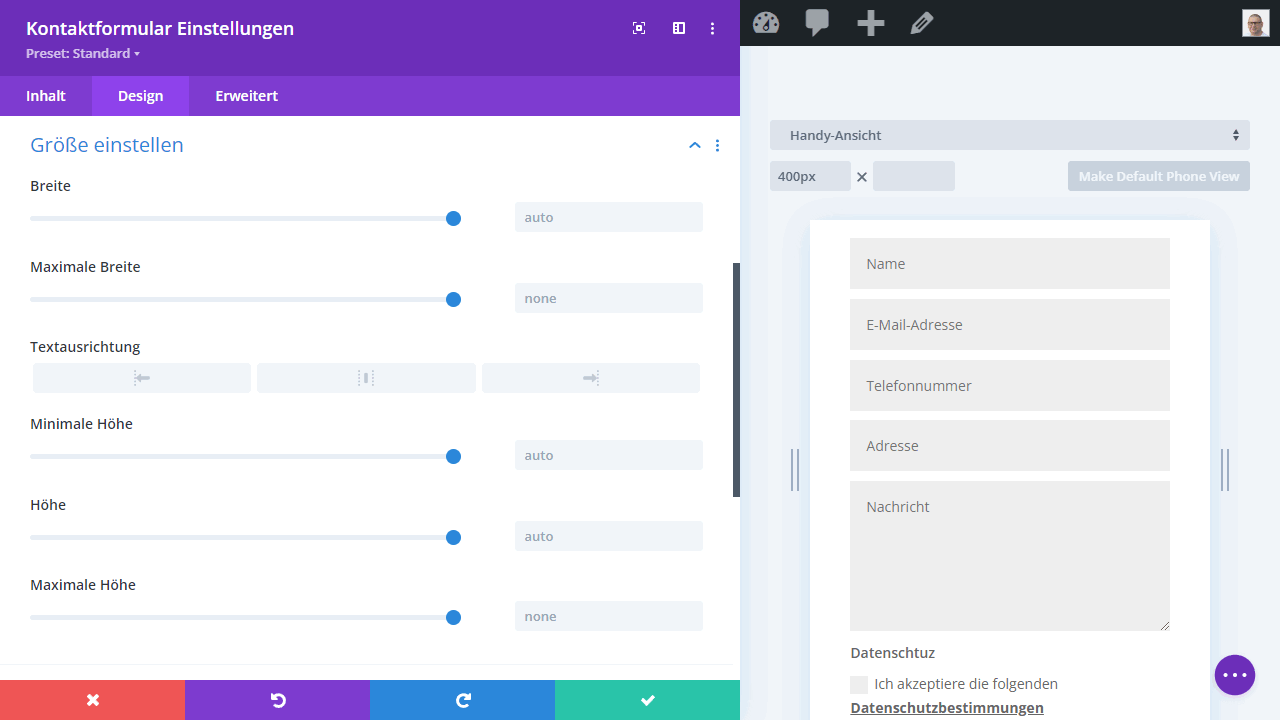
For example, in the email address section, you will inevitably have to store an email. This email address will serve as the recipient for all messages sent via Divi’s contact form. After successful sending, users can also be redirected to another page via “Redirect”. This could be a success message, as well as the home page.
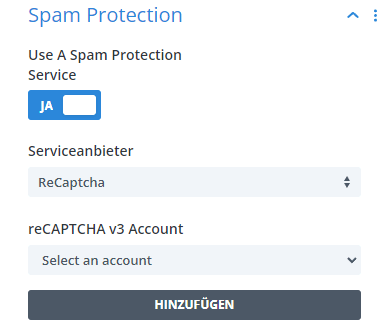
The “Spam Protection” section is all about excluding possible spam from the start. The simple captcha that Divi offers here is often enough, but unfortunately not always. It consists of a simple calculation task, which basically everyone can and must master, so that the e-mail is sent. Because Divi is very well-known as a Page-Builder, you should assume that this protection measure can already be bypassed by some bots.
The alternatives include Google reCAPTCHA, which you can also enable. But then please keep in mind that the reCAPTCHA will be a problem in terms of the GDPR and must be mentioned in any case in the data protection etc.. Whether this may be used according to our strict data protection laws currently remains open for now.
Those were then the important options for the Divi contact form. Everything else primarily concerns the appearance of the contact form and less its function. Much more important is the point just mentioned regarding data protection, which I would now like to go into in more detail.
Contact forms and the GDPR
Now it is now the case that you are no longer allowed to simply collect all kinds of data. Also, data may not be transferred indiscriminately or sent to different services and service providers. The GDPR is very strict in this regard, and data scarcity has already completely replaced the familiar collection frenzy. Quite interesting, though problematic or difficult for someone working with WordPress.
Regulation (EU) 2016/679 of the European Parliament and of the Council of 27 April 2016 on the protection of individuals with regard to the processing of personal data, on the free movement of such data and repealing Directive 95/46/EC.
eur-lex.europa.eu
The reason for this alone is that there now tends to be hardly any European alternatives to many U.S. services that are to be dispensed with. Fortunately, however, many providers have now upgraded and offer DSGVO-compliant servers within the EU with a commissioned data processing contract.
However, the GDPR is a topic in itself and one that is beyond the scope of this article. So let’s rather focus on the GDPR with regard to the Divi contact form. What is allowed and what is not and what is now mandatory for contact forms?
In principle, data should be sent directly to you and not via third-party providers.
The less external parties have access, the safer the procedure is with regard to the DSGVO. Alternative captchas should also only be used with caution. Especially the ReCAPTCHA from Google, which I mentioned above, already quite obviously violates the GDPR and can hardly be explained with “legitimate interest”, as it is often said, because there are alternatives after all. However, the privacy checkbox is much more important.
Add privacy checkbox to Divi contact form
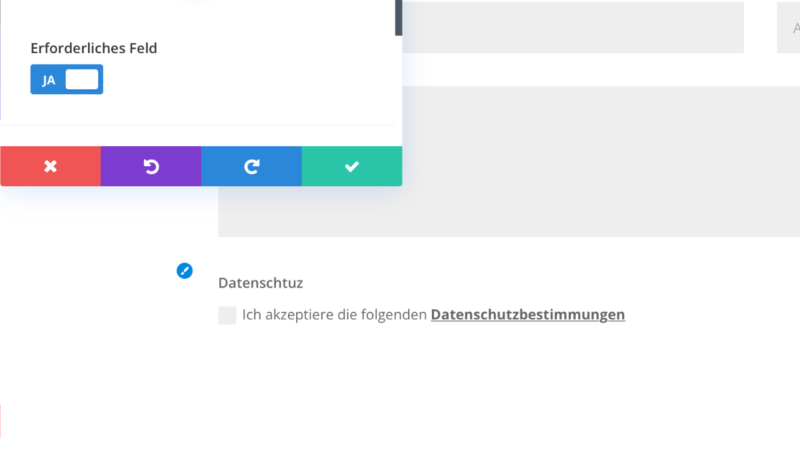
The checkbox is a mandatory field within the contact form, which forces the user to accept the privacy policy of your website. This must be done actively, so the checkbox must not be pre-selected according to the GDPR. The user should and must click to thereby give his consent.
To add such a checkbox to your contact form, select a new field within Divi and under “Field Options” select the “Checkbox” type. Also, the checkbox under “Required field” must be checked. This way the visitor can only submit the contact form if he confirms the checkbox first.
In the field options you also give your field the title “I accept the following “. Make sure that you put the space at the end. Then click the link icon to the right and add a link to your privacy policy with the title “Privacy Policy”. The checkbox will then display the following along with the link.
What to do if it doesn’t work?
Even though Divi Page-Builder makes it particularly easy for you to create your own contact form in general, you’re bound to run into some limitations here and there. This is quite normal, because with the Divi contact form, not everything always works as expected. So what to do if the form does not work as expected?
At this point I would like to go through some of the typical problems with you. Most of the time it’s just a minor issue that can be solved quickly with a subtle hint. So read the following sections carefully if you are looking for a solution to your problem.
- By default, the Divi contact form sends all messages to the email address stored in WordPress. If you don’t want that, you can store your own email address within the settings under “Content” and “Email Address” and even set a personalized scheme for sending. This solves the problem with the email address.
- Sometimes the return address of people who have written to you via the contact form is missing. Basically not really, because it was stored as a Reply-To address and is therefore available as soon as you click on “Reply”, but this is exactly what not all email programs understand. So if you don’t find a sender address or can’t reply correctly, you’ll have to set the scheme just mentioned to also transmit the sender address in text form with the email.
- The last and third problem concerns sending. Do sent messages not reach you correctly? Then try to set an individual address first, as described above. If still nothing arrives, check if your server settings are really correct or ask your hoster if you are too inexperienced to perform this step yourself. Last but not least, your email program may send your own mails to the spam folder or even delete them directly. Check again if this is the case.
These are the most common errors that occur with the Divi contact form. Honestly, I have to tell you that most of the time everything works perfectly fine and there are rarely any major problems. After all, that’s why Divi is so popular. Because it’s incredibly simple and all the technical stuff is basically done by itself and completely in the background.
Alternatives to the Divi contact form
Here are a few alternatives if the Divi contact form is not an option. Be it because it doesn’t work for you for whatever reason or because you are simply looking for a more comprehensive solution. Divi is great as a Page-Builder, but it does not replace more complex plugins for forms.
Divi Form Builder by Divi Engine
Divi Form Builder allows users to create various types of forms, such as contact forms, registration forms, surveys and much more. The plugin offers a wide range of settings and options to customize the form to meet individual needs.
With GPT integration, you create forms that can answer questions from customers.
Fluent Forms
With Fluent Forms you get not only an all-rounder for forms, but basically a little wonder weapon. Fluent Forms can do much more than just create a few simple contact forms. You can create polls, surveys or even a quiz. A great plugin for you, if the simple Divi contact form is not enough for you or you just want something more.
In your pages you can insert the form with a shortcode, or with a Gutenberg block.
WPforms Form
If you want to integrate a so-called multi-step form on your blog, WPforms is the right place for you. The plugin for WordPress creates them in no time. The whole thing looks good, has a progress bar and other conveniences, making WPforms forms much more interactive and exciting for the participant.
WP Mail SMTP Pro
Sending mail is not necessarily trivial. Although it often seems so to you as a WordPress user, because all the complex remains in the background, but technically there is a lot behind it. If you have problems and want to solve them or simply want to do extensive configurations, you should get WP Mail SMTP Pro. So if you have trouble sending mail, the plugin here is probably the solution.
If you need more suggestions, check out my article on the best WordPress form plugins.
Conclusion about the Divi contact form
The Divi contact form makes it easy for you to integrate a contact form into your blog. Of course, there are a few important things you should pay attention to, but in the end Divi is once again much simpler than many comparable solutions.
By the way, all plugins also have special fields where you can insert your own CSS or Javascript code.
So if you use the Divi Page-Builder, you can do without any other WordPress plugins. Even though the contact form in Divi has its limitations, it should still be more than sufficient in most situations and requirements.
For all others, the alternatives just mentioned are worth a look. Especially beginners can’t really go wrong with the Divi contact form. The best thing to do is just try it out yourself and find out if it meets your needs.
More articles about Divi:
- Divi WooCommerce Themes
- Divi WooCommerce Modules
- Div best Divi plugins
- Divi Child Theme
- Divi vs Elementor
- Divi Blog Layouts
- Divi Themes for Photographers
- Divi Tempaltes for lawyers
That’s enough reading material for now.


