Email Marketing and Popups with Thrive Leads
Thrive Leads is a WordPress plugin from Thrive Themes for email marketing, lead generation and popups with exit intent. This Thrive Leads review will show you everything you need to know before you buy.

Thrive Leads: leads matter. Always. Every lead generated is a new opportunity for revenue growth. So lead generation is critical to your business success. It’s not for nothing that marketing experts have focused on permanently increasing the number of leads.
Especially with regard to clever and promising e-mail marketing, everything ultimately revolves around generating leads (contact with a potential customer); newsletter campaigns in particular are very popular.
- Lead Generation
The ultimate toolbox for lead generation. - 200 Ready-made opt-in templates
Choose a professionally designed template. - Exit Intent
The most effective method for attention. - A/B Testing
Optimize your campaign!

With the new list-building plugin Thrive Leads by Thrive Themes, you now have a functional and efficient solution that may put those annoying and pesky popups on the sidelines. This WordPress plugin allows you to make professional and visually attractive newsletter forms. In doing so, layouts can be selected and modified with just a few clicks.
You also get the option to customize your own texts, images, animations and videos respectively. These individualized layouts and the variety of different forms guarantee you higher entry rates in the end. Functionally, the list-building plugin offers extremely interesting and promising features.
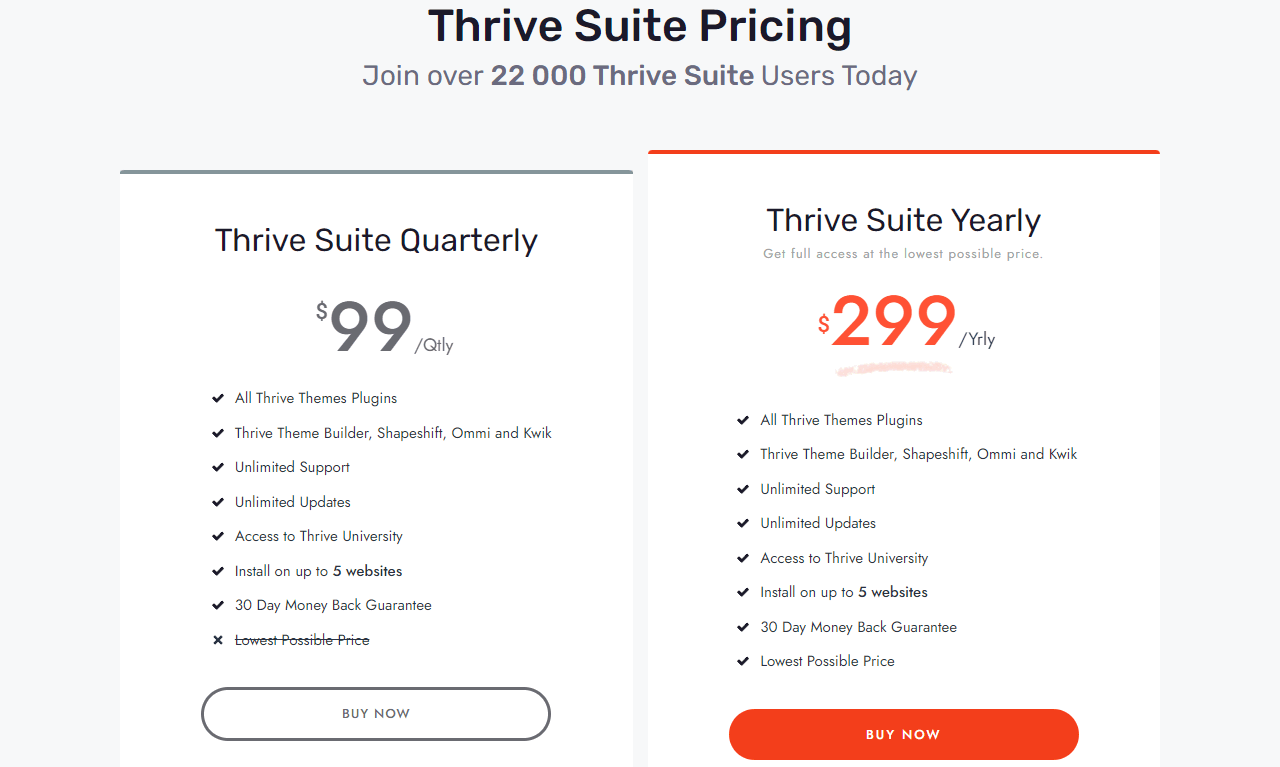
What does Thrive Leads cost?
| Thrive Suite | Thrive Suite Agency | |
|---|---|---|
| Audience | Private and sole proprietor | Agencies and web designers |
| Websites | 5 | 50 |
| Use on client websites | no | yes |
| Price | $ 299.00 / Year | $ 588.00 / Year |
| To Offer | To Offer |
With the Thrive Suite you have access to all plugins and themes, for 5 websites. The membership is worth it especially if you want to use all products and also have more than one WordPress website.
The standalone plugin costs $97.00 annually, but with only one website.
Refund Policy: Within 30 days you can cancel your purchase without any reason.
Thrive Leads Installation
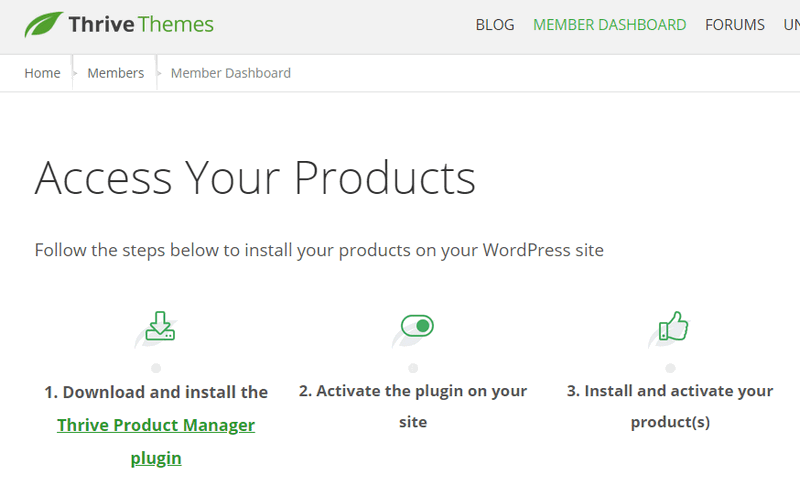
For installation, you can find the Thrive Product Manager in the Member Dashboard of Thrive Themes. You can now upload the plugin .zip file as usual in the plugins menu of WordPress and activate it afterwards. If you have never done this before, you can find our WordPress plugin installation guide.
Afterwards you have the item Product Manager in the WordPress admin menu. The first time you click on it, you need to connect to the ThriveThemes.com dashboard. Enter your login details and now click on Log In.
If you have a Thrive membership, you can install all products right away. If you have only bought single plugins or themes, only these products are unlocked. All other products are grayed out.
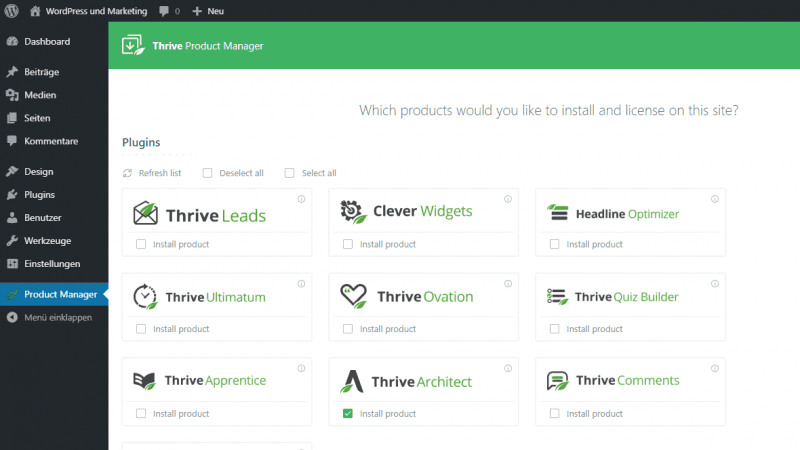
Now select Thrive Leads and click on Install selected products.
Now you can get started.
Thrive Leads guide: 4 steps to the finished popup
When you first get started, the abundance of options may seem a bit overwhelming. That’s why I want to show you in just a few steps how to create your first popup.
I deliberately don’t go into many options here. These four steps are meant to be as simple a Thrive Leads Howto as possible.
You will find all advanced features explained in detail afterwards.
Thrive Leads: In 6 Schritten zum ersten Popup.
Ziel: Auf jeder Seite soll ein Exit-Intent Popup erscheinen.
Create Lead Group (Where?)
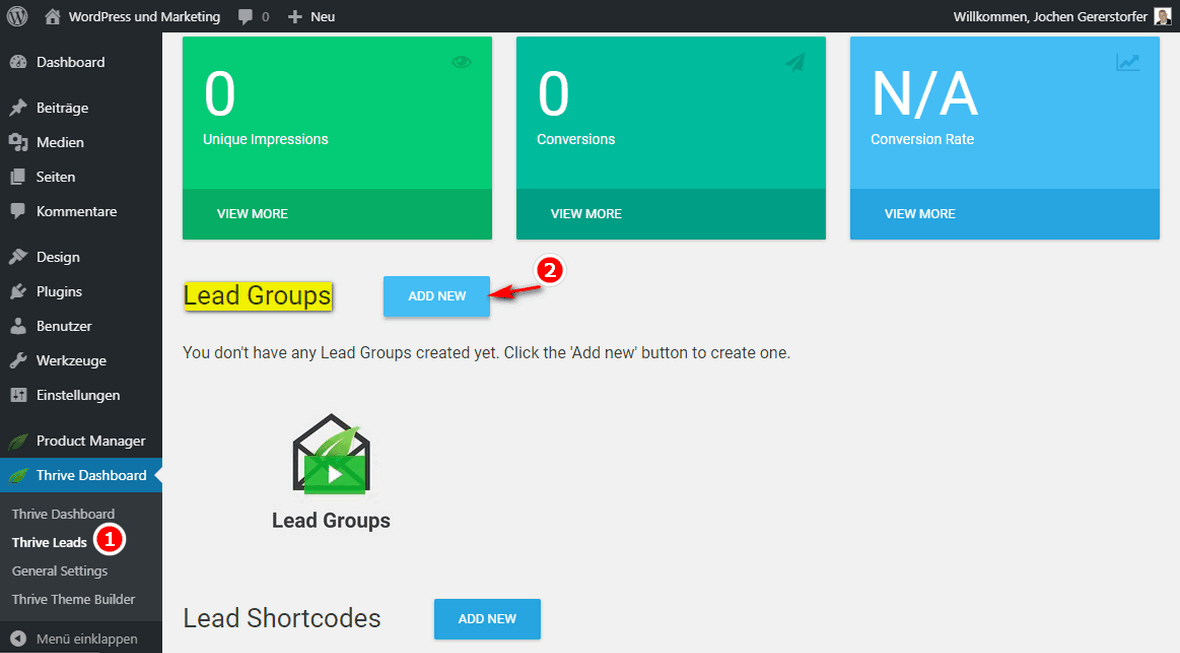
a) First, in the WordPress admin, go to the Thrive Dashboard > Thrive Leads menu and then click ADD NEW next to the Lead Groups text.
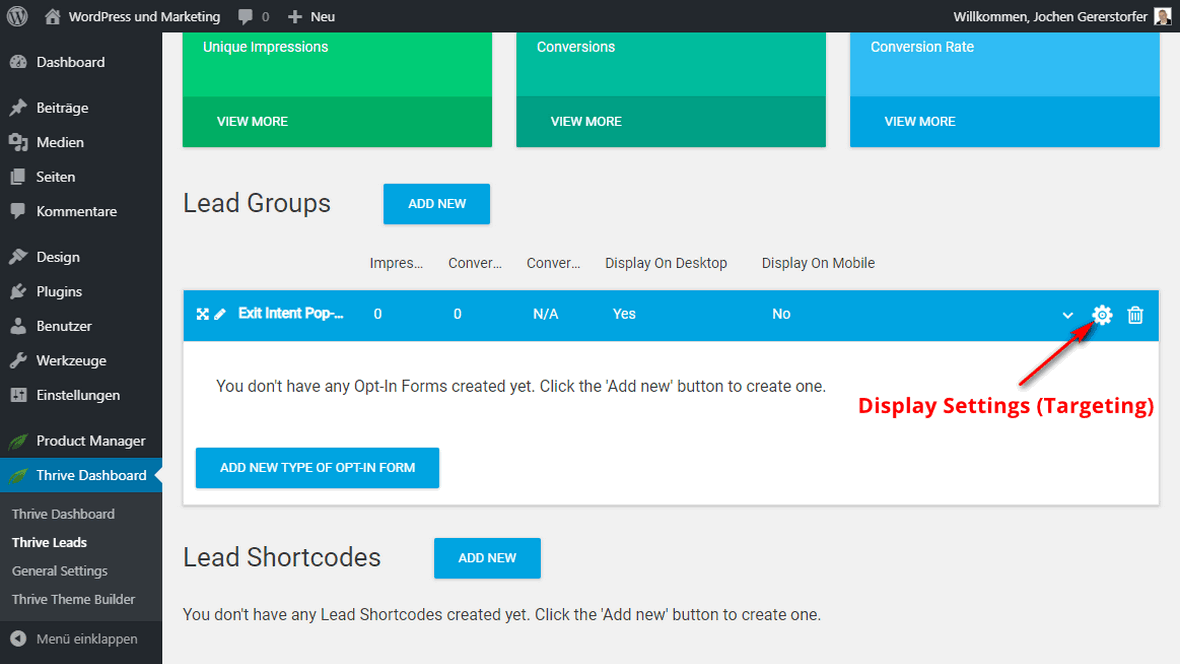
b) A dialog window will open where you can enter a name and click on ADD LEAD GROUP. In the same window, a blue box appears with the previously assigned name.
c) Now click on the gear icon to open the display settings.
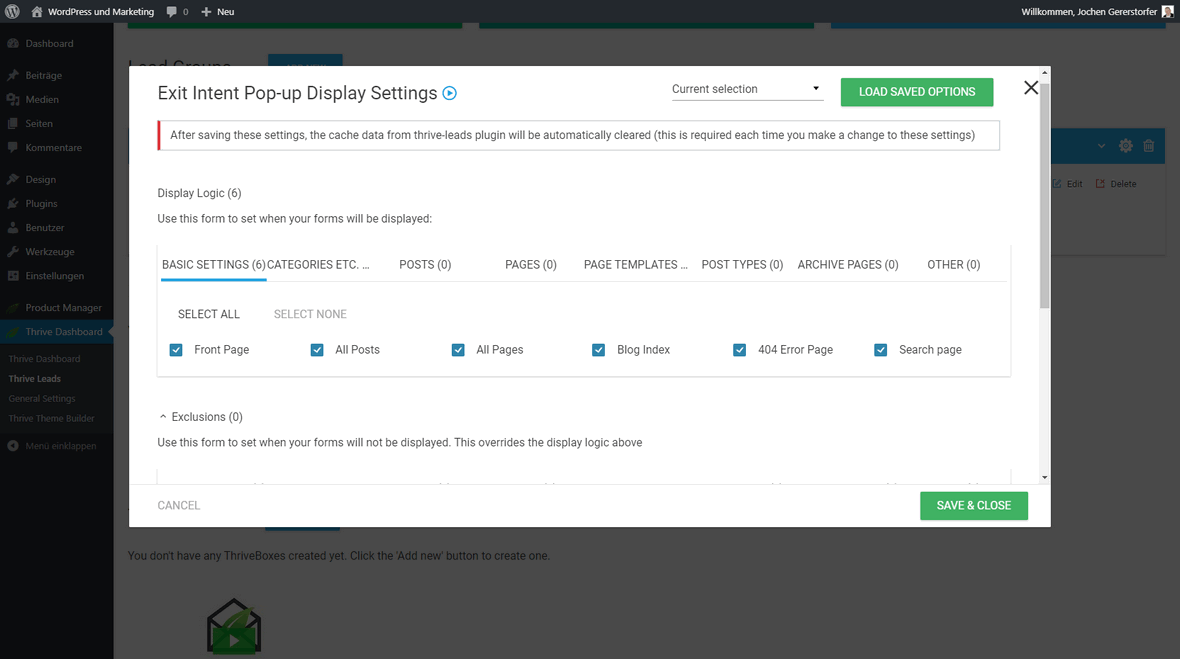
d) In the BASIC SETTINGS tab activate all options and click on SAVE & CLOSE.
Success: Lead group created for display on all pages.
Create Opt-in Form Type (What?)
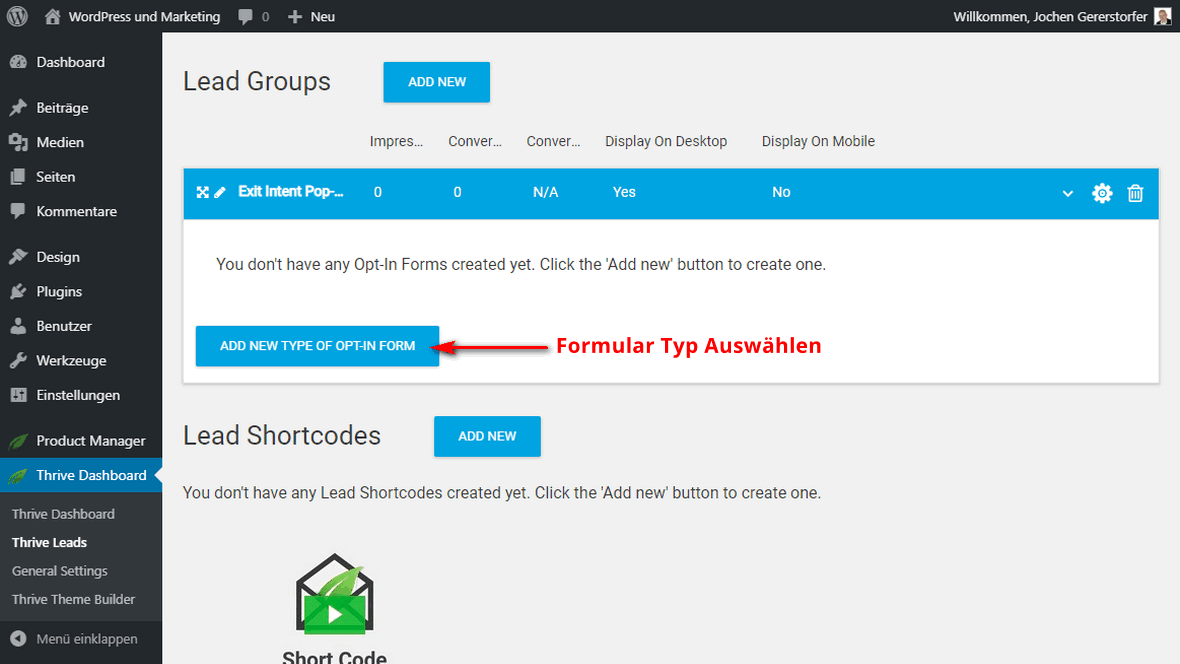
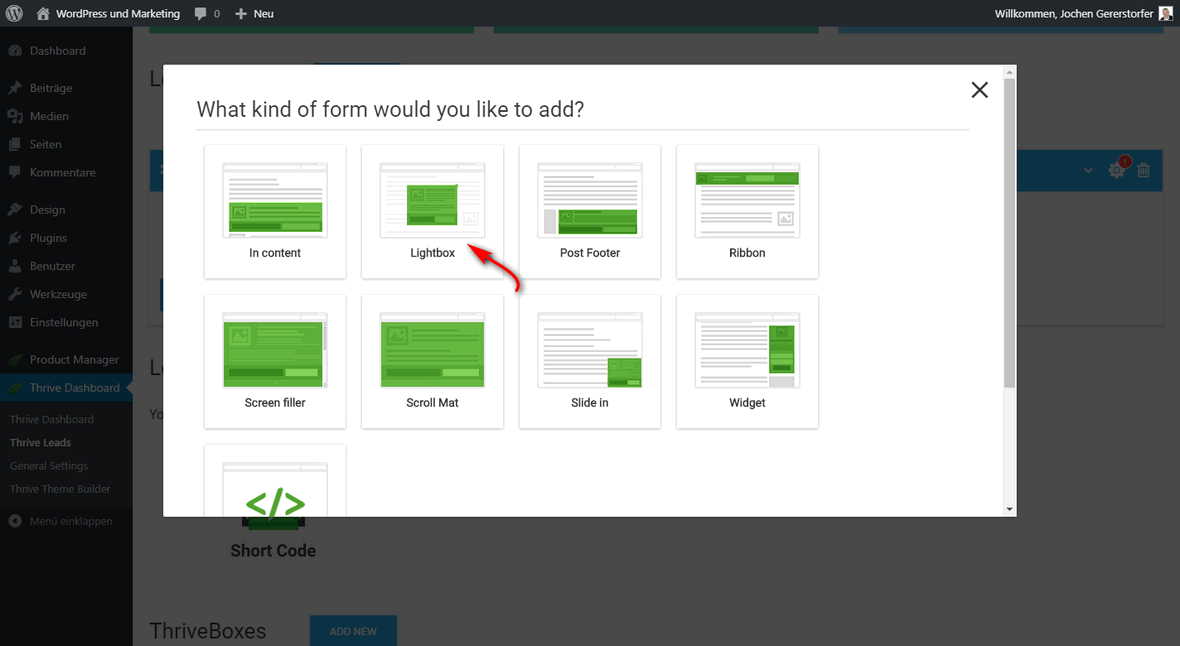
a) In the first step you need to select the opt-in type. To do this, click ADD NEW TYPE OF OPT-IN FORM.
b) Since we want a typical popup, please choose Lightbox.
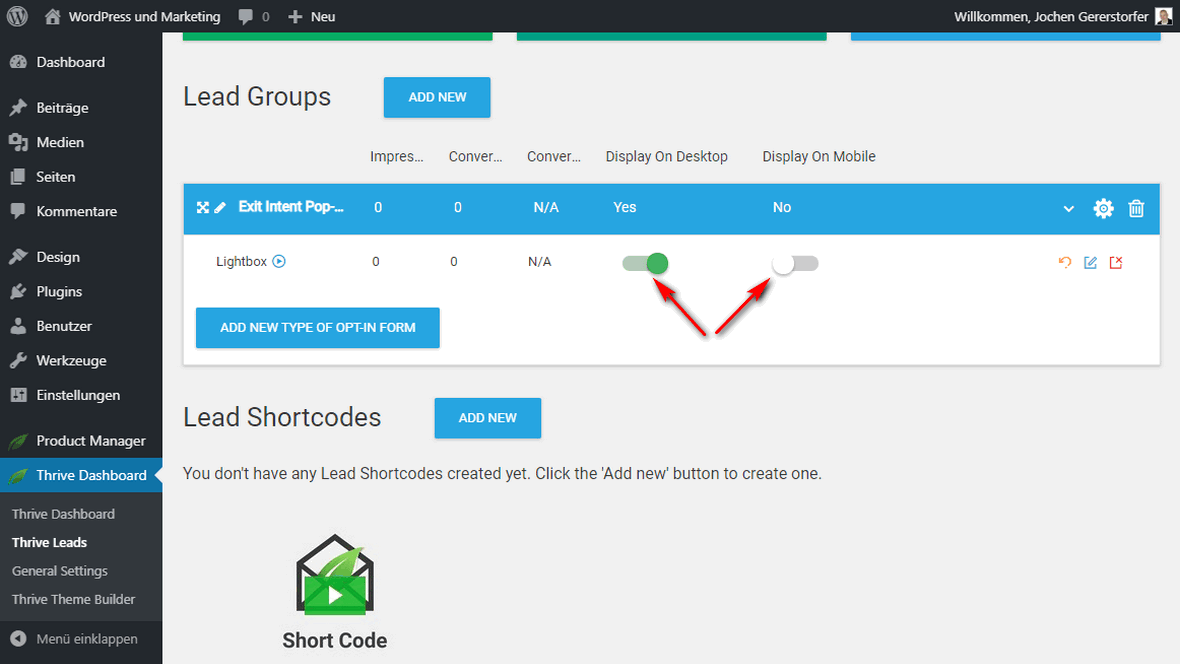
c) A new line with the Lightbox type appears.
In order for the form type to be displayed, you need to enable it for desktop and/or mobile. I have only enabled it in the Display On Desktop column in the screenshot.
Success: Opt-in form type lightbox (popup) created and enabled for desktop.
Create opt-in form (How?)
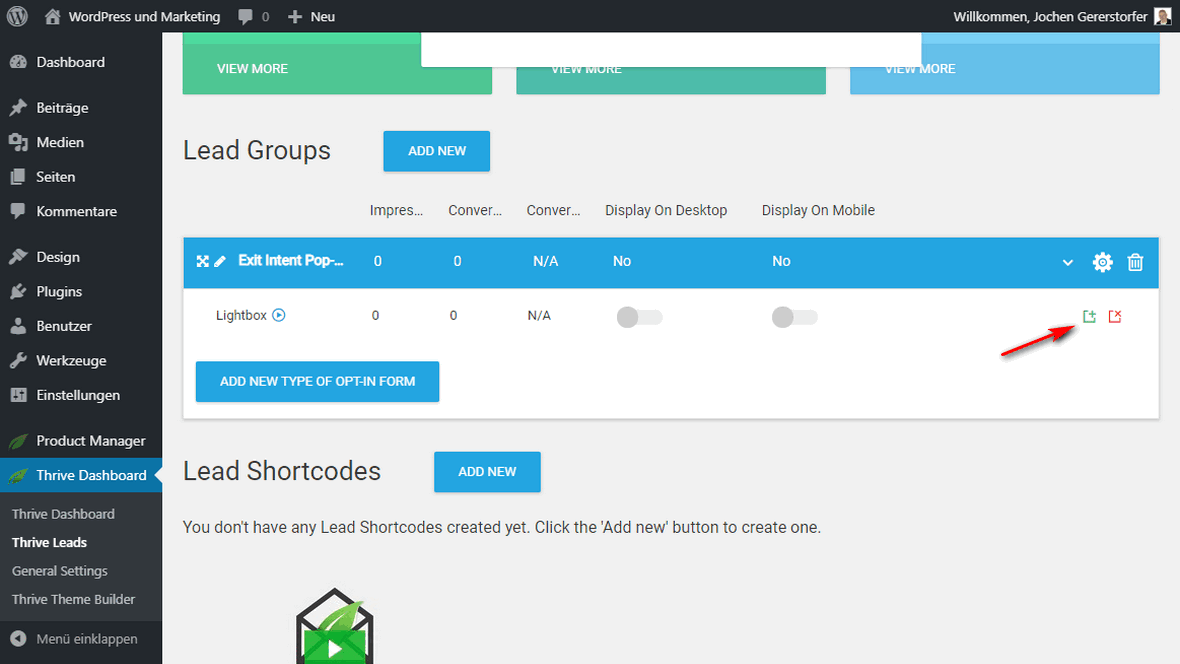
a) Now click on the small green icon (Add).
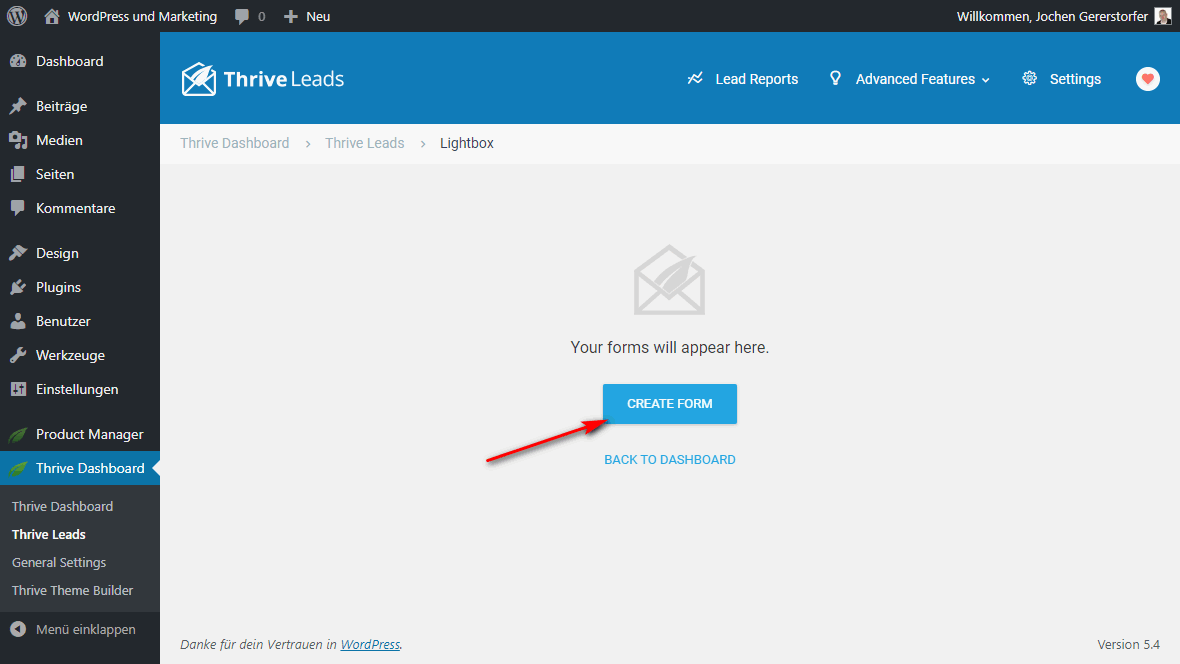
b) In the new window select the CREATE FORM button to create a new form.
c) In the opened dialog you assign a name for your first form and click CREATE FORM.
d) Now we need to change the trigger for the form to Exit-Intent. In the Trigger column click on Displays immediately on page load. In the Trigger Settings dialog, select “Show when the user is about to exit the page (exit intent)”.
Now this form appears when the visitor moves his mouse pointer near the window bar.
Let’s leave display frequency and animation at the default settings.
Success: Form created and trigger changed to exit intent.
Select form design
Finally, we need to select and customize the form itself.
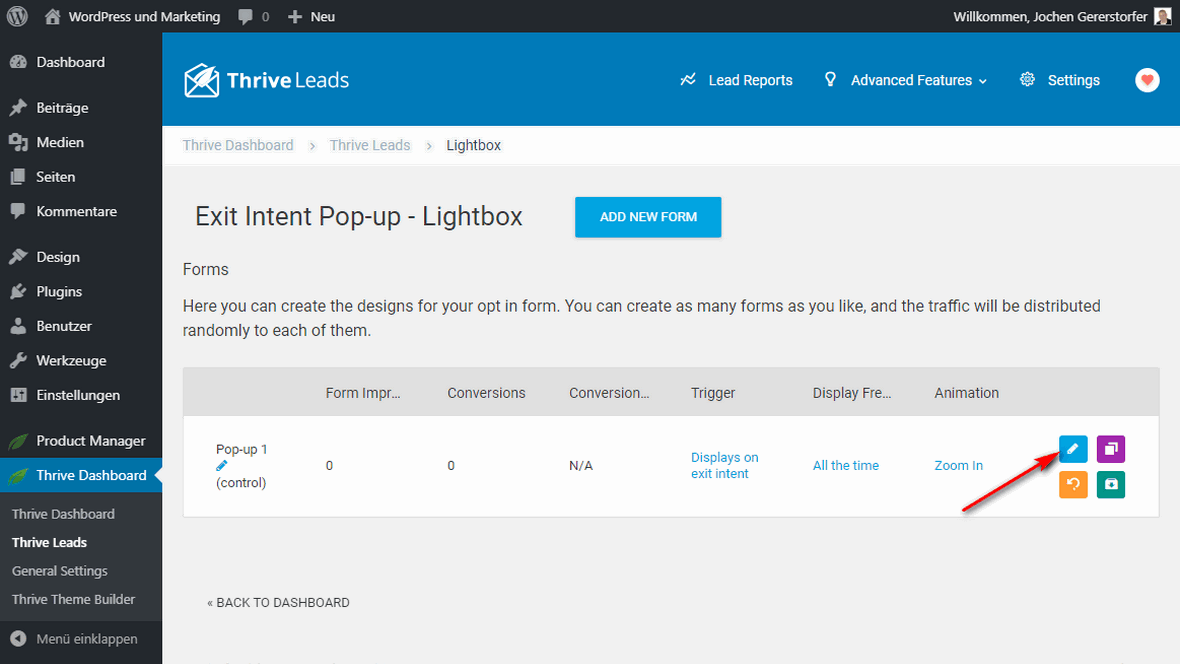
a) Clicking the blue button opens the form editor in a new tab.
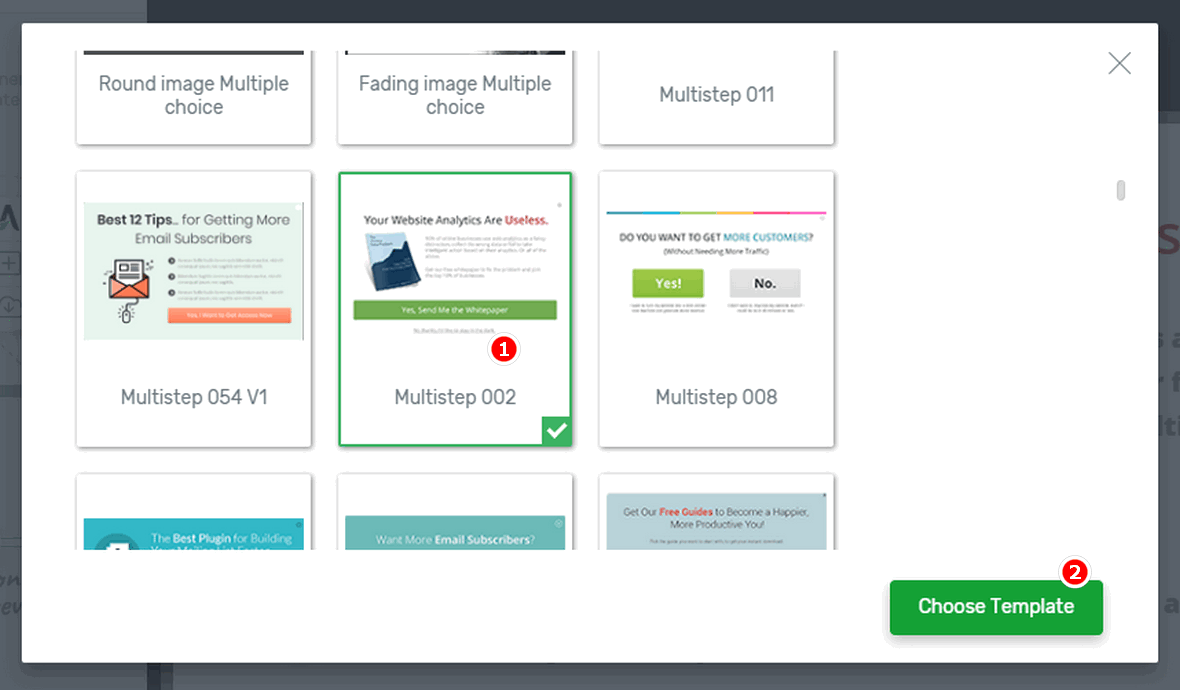
b) Select template: In the new dialog, search the hundreds of templates for a suitable form design. Alternatively, you can select Blank Template to start with a blank sheet. Click on Choose Template.
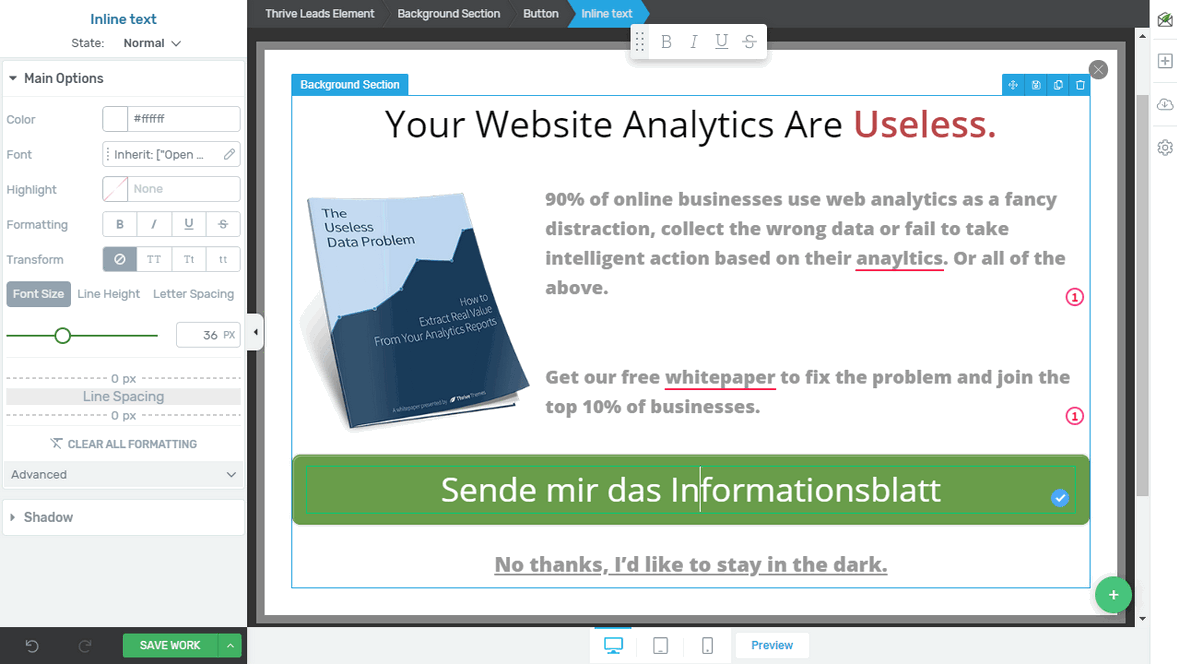
c) In the form editor you now have all possibilities for technical and visual changes.
Customize the form and select SAVE WORK.
Ready – How to do it!
Success: The exit popup appears on all pages.
Thrive Leads Review
To give you an idea of the functional possibilities Thrive Leads offers you, several interesting functions are outlined below. You will quickly realize that it is exactly this variety of functions that makes the plugin an attractive solution.
While until now you always had to buy two or three plugins to get enough combination or choice possibilities, Thrive Leads covers this as an all-in-one product alone.
Good to know: Even in the course of extremely intensive use or even complex projects, there are no noticeable drops in terms of access times and overall performance
The visual editor in particular offers you numerous options for creating individual opt-in forms that are tailored to your needs. Thrive Leads offers you comprehensive possibilities to design less intrusive features than annoying opt-ins. The plugin’s structural and technical design is so flexible that it is compatible with all browsers.
I have already presented the Thrive Architect Content Builder in detail.
Thrive Leads Dashboard
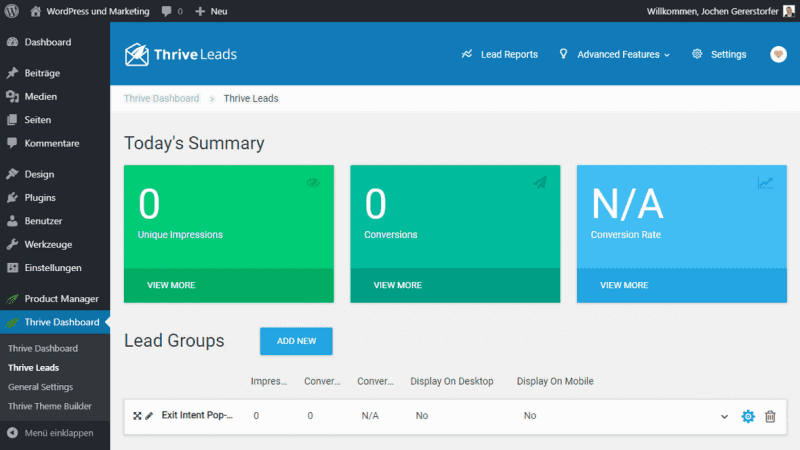
The Admin is your administration center for all forms.
Today’s Summary
Most prominent are the three boxes with the daily data.
Unique Impressions shows you the unique impressions of all form types
Conversions can be clicks on a button or the entry into a newsletter form. Every reached goal is a conversion.
Conversion Rate shows the relation of your conversions to your impressions. This value says a lot about the quality and targeting of your opt-in forms.
Menus
At the top of the blue menu you will find the links to the reports, the advanced features and basic settings.
Further down you will find the four options for creating the different opt-in forms.
I’ll go into that in the very next paragraph.
- Lead Generation
The ultimate toolbox for lead generation. - 200 Ready-made opt-in templates
Choose a professionally created template. - Exit Intent
The most effective method for attention. - A/B Testing
Optimize your campaign!

Engagement options
Thrive Leads brings you all the tools you need for your email marketing. Many of these tools you may not even know about. But that’s exactly what you can do to significantly increase your chances.
First, I’ll show you 4 ways to distribute forms to your visitors or newsletter subscribers.
Lead Groups – Automation with groups
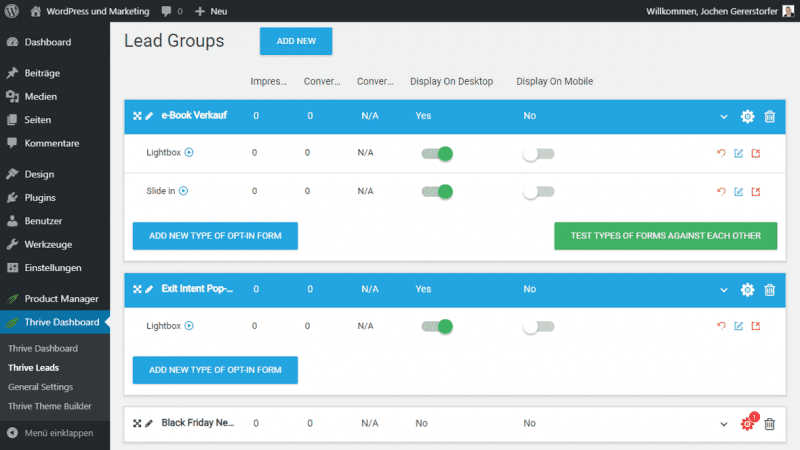
Located at: Thrive Dashboard > Thrive Leads > Lead Groups
Lead Groups provide the familiar option for serving out forms. This is where you’ll spend the most time.
You can set different rules and forms for each group.
Notice Different form types within a group do not compete with each other.
In the screenshot above, the lightbox and the slide-in are displayed together in the lead group “e-book sale”. Alternatively, you can have the two compete against each other. With the green button TEST TYPES OF FORMS AGAINST EACH OTHER you start an A/B test and the different types are played out alternately. This way you can see which type is better accepted by your visitors.
Attention: Different lead groups are in competition with each other.
If the display settings (targeting) overlap, only the top group will be played.
In the screenshot you can see three groups. “e-Book Sale”, “Exit Intent Popup” and “Black Friday Newsletter”. Now, if more than one group is active for the same page, only the top group will be played out. Only one lead group can actually be active per page.
You can change the order of the groups with the mouse.
A/B tests: You cannot create a split test for different groups. Only for types within a group, or for different forms within a type you can create an A/B test.
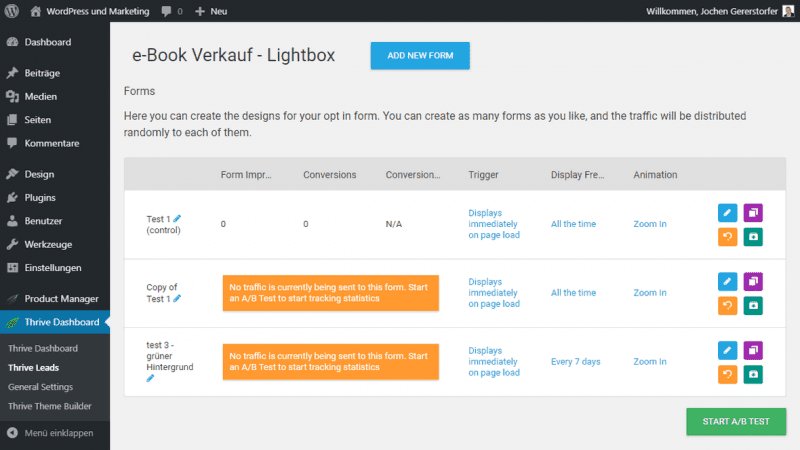
In this example, three forms are created within the Lightbox opt-in type. As you can see, the bottom two forms have a warning that they will not receive traffic unless an A/B test is started.
Attention Different forms within the same type are in competition.
Here you can either archive the first form or start a split test for all three forms.
Lead Shortcodes – Targeting
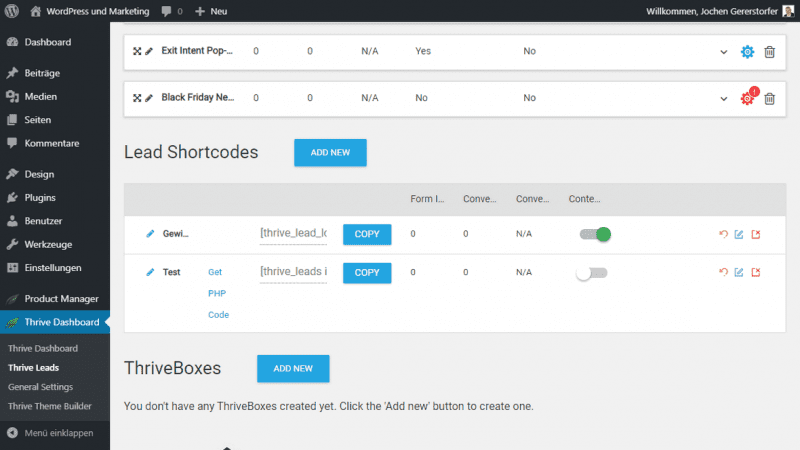
To find: Thrive Dashboard > Thrive Leads > Lead Shortcodes
Shortcodes are predefined strings inside square brackets.
Example: [myshortcode]
Where this code is inserted, this code will be replaced with a specific action. In our case, it is an opt-in form or a contact form, for example.
Otherwise, the procedure is hardly different from the forms in the Lead Groups. Only the targeting is missing, since the delivery location is already specified by the shortcode.
To create a form shortcode, select the blue ADD NEW button with the mouse, next to the Lead Shortcodes heading. In the popup enter a name and press ADD LEAD SHORTCODE.
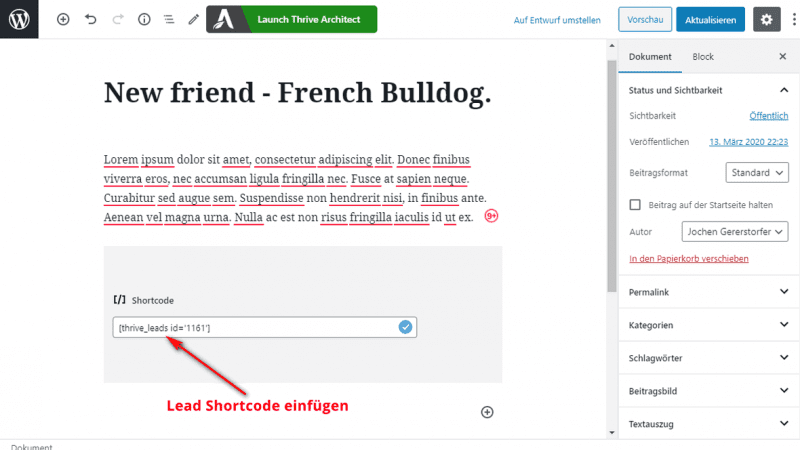
In the WordPress editor, insert the shortcode using the appropriate block at the desired location. This is exactly where the form will be displayed to your visitors. With Thrive Architect, Elementor or Beaver Builder it works similar.
ThriveBoxes – 2 Step Shortcodes
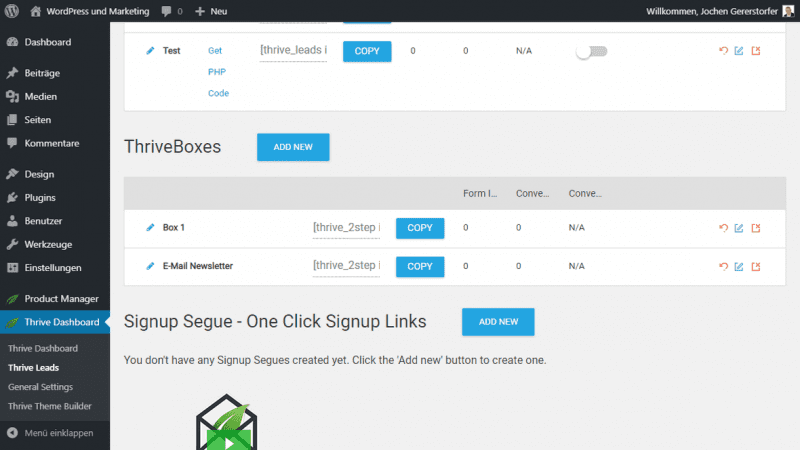
Located at: Thrive Dashboard > Thrive Leads > ThriveBoxes
The 2-Step Opt-in Form feature allows you to have an opt-in form invoked via a link or button. The corresponding windows or boxes will open on click.
Open the blue ADD NEW button next to the ThriveBoxes heading.
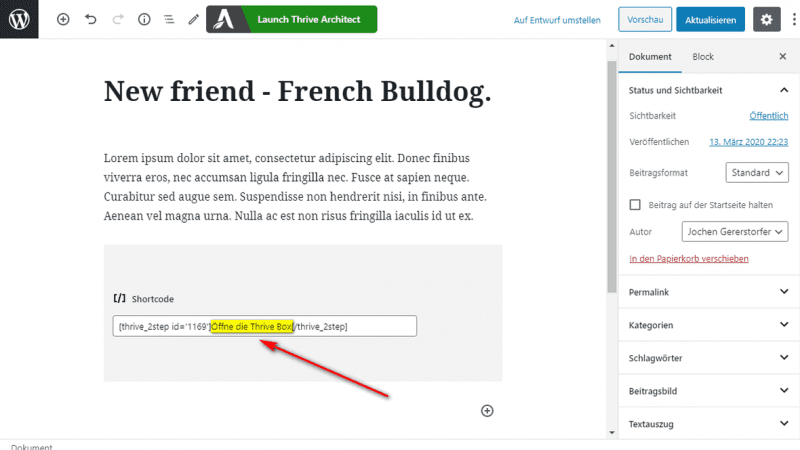
After that you can insert the shortcode on any WordPress page. But this shortcode consists of an opening and a closing part. Between them is the link text.
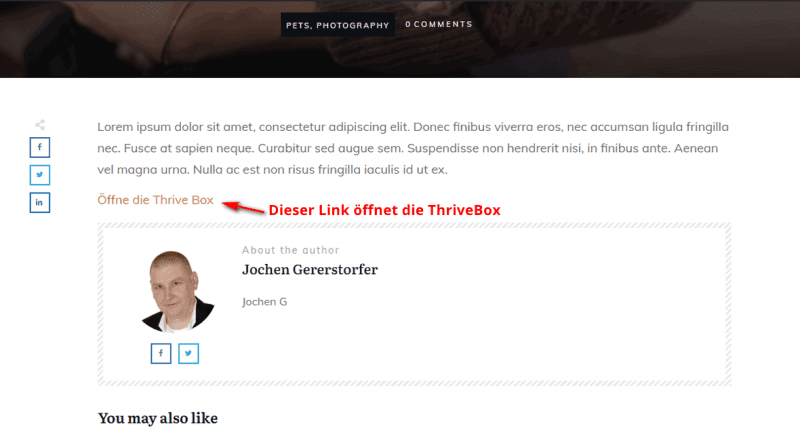
The link will now appear on your website. Calling it will open your created Lightbox, Ribbon, In-Line Form, 2-Step Opt-in Form, Slide-in, Opt-in Widget, Screen Overlay or Scroll Mat.
Signup Segue – One Click Signup Links
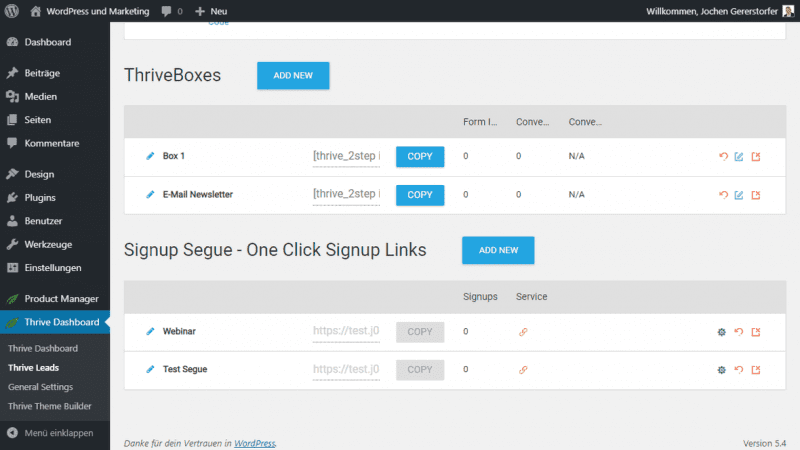
I know the name Signup Segue is unfortunate. “Seque” is pronounced as “Segway” and means transition.
With this technique we don’t want to collect new newsletter members but invite existing ones for an event. After all, we already have the email address. Using the Signup Segue link, we can sign up existing users directly for an event.
The link will pass the email and name to a webinar service. The user only has to click on this link in our email to register for the webinar. The following video contains a very good explanation:
First, go to the ADD NEW button next to the Signup Segue heading. Give it a name and press ADD SIGNUP SEGUE.
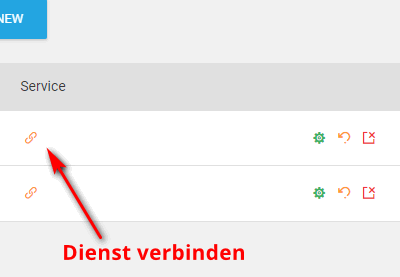
For Signup Segue to work, you must have at least one service connected. In my example this is a webinar service.
You connect this service by clicking on the orange link icon.
In the new Connections Setup window, either select the already connected service or create a new API connection.
For a new connection press the blue ADD NEW button. The API Connections menu will open in a new browser tab.
You can also access it under Thrive Menu > API Connections.
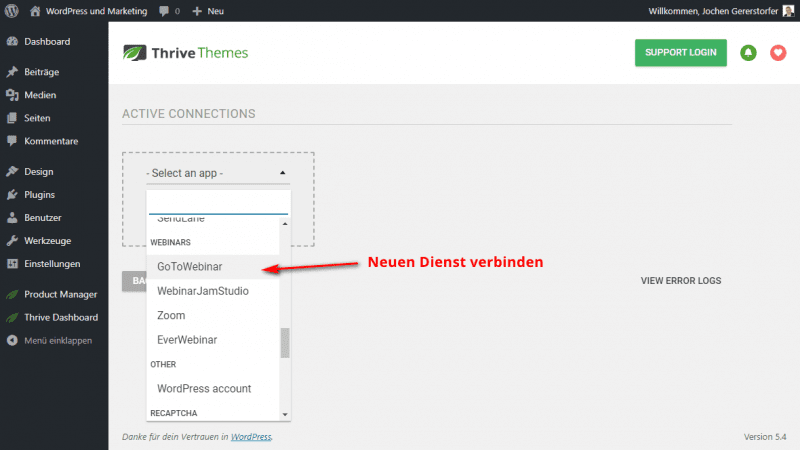
After you have connected a new service provider, select it.
As a last step we need to configure a “Thank you page” forwarding. Select the small green gear.
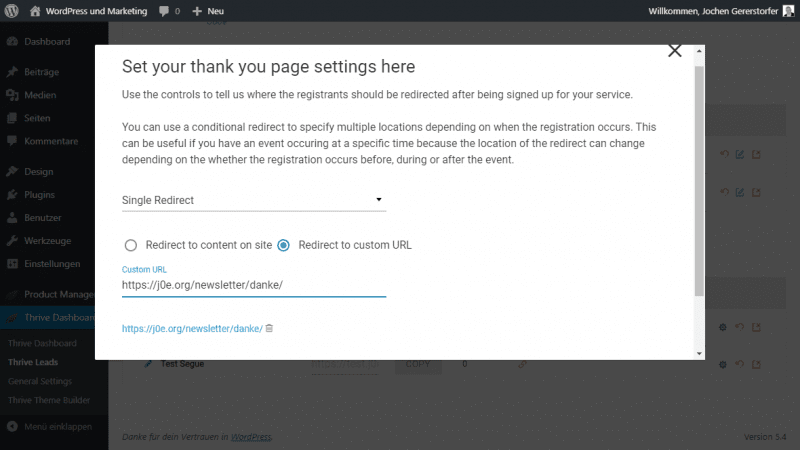
In the new window I selected Single Redirect. Alternatively there is Conditional Redirect, which allows rules for different thank you pages.
Specify your page and go to SAVE & CLOSE.
Then paste the new segue link into your email.
Advanced Features
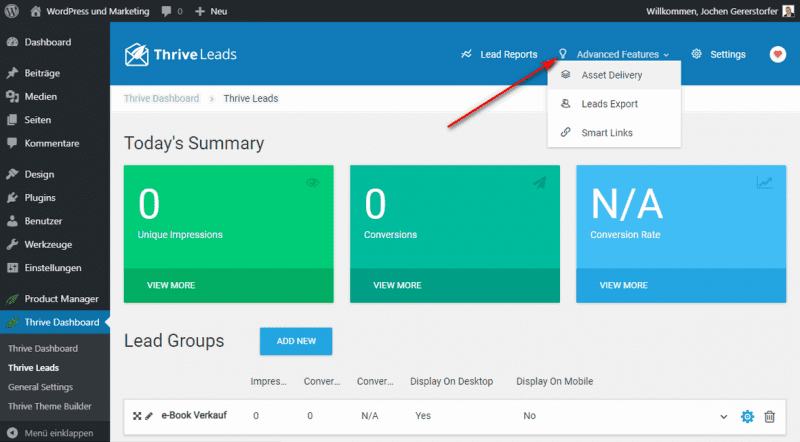
The Advanced Features can be found in the dropdown menu of the same name. These are three tools that you will rarely use.
Asset Delivery
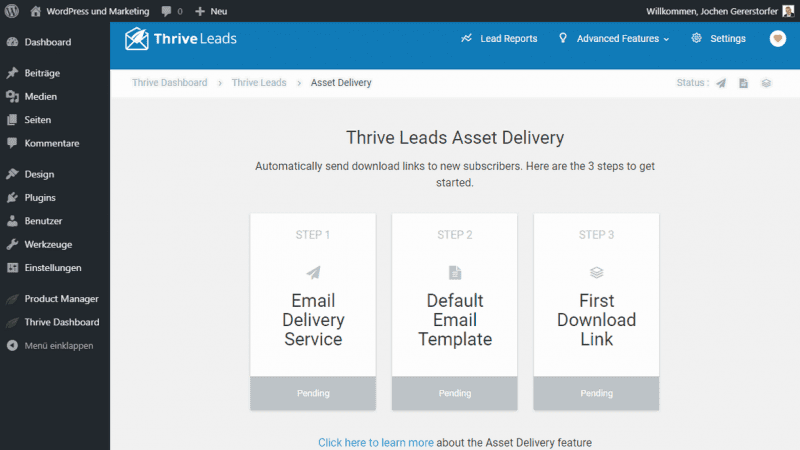
Can be found: Thrive Dashboard > Thrive Leads > Advanced Features > Asset Delivery
The asset delivery feature allows you to upload files (such as PDF documents) to your WordPress site and then have those files delivered automatically when someone signs up via a form. Really cool, right?
The following conditions must be in place for successful asset delivery:
- An opt-in form, created with Thrive Leads.
- An autoresponder, for new leads.
- One or more downloadable files (usually free reports, free e-books, or PDFs).
- An email delivery service, to ensure files are delivered immediately and don’t end up in a spam folder.
You can choose whether or not to send a downloadable file and which downloadable file to send, based on the form.
How it works:
- Connect an email delivery service.
- Create a standard email template.
- Create a download.
- Assign the download to a Thrive Leads opt-in form.
Currently, you can choose from one of 10 email delivery services:
- Amazon SES
- Campaign Monitor
- Mailgun
- Mandrill
- MailRelay
- Postmark
- SendGrid
- Brevo
- SparkPost
- MailerLite
Leads Export
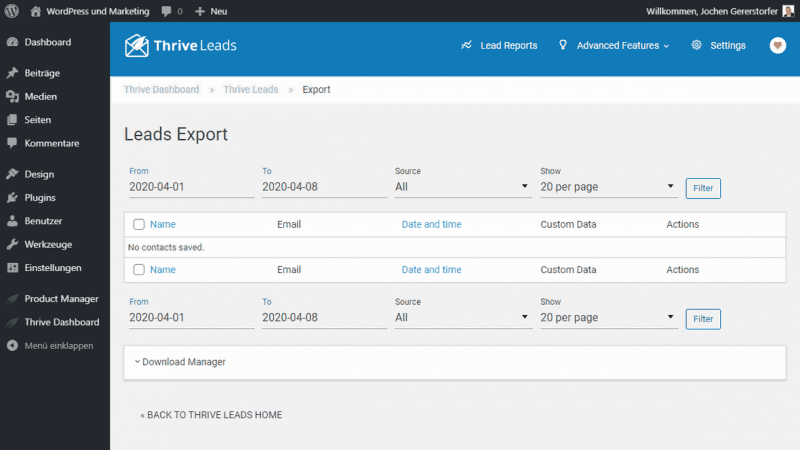
Located at: Thrive Dashboard > Thrive Leads > Advanced Features > Leads Export
Want to switch to a new autoresponder and don’t know how to get your existing subscribers there? That’s exactly the kind of action this tool is for.
Export your subscribers and import them into your new system.
Before exporting you can filter exactly by date and opt-in form, in case you need only a part for a specific campaign.
Smart Links
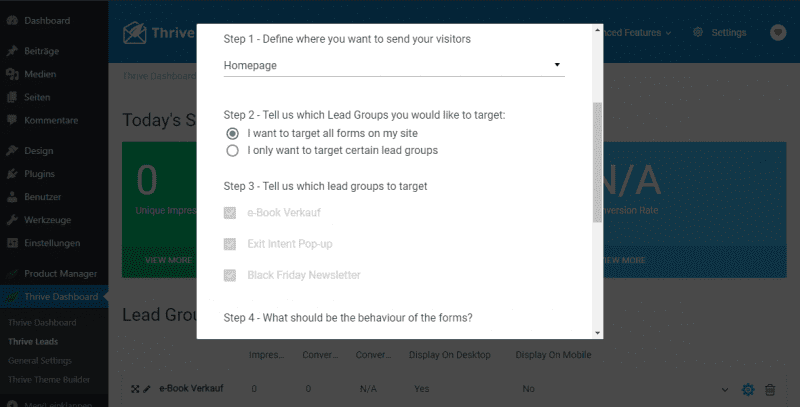
Located at: Thrive Dashboard > Thrive Leads > Advanced Features > Smart Links
With the link builder, you can decide which forms to show based on where your visits are coming from.
Let’s say you’re sending a newsletter to your email list and you want a group to not see certain forms. Then you can use this tool to create a special link. It can even be filtered by Leads Groups.
Settings – Preferences
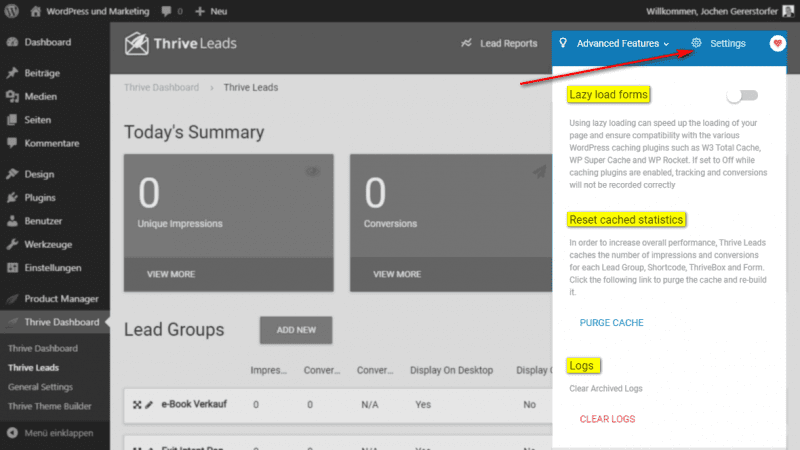
Lazy Load Forms
Using lazy loading can speed up the loading of your website and ensure compatibility with the various WordPress caching plugins like W3 Total Cache, WP Super Cache and WP Rocket.
If this option is set to Off while caching plugins are enabled, tracking and conversions will not be measured correctly.
Reset Cached Statistics
To improve overall performance, Thrive Leads caches the number of impressions and conversions for each lead group, shortcode, ThriveBox, and form. This option allows you to clear and rebuild the cache.
Logs – Clear Logs
This setting does not clear all logs, only archived ones.
Important features
The newsletter marketing plugin offers many other features and functions for successful list-building besides the double opt-in process.
Opt-in form types
With Thrive Leads, you no longer have to rely on just one way to generate leads. You also no longer need multiple WordPress subscription plugins (that may conflict with each other). This is the one-stop solution for list building.
All opt-in form types:

Lightbox popup
A non-blockable overlay (aka popup) that displays over your content and is very attention-grabbing.
“Sticky” Ribbon
Adds a ribbon or sticky bar type form that displays at the top of the screen and stays fixed as the visitor scrolls down the page.


In-Line Form
Automatically add an opt-in form at the bottom of your posts, or insert the form anywhere with a simple shortcode.
2-Step Opt-In Form
Create a 2-step form process by adding buttons or links that open a popup when clicked.


Slide-In
Less intrusive than a popup, but almost as attention-grabbing, this form slides out of the corner into view.
Opt-In Widget
Add an opt-in form to your sidebar or other widget area on the site in just a few steps.


Screen Filler Overlay
The “not to be underestimated” opt-in form and the perfect way to make sure you draw the visitor’s full attention to your offer. Also called Welcome Mat.
Content Lock
A great way to build an opt-in incentive right into your content. Email vs. content!


Scroll Mat
A unique type of full-screen offer that appears from the top of the page and pushes content down.
Multiple Choice
Engage your visitors and increase conversion rates by giving them multiple choices!


Landing-Pages
Build your own Landing-Pages and include an opt-in form. Perfect for CPC Campaigns.
Templates – Choose from hundreds of conversion boosters
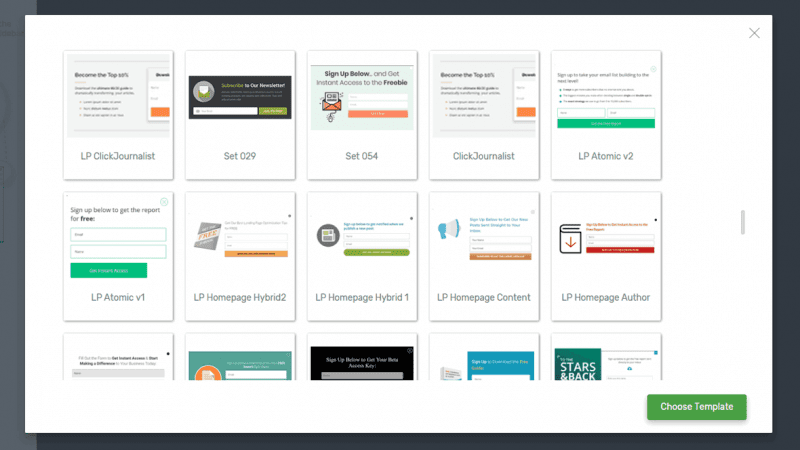
But it’s not exclusively about the content you include in your forms. Since it’s basically the visual impression that counts as well, the WordPress opt-in plugin also has many design options built in.
With these templates you can quickly realize your advertising material. There are also regularly new templates added.
Well over 200 form templates for these form types:
- Lightbox
- Ribbon
- Scroll mat
- In content
- Post footer
- Screen filler
- Slide In
- Widget / Sidebar
This gives you the opportunity to create real eye-catchers, which directly encourage reading or lead to an increased conversion rate on the part of website visitors.
You can also create your own opt-in form templates and save them for later. Or modify existing templates and add them to Saved Templates.
Targeting – Options for specific targeting
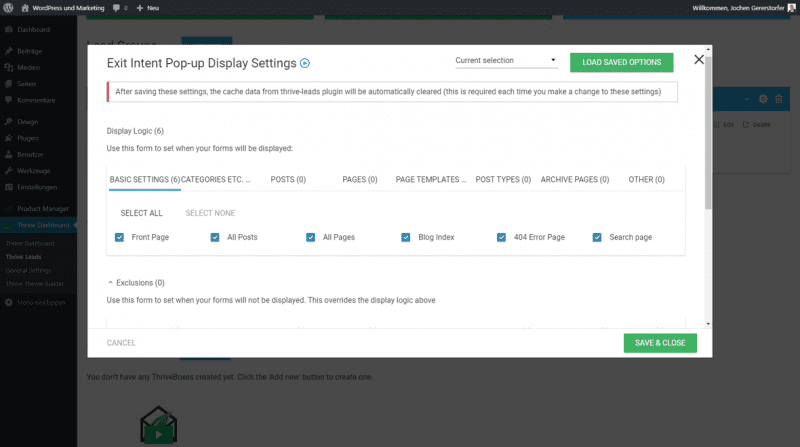
These settings are called targeting or display settings by Thrive Themes.
It’s all about on which pages, posts or archives do I display my form.
Basic Settings is the quickest way to select all pages:
- Front Page
- All Pages
- 404 Error Page
- All Posts
- Blog Index
- Search Page
The other tags allow a much more precise selection. But to list all options would be too much, so I only list the names of the tabs:
- Categories
- Posts
- Pages
- Page Templates
- Post Types
- Archive Pages
- Other (Status: Logged in, Logges out)
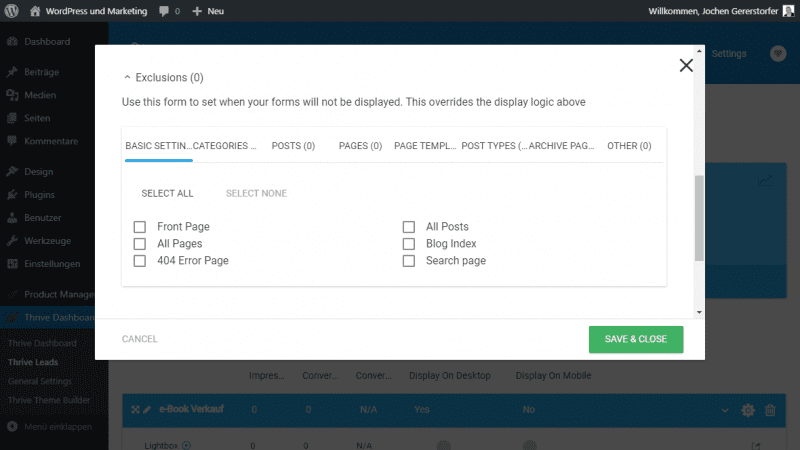
All the above options are available as exclusions.
For example, you can select all pages and in the exclusions you can select only a specific page where the optin forms should not appear. Very powerful and accurate.
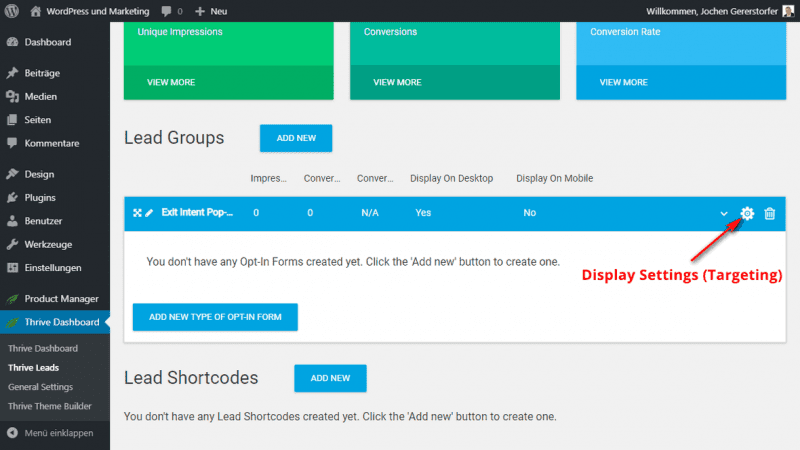
Separate Display Settings are available for each group.
Trigger – Form Triggers
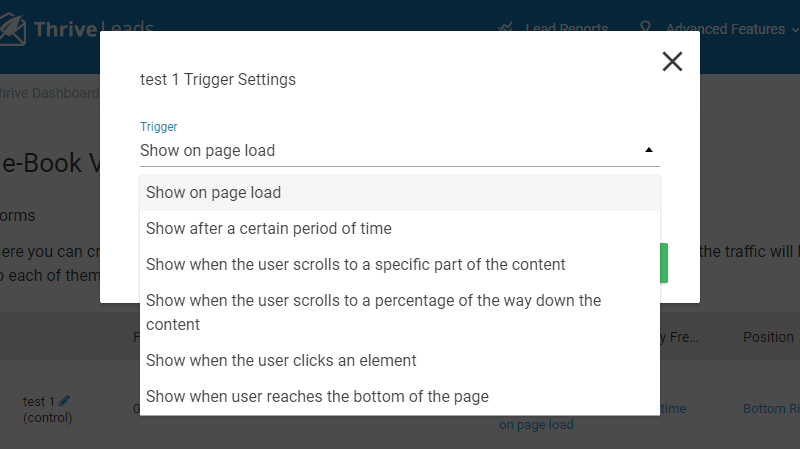
With the Trigger Settings you can define the event that must occur to show the opt-in form.
Depending on the opt-in type, different triggers are available. For some variants, values such as seconds, HTML class or percent must be specified.
The following triggers are available:
- Show on page load (When calling the page)
- Show after a certain period of time (After a certain time)
- Show when the user scrolls to a specific part of the content
- Show when the user scrolls to a percentage of the way down the content
- Show when the user is about to exit the page – exit intent (mouse moves towards menu bar)
- Show when the form enters viewport (When a form moves into the viewport)
- Show when the user clicks an element (On click)
- Displays on click. (Selection)
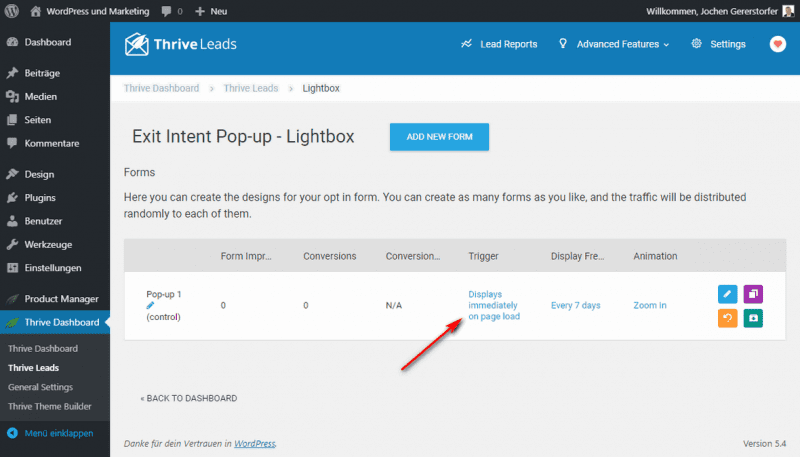
You can find the trigger settings in the Thrive backend directly at the individual forms.
Content Lock
Do you have free e-books or other PDFs?
Then Content-Lock is a very effective way to collect subscribers. Download against subscription :)
Animations
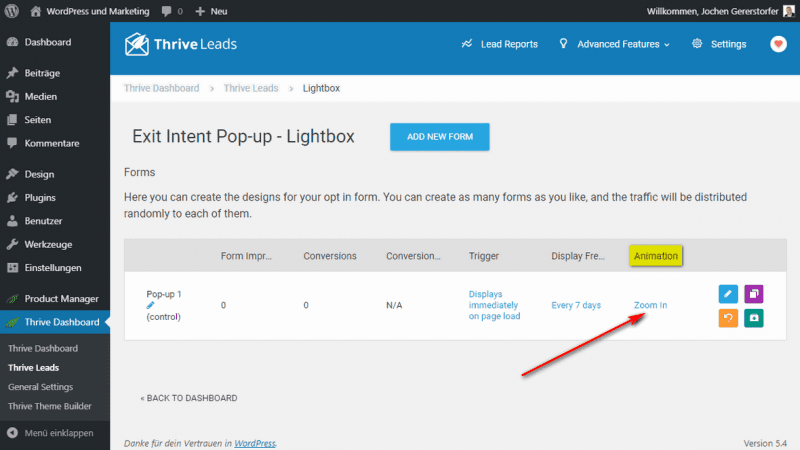
Animations are not available for every form type. In the screenshot the animation“Zoom in” is currently active. Click on it to get to the selection of all available animations for this type.
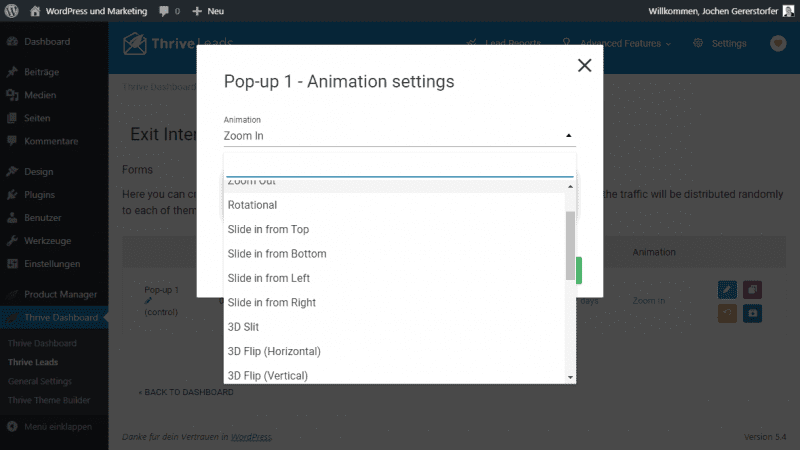
Currently there are 22 different animations.
- 3D Sign
- 3D Rotate Left
- Bounce In Right
- Bounce In Up
- Bounce In Down
- Bounce In Left
- Blur
- Slide in From Right
- Slide in From Left
- Zoom Out
- Zoom In
- Make Way
- Slip from Top
- 3D Horizontal Flip
- 3D Rotate Bottom
- Slide in From Bottom
- Bounce In
- 3D Vertical Flip
- Rotational
- 3D Slit
- Instant
A/B Testing makes optimization potential visible

A/B Testing for Forms
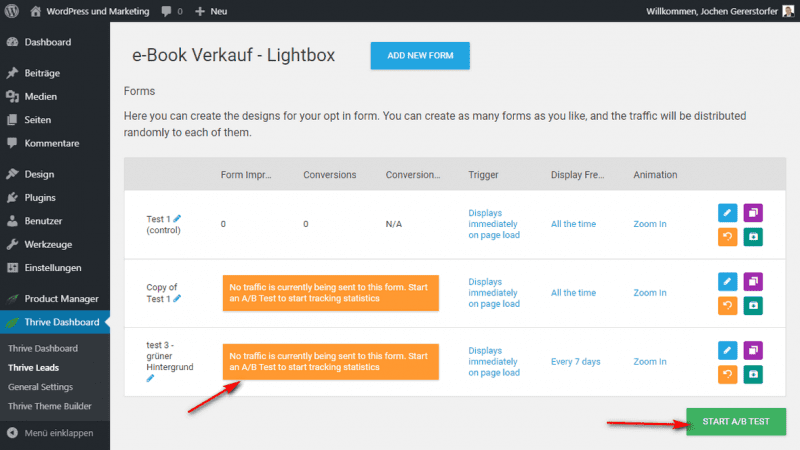
With ThriveLeads you can perform A/B tests for each form
If multiple forms are created within a form type, you will immediately see a warning message that some forms are not being played.
Select the green START A/B TEST button with the mouse, so we can rotate the forms to determine the conversion winner.
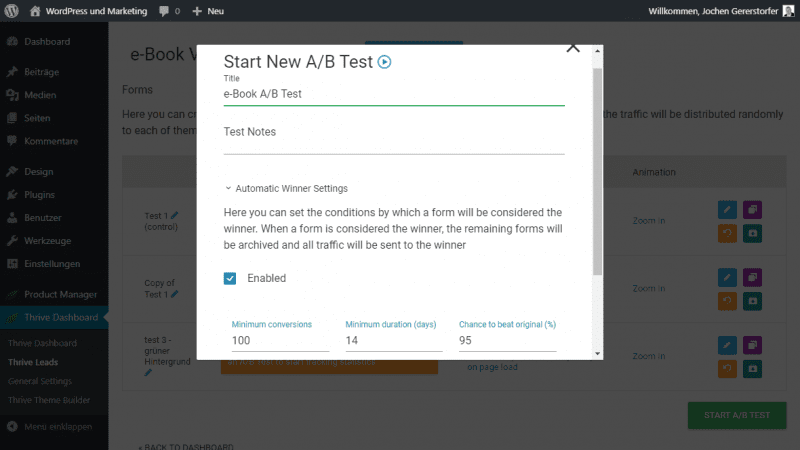
You have to give the new split test at least a name. Very handy is the option to automatically determine a winner.
Automatic winner: For this you have to specify the minimum number of conversions, number of days and the percentage needed to defeat the original (CTBO).
If the goal was reached, the winner will get all the traffic.
Finally, click on START TEST.
The next two images show the statistics for the test.
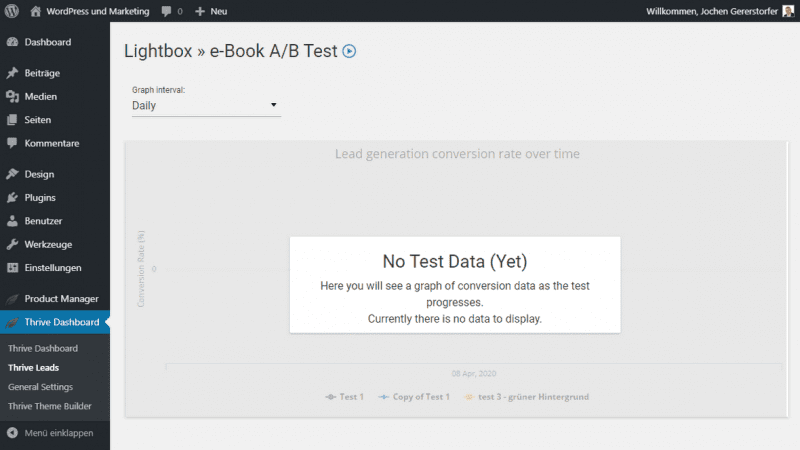
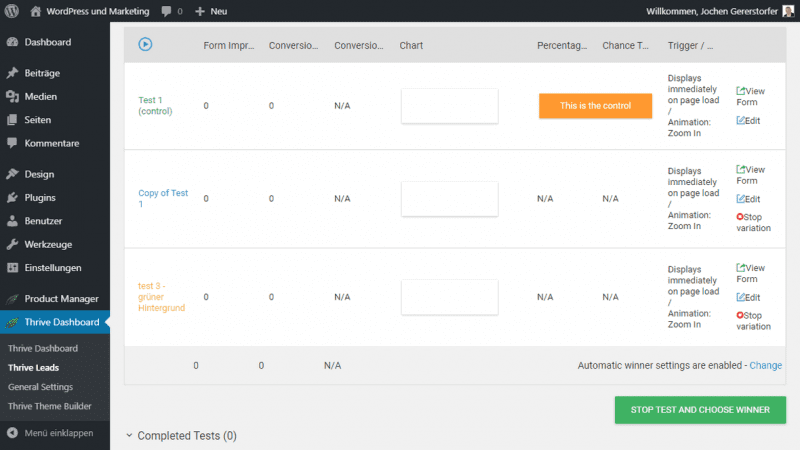
You can also stop running A/B tests at any time or manually choose a winner.
A/B testing for form types
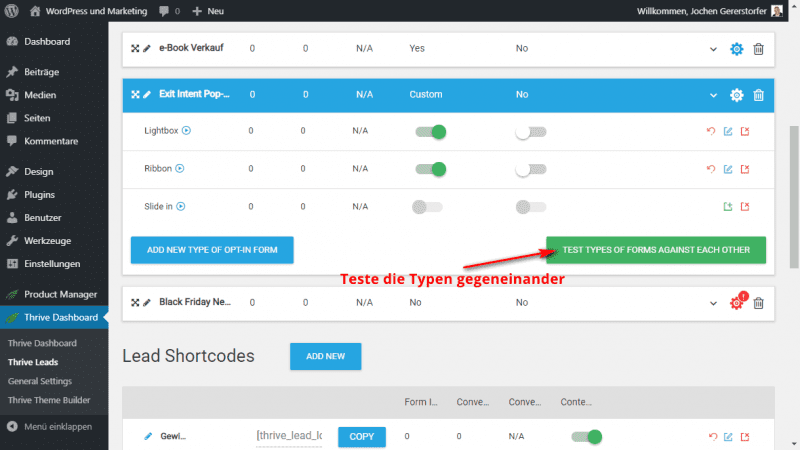
Thrive Lead offers you the possibility to set up a comparison test of several form types within a few minutes. This is the end of your work for now. The test runs automatically, without any intervention from you. Thrive Leads checks every single version, collects and determines the decisive statistical figures and shows you the best variant.
API Connections – Integration
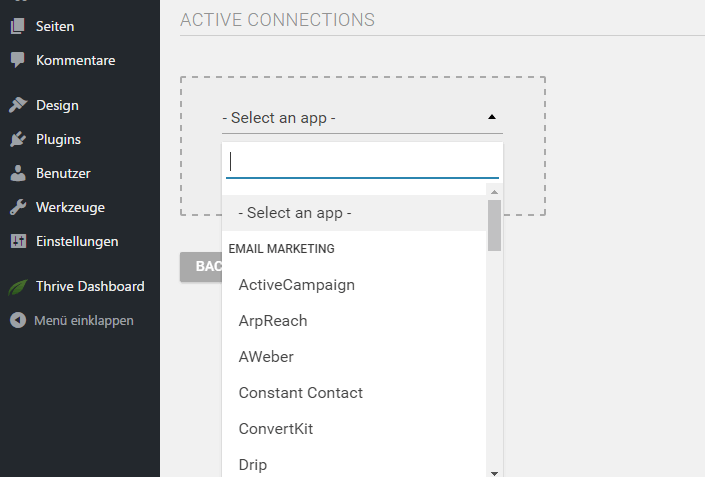
Located at: Thrive Dashboard > API Connections
With WordPress opt-in plugins, the first question is always whether my autoresponder service is supported via API connection.
The WordPress newsletter plugin Thrive Leads really knows how to shine there. With about 40 integrations, there’s a very high chance that your service provider is included.
Here I would like to list just a few of the autoresponders:
- Active Campaign
- Amazon SES
- arpReach
- AWeber
- Campaign Monitor
- Constant Contact
- ConvertKit
- Drip
- GetResponse
- GoToWebinar
- Hubspot
- iContact
- Infusionsoft
- KlickTipp
- Mad Mini
- MailChimp
- mailer lite
- mailgun
- mailpoet
- ailrelay
- Mandrill
- OntraPort
- Postmark
- reCaptcha
- SendGrid
- Brevo
- Sendlane
- SendOwl
- RendReach
- Sendy
- SG Autorepondeur
- SparkPost
- Webina Jam Studio
- WordPress Zapier
- Zoom

It is also possible that you use different services or even different lists; this way you are not exclusively bound to one particular system.
Lead Reports: Reports for optimization
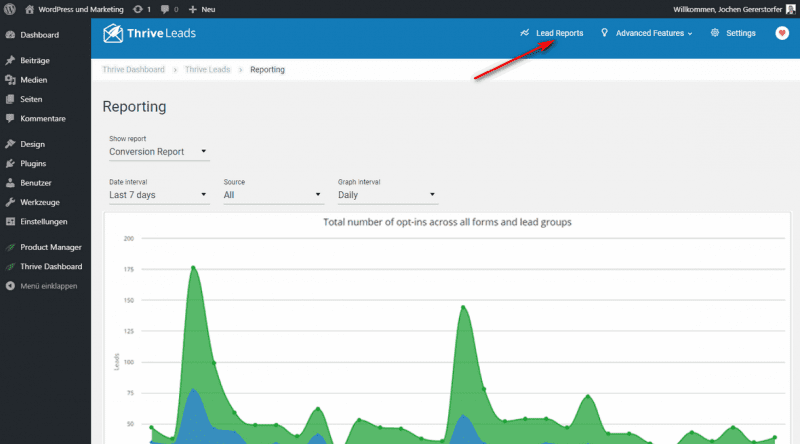
So that you can generally assess the progress and success of your activities, the developers have implemented a comprehensive control system in the WordPress listbuilding plugin Thrive Leads.
The outlined data will help you optimize your activities if necessary. This way, you can organically increase your conversion rate.
All report types:
- Conversion Report: Number of leads
- Conversion Rate Report: Track whether your subscriptions are increasing
- Cumulative Conversions Report: All conversions
- Comparison Report: Identify which opt-ins convert best
- List Growth: All opt-ins across all forms and lead groups
- Cumulative List Growth: Opt-ins across all forms and lead groups
- Lead Referral Report: Learn where your leads are coming from
- Lead Tracking Report: Effectiveness of your campaigns
- Content Marketing Report: Which content generates the most leads
- Lead Generation
The ultimate toolbox for lead generation. - 200 ready-made opt-in templates
Choose a professionally designed template. - Exit Intent
The most effective method for attention. - A/B Testing
Optimize your campaign!

At a glance: Why Thrive Leads is recommended
Below you will find all the main advantages of the product:
- Intuitive user interface and navigation. Thrive Leads offers a pleasantly clear presentation of all functions. Everything is structured and doesn’t seem cluttered at any time.
- The WordPress list-building plugin includes an extremely comprehensive portfolio of layout templates.
- The classic Lightbox, the obligatory WordPress widget for the sidebar and the shortcode are on board. But also the modern Ribbon, Welcome Mat as well as Slide-In are included.
- The effective Trigger Exit Intent is available.
- You can perform a complete split test (A/B test) with just one click.
- In general, the tool works flawlessly; there are no bugs to be found, neither during the installation of the plugin nor during its use. Thus, Thrive Leads should then also work on all websites without any problems.
- The plugin is under constant development.
Thrive Leads Alternatives
- Also very good is the WordPress opt-in plugin Bloom from Elegant Themes (Divi). However, without exit intent function.
- OptionMonster is a lead generation service. Very good, but also a bit more expensive than the competition. Very similar is ConvertBox.
- Another popular service is Hello Bar. Even if the name would suggest otherwise, Hello Bar also offers all kinds of opt-ins.
- Here on bloggerpilot.com I use the Convert Pro plugin.
For more great alternatives, check out my review on the best WordPress popup plugins.
Advantages and disadvantages
- Intuitive handling
- All imaginable forms
- Hundreds of ready layouts
- No disadvantages found yet
Thrive Lead FAQ
Conclusion
You can’t go wrong with the Thrive Leads plugin. The features and possibilities outperform almost all competitors.
The membership is worth it and you always have all products including updates and support.
As a theme I can recommend the Thrive Theme Builder. Comes from the same company and complements each other perfectly.
From bloggerpilot.com there is a clear recommendation for Thrive Leads.
If you have any questions, please use the comment form.
Updates
18.02.2022
- One year later, Thrive Themes plugins and themes are available again individually.
01.02.2021
- Thrive products are now only available with Thrive Suite.
21.05.2020 – Version 2.2.15.1
- Checkboxes for Lead Gen Forms
- Hide Smart Completed Lead Gen Fields
- New Lead Gen Button Styles
- Custom fields for Campaign Monitor and Brevo
01.05.2020 – Version 2.2.15:
- Radio buttons for opt-in forms
- Dropdown menus for opt-in forms
- Editor for email notifications: used the lead generation element.
- New login form element
Thrive Leads Review und Anleitung
Features
Usability
Price
With the new listbuilding plugin Thrive Leads from Thrive Themes, a functional and eminently efficient solution is now available, which also puts those annoying and pesky popups to the side.

