ConvertBox Review - Lead Generation with SaaS Tool
ConverBox is a Saas (Software as a Service) lead generation tool for website owners that makes it very easy for you to integrate advertising elements and other popups on your websites. In this article, we will take a close look at the functionality of ConvertBox, explain pictorially how the tool works in the application and finally draw a conclusion in which points ConvertBox could convince and where there may be shortcomings.
ConvertBox is an all-round SaaS tool for online marketers: With own product or affiliate marketing focus. ConvertBox’s mission is lead generation through features like targeted ads, multi-funnels, behavior-based offers and other clever solutions.
I decided to buy it back in 2018. At that time, the lead generation tool was still unknown and very far from today’s scope in terms of features.
This has been my best tool purchase so far. No other tool I use daily and at the same time saves me so much work as ConvertBox.
If you want to find out if ConvertBox is also interesting for your lead generation and conversion projects, read on.
ConvertBox Prices
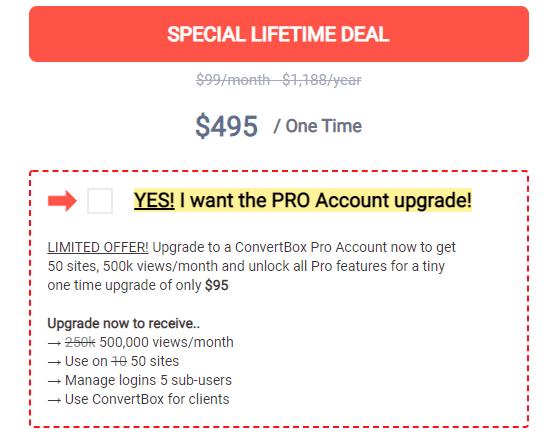
Currently, the lead generation tool is still available for a one-time payment. You pay a little bit more and can use the service for lifetime without any further costs.
| ConvertBox | ConvertBox Pro | |
|---|---|---|
| Inserts / month | 250.000 | 500.000 |
| Domains | 10 | 50 |
| Sub-Users | 0 | 5 |
| Use for clients | no | yes |
| Price | $ 495,00 | $ 590,00 |
If you only have a small website with a few visitors, you can probably get by forever with the basic version. If you have multiple sites, or even customers, you should upgrade to the Pro version. That’s what I did.
At first, the price may seem a bit high, but compared to OptinMonster, it’s a really good deal. This is because with the most expensive plan, for $49.00 a month, you only get 100,000 impressions and are only allowed to use it on 5 domains.
The ConvertBox user interface
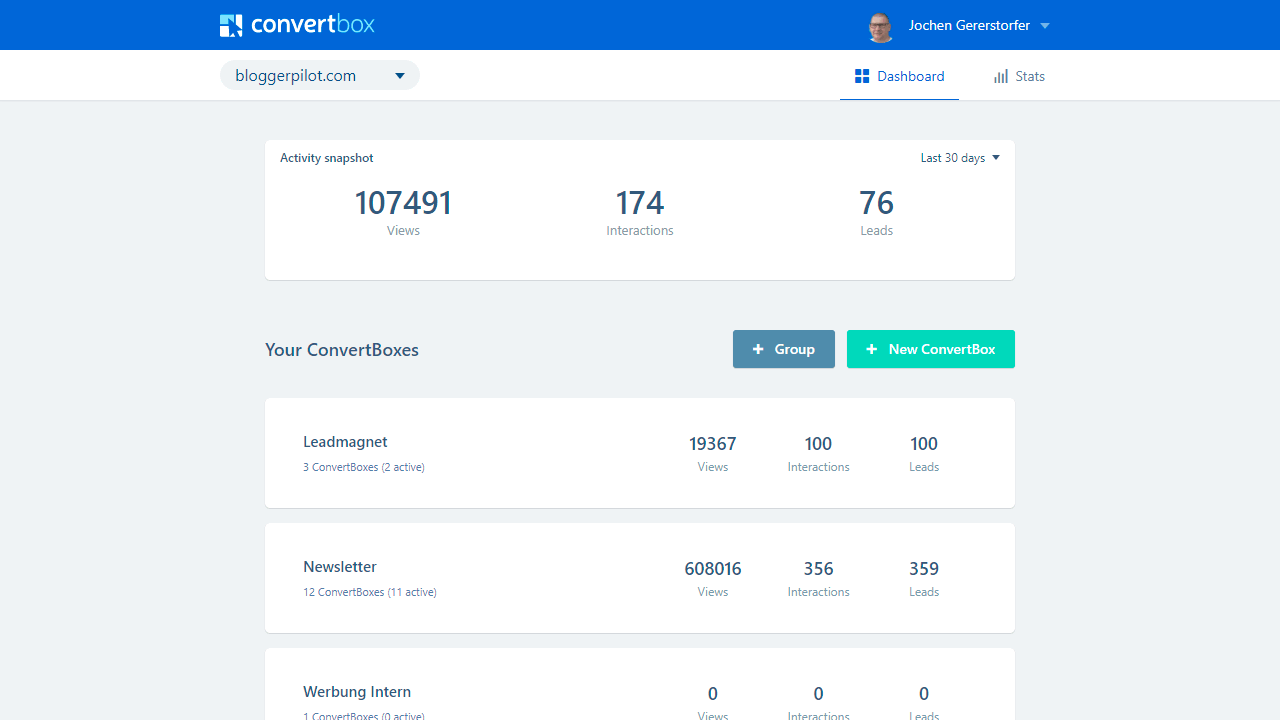
After logging into ConvertBox, you will be greeted by a clear user interface. In the dashboard you have the insight to your groups and the most important numbers:
- Number of ConvertBoxes
- Views (insertions)
- Interactions
- Leads
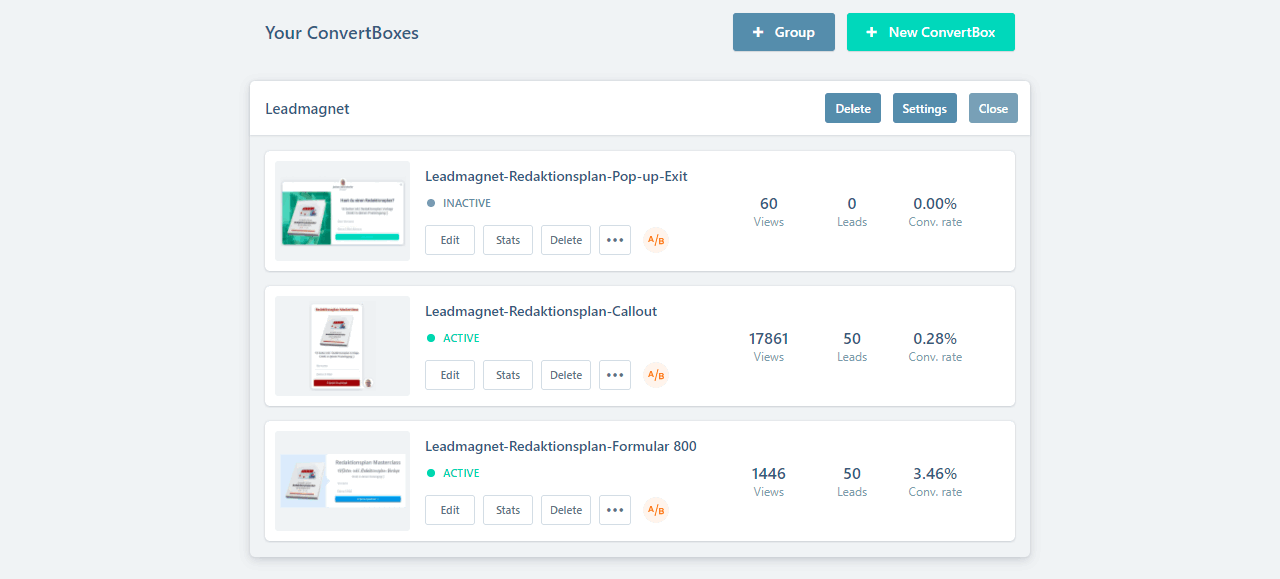
By clicking on one of the groups, all existing and active ConvertBoxes, as well as their respective functions, are immediately displayed. Additionally, direct feedback on the performance of each lead gene is displayed.
You can use a ConvertBox account for up to 10 or 50 projects and select the desired project via drop-down in the upper left corner.
By clicking on a category, e.g. Newsletter, you get more detailed data on the performance of the ConvertBox: Calls, leads and conversion.
Statistics
Last but not least, in addition to the dashboard, there is also the option to call up the statistics of your forms. Here you can view the performance of a desired period, accompanied by a clear graph.
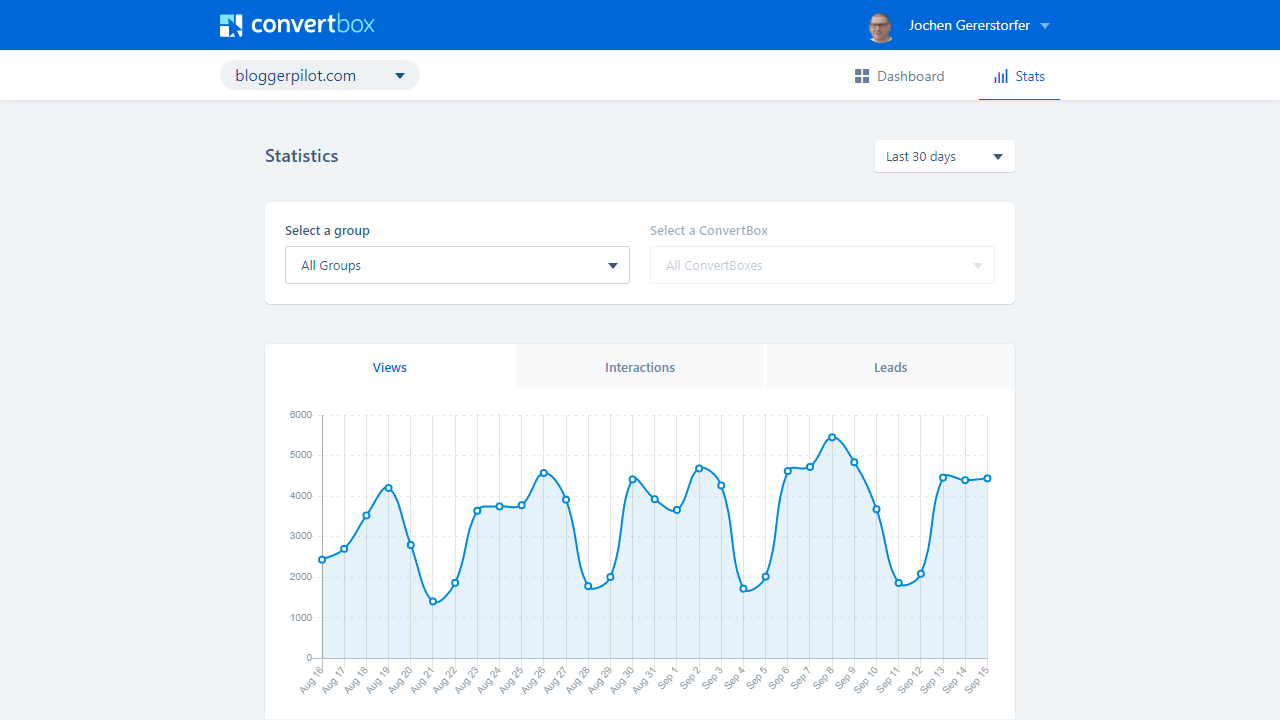
Right by each ConvertBox is a link called “Stats” that takes you to the performance data for just that lead form.
A look at the different functions of ConvertBox
The main function of ConvertBox is to generate leads through targeted placement of elements like newsletter invitations, special offers to custom interactive quizzes.
For example, with ConvertBox you can set an element to be displayed only if a visitor came to your project via Facebook and then receives a suitable greeting such as “Hello Facebook friend” + creative invitation to sign up for an existing newsletter, for example
Besides lead generation, the ConvertBox can also be used to get more detailed information from your visitors, such as interests or opinions. For this purpose, you can create a ConvertBox without providing it with an opt-in function.
Since ConvertBox is not a classic Plugin, but a script, it is not only suitable for WordPress sites, but also compatible with HTML and other common formats.
Create a new group in ConvertBox
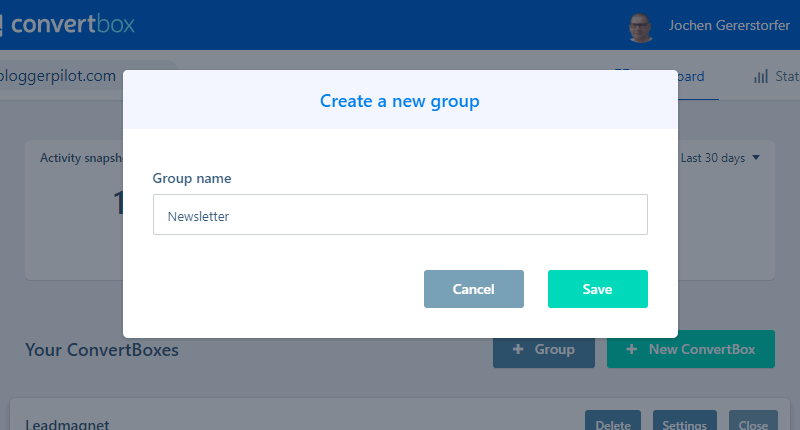
To create a new group, all you have to do is select the “+ Group” option in the dashboard and give your new group a name. It’s best to choose the name to match what function you want the ConvertBoxes from the group to end up performing.
Examples include:
- Lead Magnets
- Newsletter
- internal advertising
- Countdowns
- or even a contact form
The groups are useful to keep a good overview once you have created several ConvertBoxes. With a simple click on a group, you can see all the boxes from said group, short statistics on performance and whether it is active or inactive.
You can also drag and drop ConvertBoxes from one group to another.
Create new ConvertBox
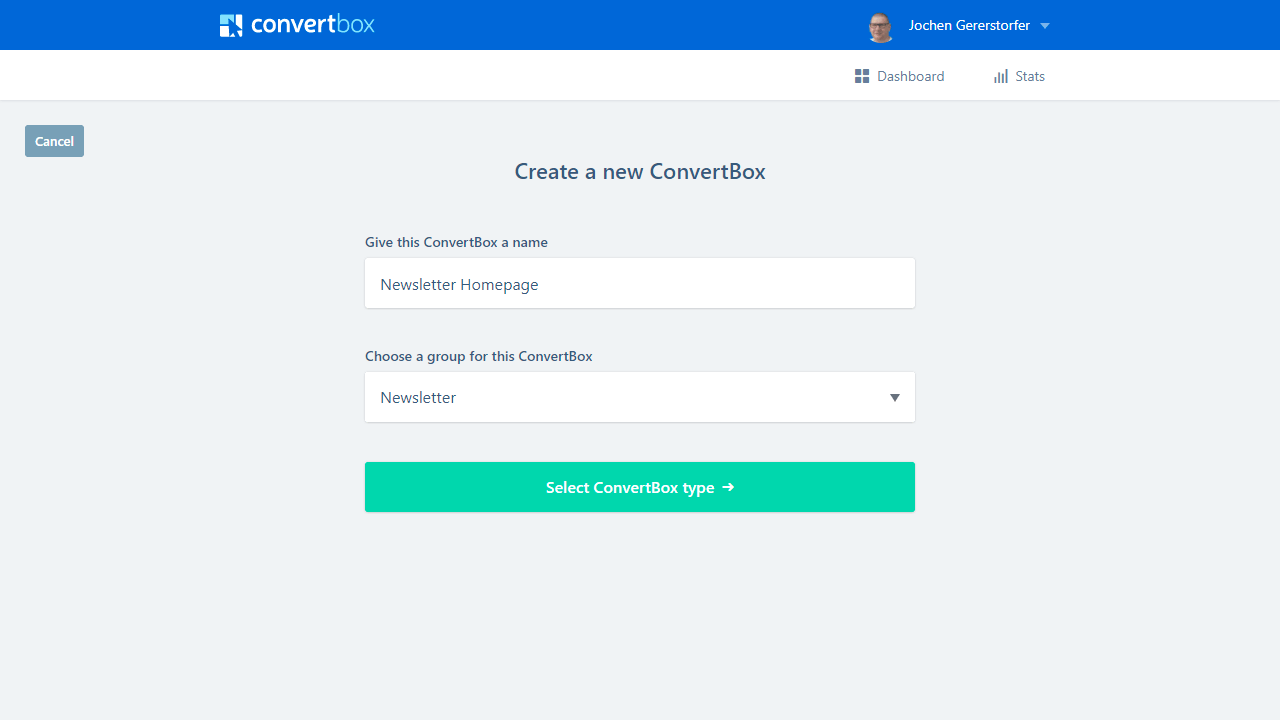
First, you just select a name and the Group.
You can choose whether the ConvertBox is displayed as an element or banner on the page or across the entire page. The boxes themselves are also definable by size and content, be it only text, image or video.
Basically you have two types to choose from:
- Overlay (Above the content)
- Embedded (Embedded)
Overlay
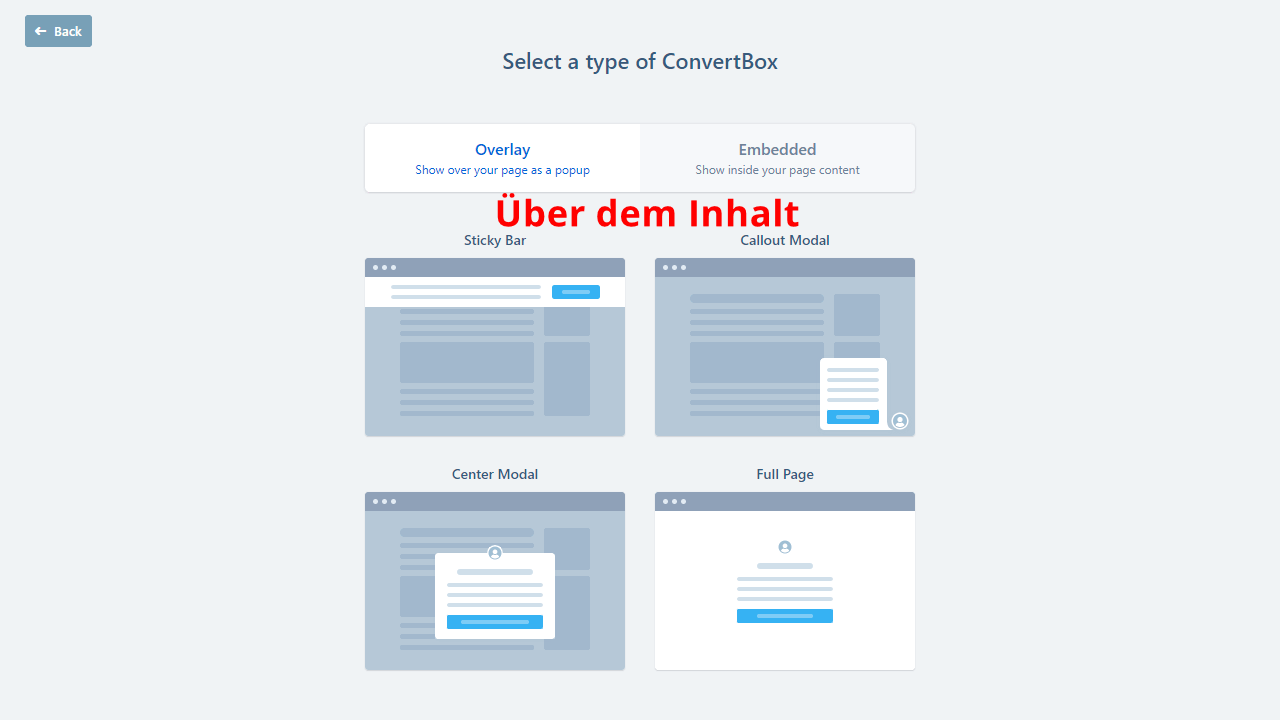
The ConvertBox type overlay is, among other things, the typical popup. The box is placed over the regular content.
- Sticky Bar
- Callout Modal
- Center Modal
- Full Page
TIP: After extensive testing and analysis, the Callout Modal has proven to be the most successful.
Embedded
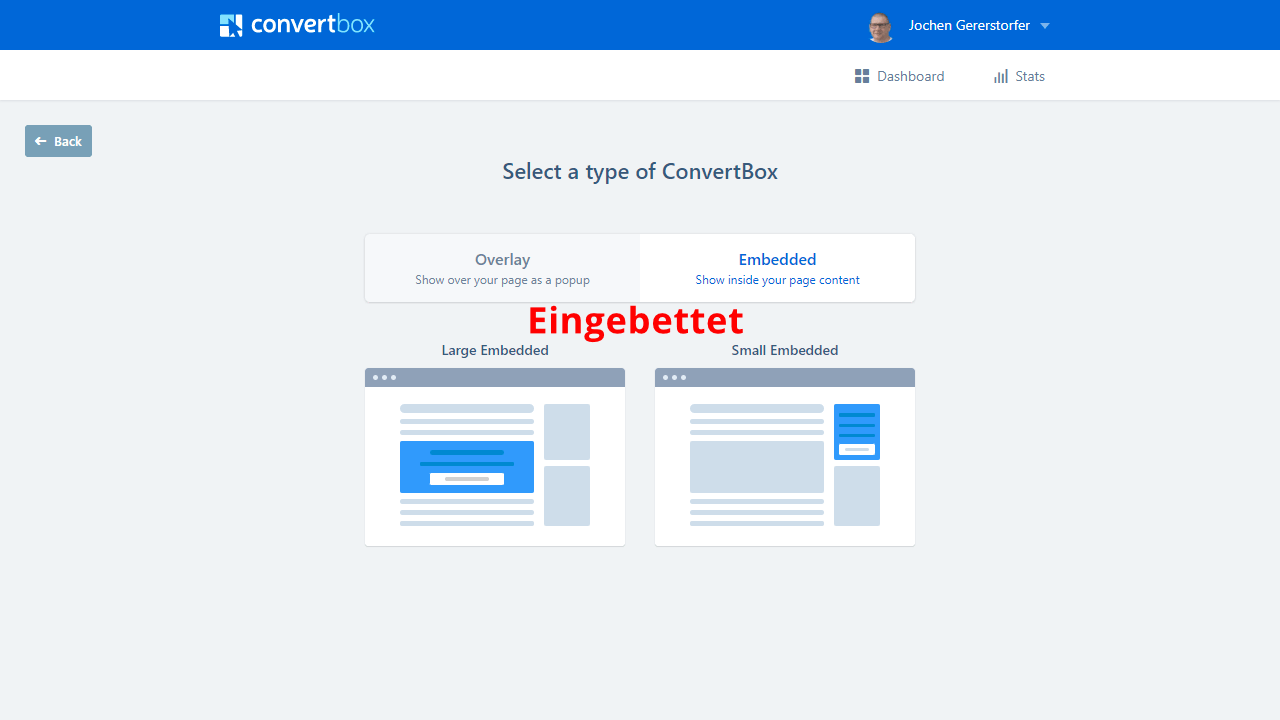
The embedded forms are only available since 2021. The box is shown within your content.
- Large Embedded (For the full-width body text)
- Small Embedded (For the sidebar or footer widgets)
I like to use these opt-in forms for lead magnets or newsletter forms.
Ready-made templates
ConvertBox’s strengths are its ready-made templates and ease of use.
In fact, the service was created because there was no vendor offering truly high-converting lead boxes that were ready to use in minutes.
Please note that the templates are constantly being expanded and improved. So the screenshots below are just snapshots.
Sticky Bar
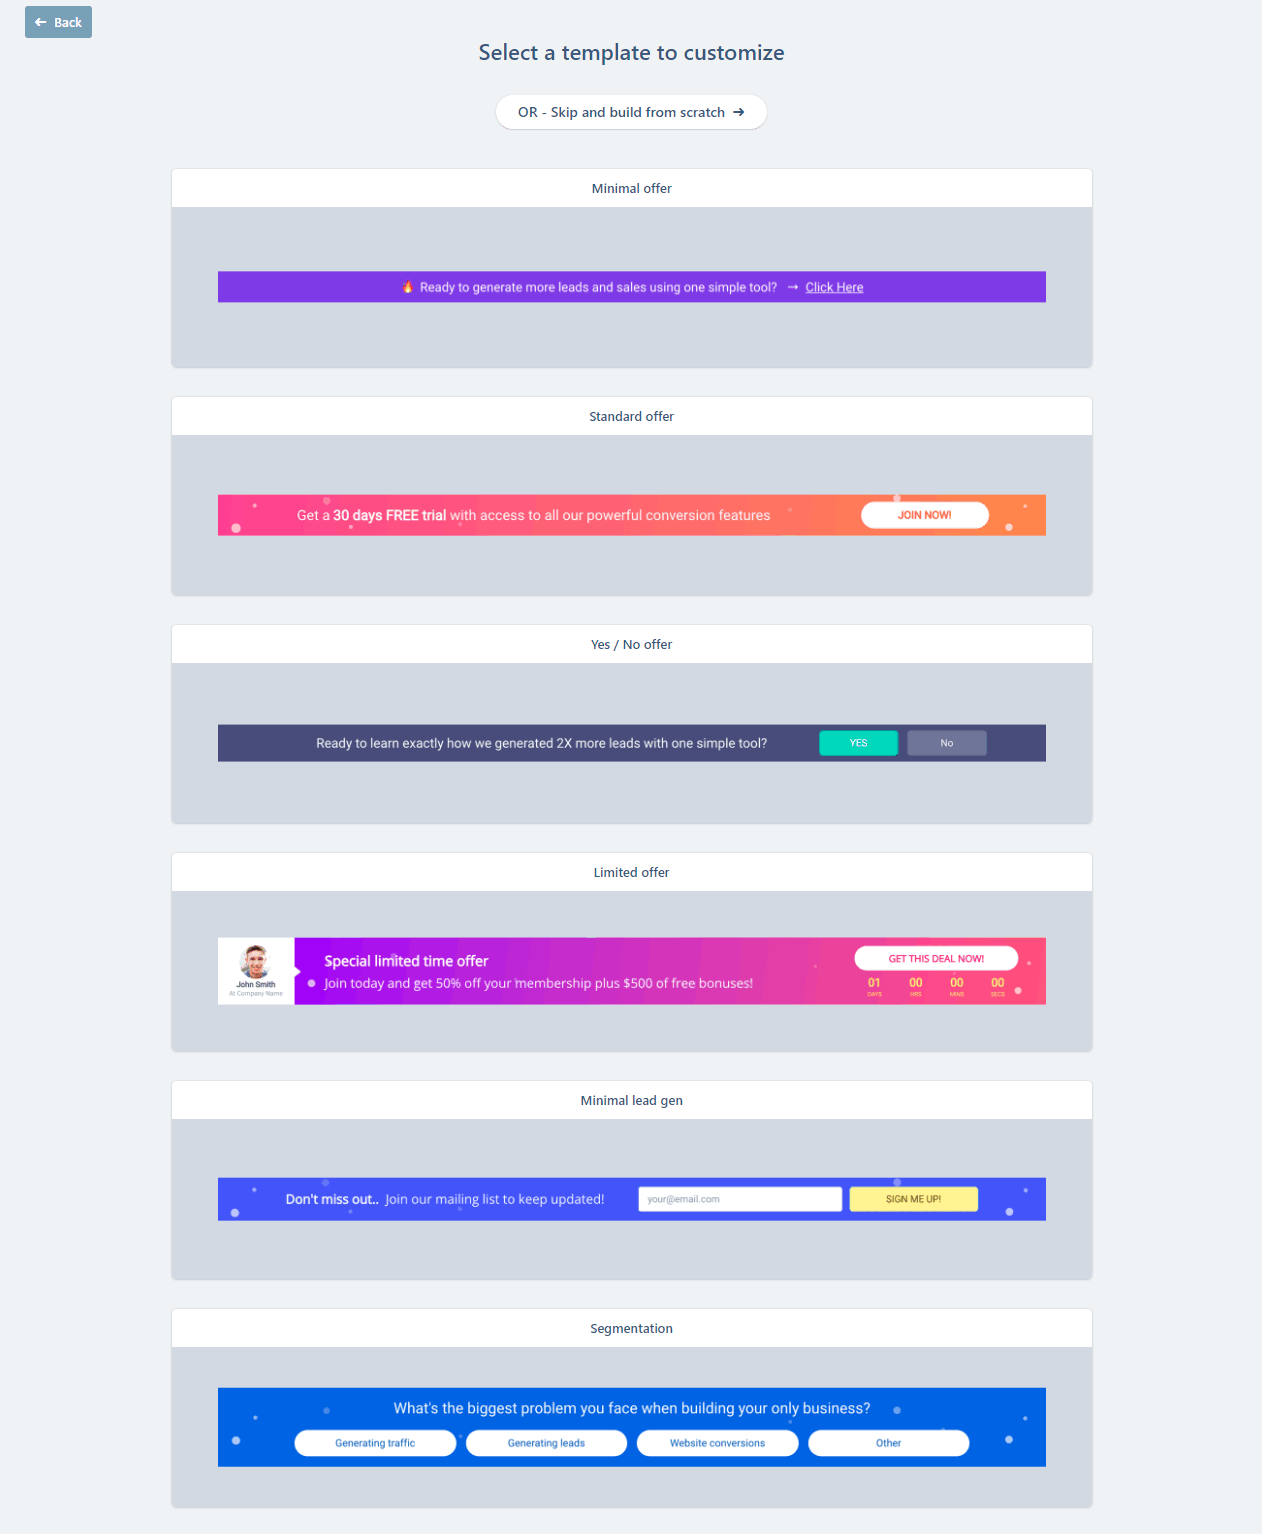
The fixed bar in the header or footer is best for announcements or promotions.
Ready-made sticky bars:
- Minimal offer
- Standard offer
- Yes / No offer
- Limited offer
- Minimal lead gen
- Segmentation
Callout Modal
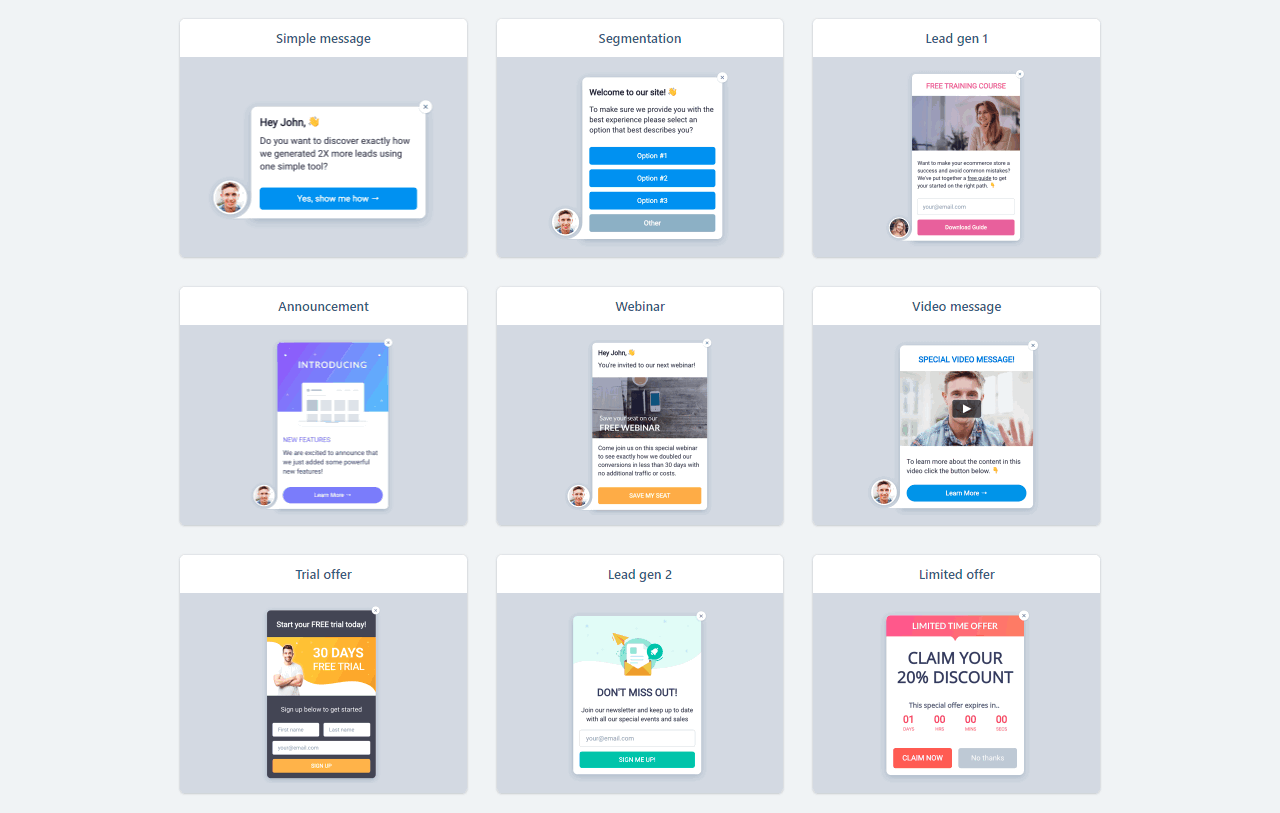
You can use the popups at the bottom of the page for really any situation. Be creative!
Make callout modals:
- Simple message
- Segmentation
- Lead gen 1
- Announcement
- Webinar
- Video message
- Trial offer
- Lead gen 2
- Limited offer
Center Modal

The Center Mod al is just a fancy name for the old familiar popup in the middle of the screen. Never gets old.
Finished Center Modals:
- Video message
- Workshop
- Cosulting
- Live event
- Report
- Limited offer
- Segmentation
- Training
- Lead gen
Full Page

The Full Page Opt-in is also often called “Welcome Mat”. It is a modal that covers the entire browser content.
Ready-made Full Page templates:
- Workshop
- Lead gen
- Consulting
- Segmentation
- Report
- Video message
- Limited offer
- Podcast Exit segmentation
Large Embedded
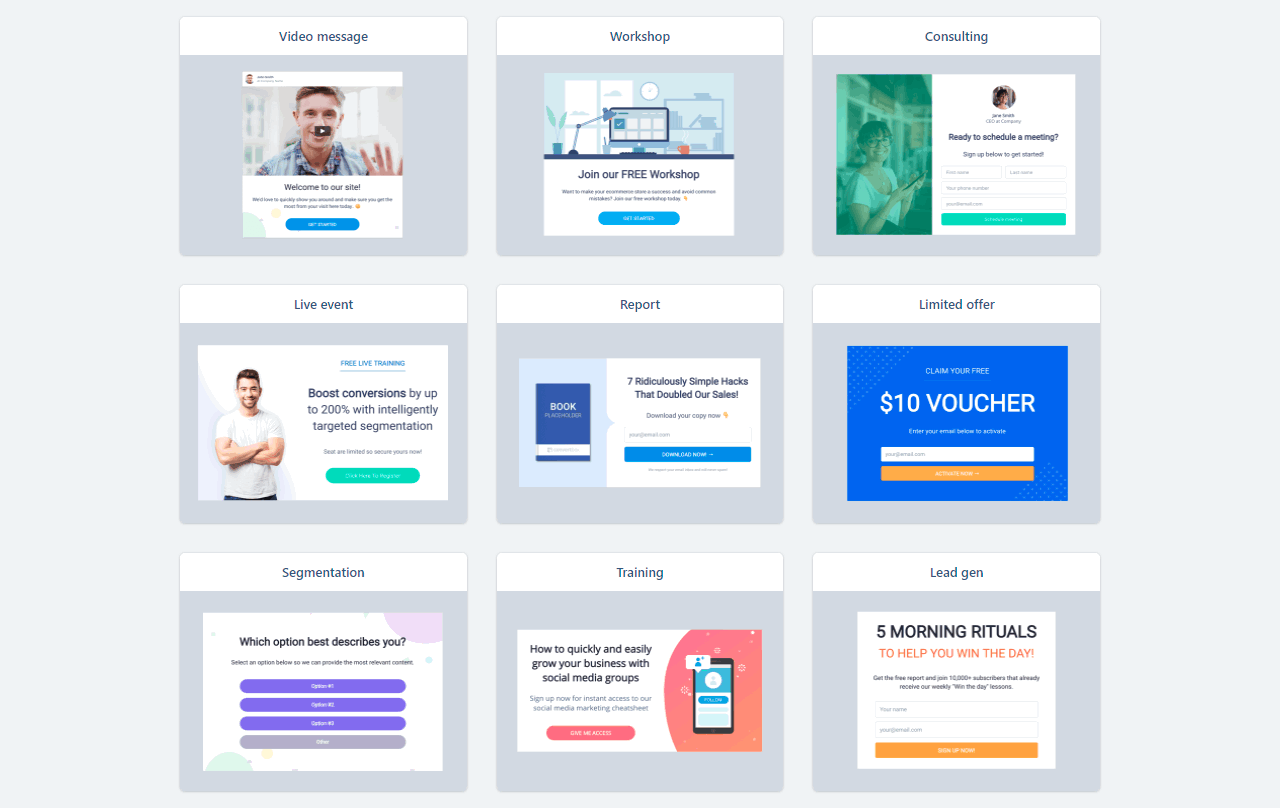
I had been waiting for this form type for a long time. I use it to make my contact forms and other newsletter forms that I want to include directly in the text.
Ready-made Large Embeddeds:
- Video Message
- Workshop
- Consulting
- Live event
- Report
- Limited offer
- Segmentation
- Training
- Lead gen
Small Embedded
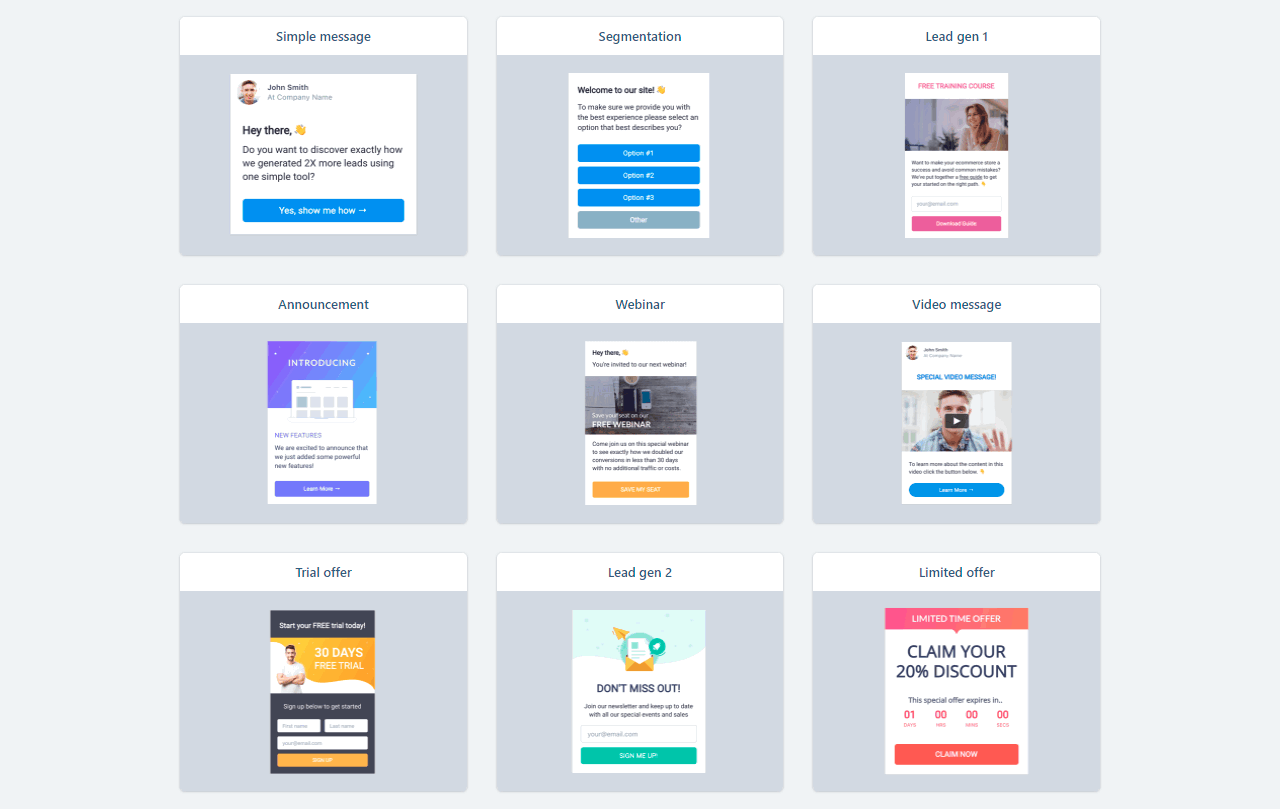
Narrow opt-ins for your blog‘s sidebar.
Create Small Embeddeds:
- Simple message
- Segmantation
- Lead gen 1
- Announcement
- Webinar
- Video message
- Trial offer
- Lead gen 2
- Limited offer
Design and configure ConvertBox
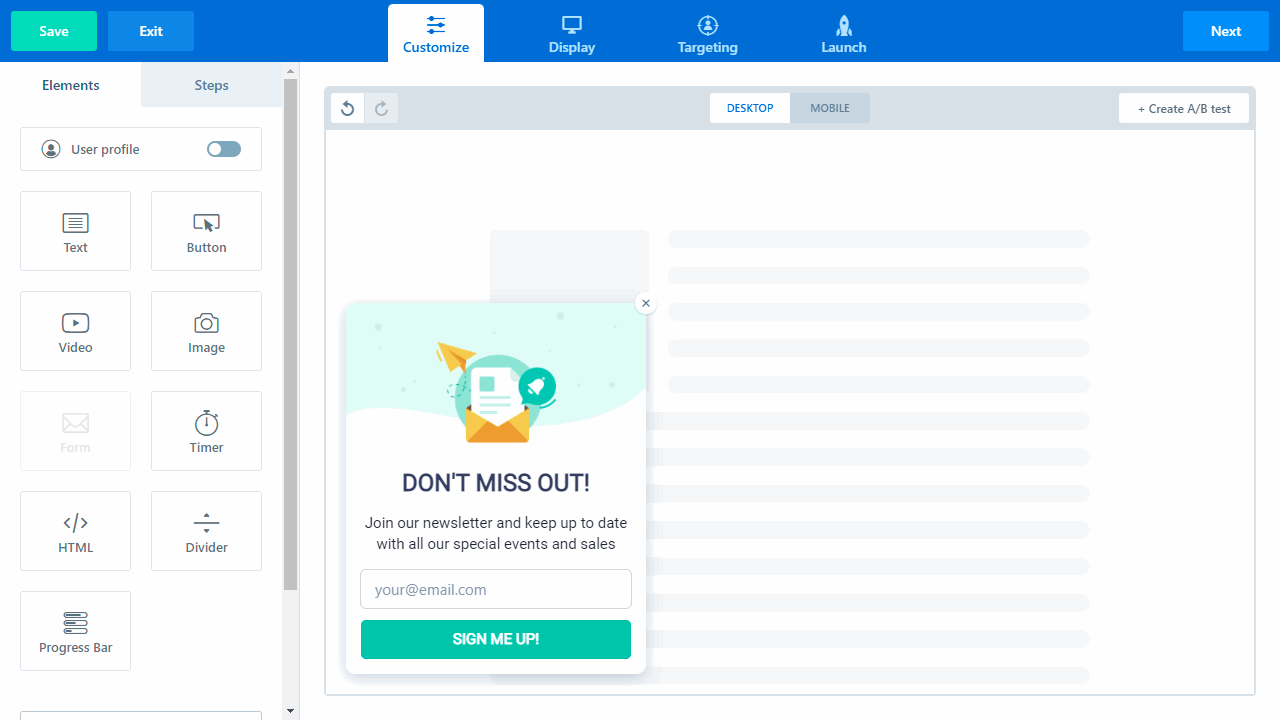
I love the simple editor!
First look at all the available form fields so you know what to work with:
- Text
- Button
- Video
- Images
- Form
- Timer
- HTML
- Separator
- Progress bar
Gooddy: Even if you’re not fully into the marketing tool, just keep clicking “Next” and you’ll be taken all the way to publishing your form.
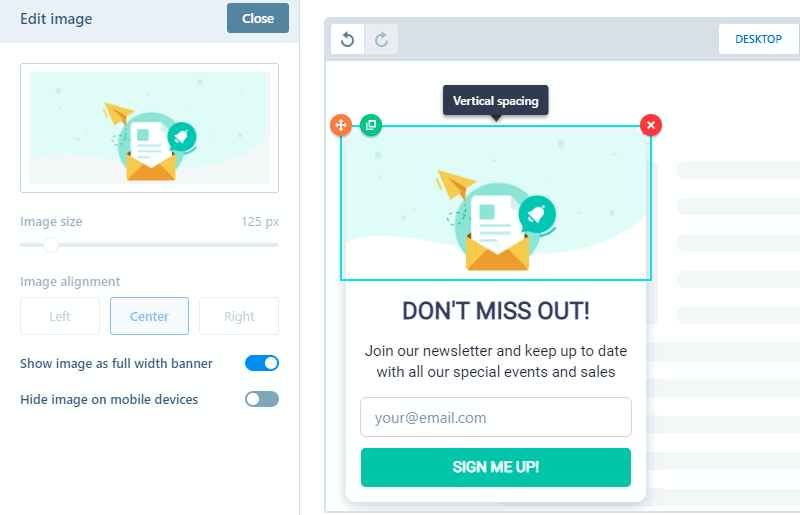
No matter what you want to change on your selected form, just click on it and immediately you will get all possible settings displayed on the left.
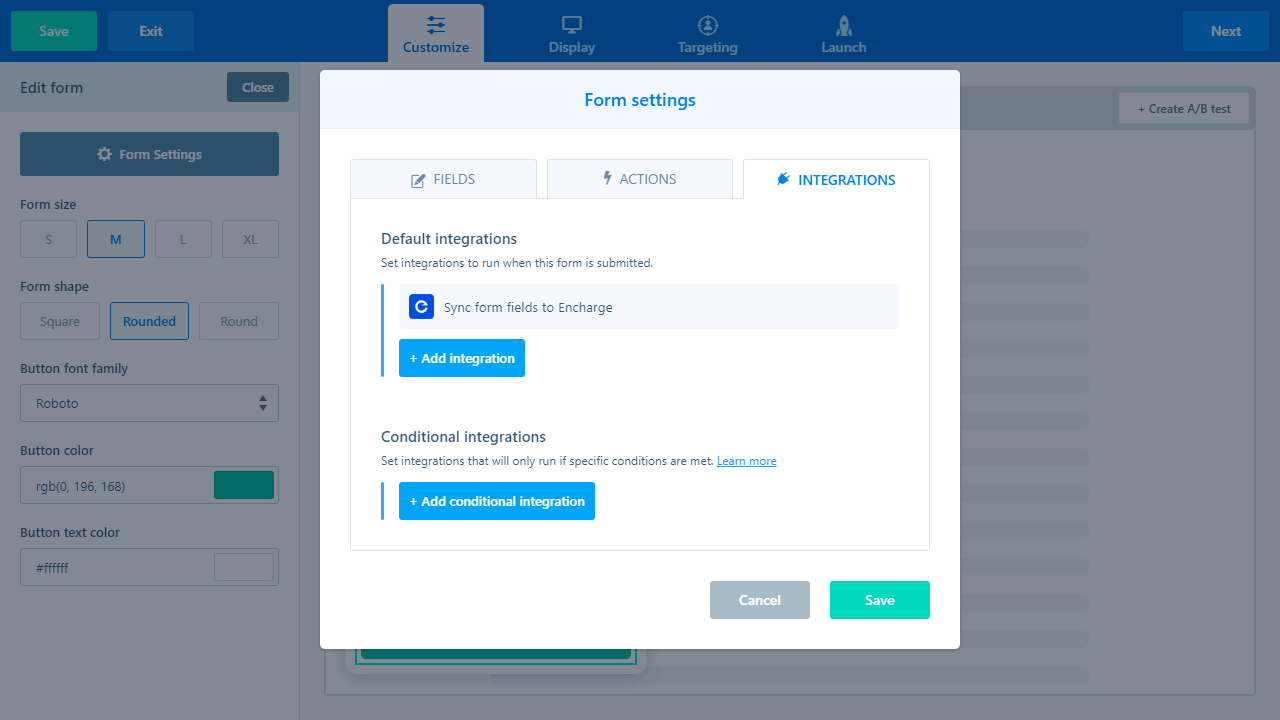
You can also add an entry form to each ConvertBox to effectively generate leads in the long run.
Nothing is as effective in marketing as scarcity!
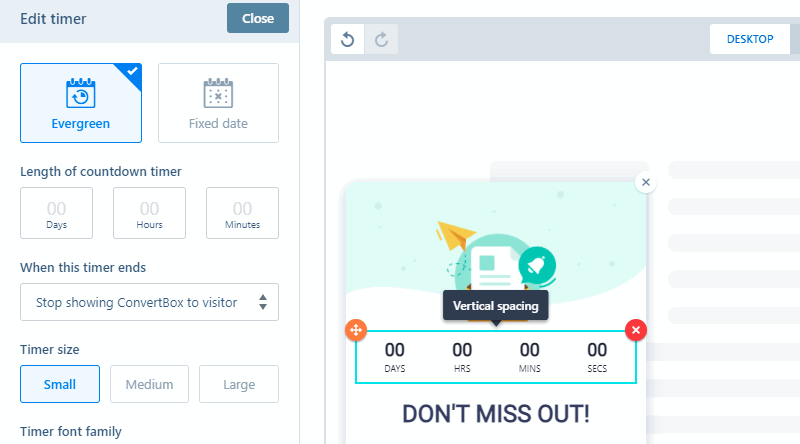
Lastly, a countdown can be added to each ConvertBox, closing the ConvertBox after a set time. Unlike other solutions for countdowns, ConvertBox offers the possibility that individual users actually do not see this ConvertBox again after the countdown has expired, which leaves a professional impression.
Display and Trigger
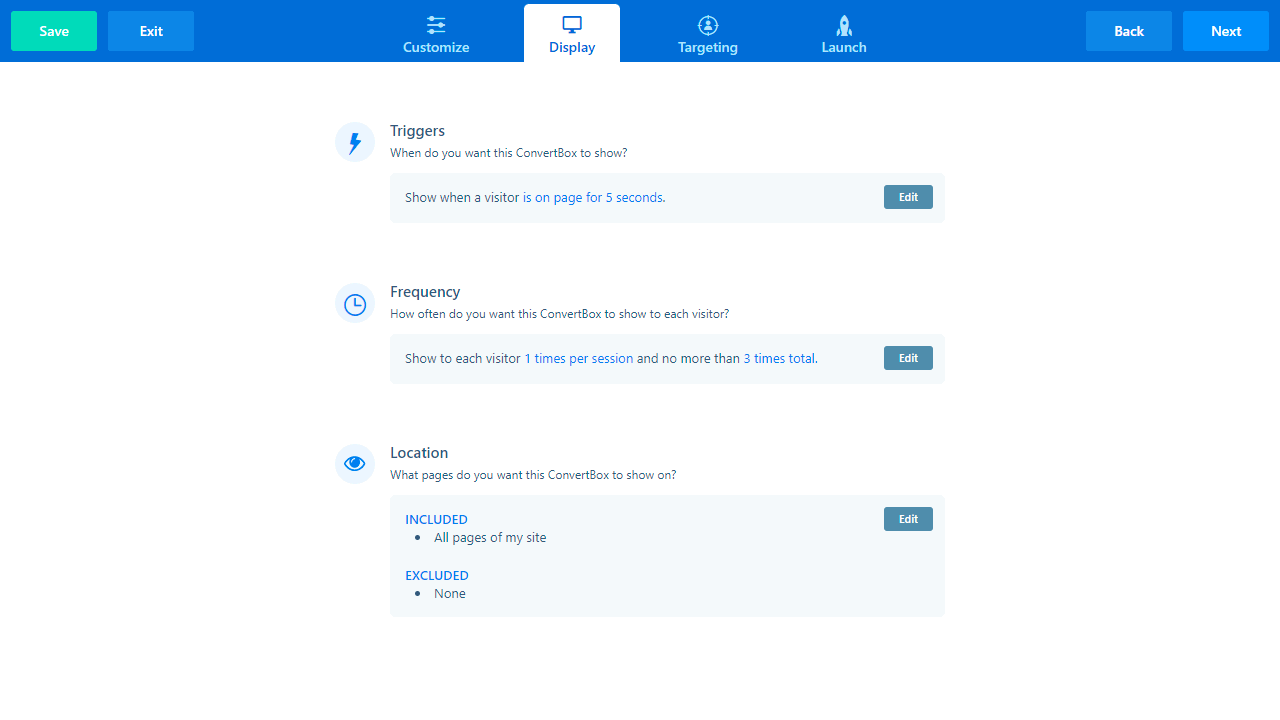
After you have designed the ConvertBox according to your wishes, the next step is to set when, how often and for how long the ConvertBox will be displayed to your visitor.
For example, it can be displayed automatically, after a certain time of stay or after a trigger. The triggers are, for example, when scrolling the page, after a longer period of inactivity, when leaving the page or when a link on the page is clicked
Under the item “Frequency” you can set how often the ConvertBox is displayed. This way you can make sure that a visitor does not see the ConvertBox more than three times in total, which is much more professional than an always visible element with a countdown, which you surely already know from many other sites.
The last menu item under Display is “Location”, where you can set on which of your pages the ConvertBox is visible. To exclude single pages, just add them to a list under the menu item “Exclude”.
Embed Areas
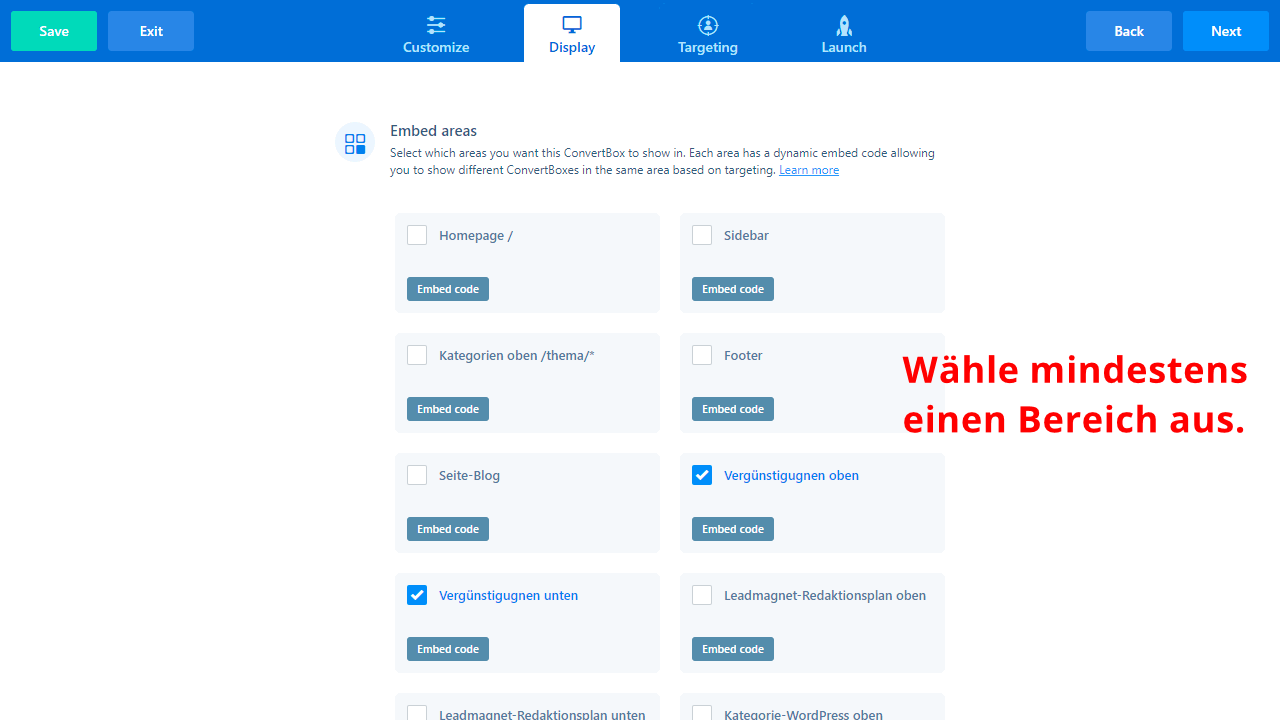
ConvertBox has powerful inline/embedding features that allow you to display forms located within targeted areas of your web pages, as well as content. Embed Areas are available for embedded forms only. See.
Embedding ConvertBoxes within your content is an extremely effective and non-intrusive way to engage and convert visitors as they browse your site.
I have created several sections for this system, such as:
- Homepage
- Sidebar
- Footer
- Blog
- for certain categories
- …
Targeting
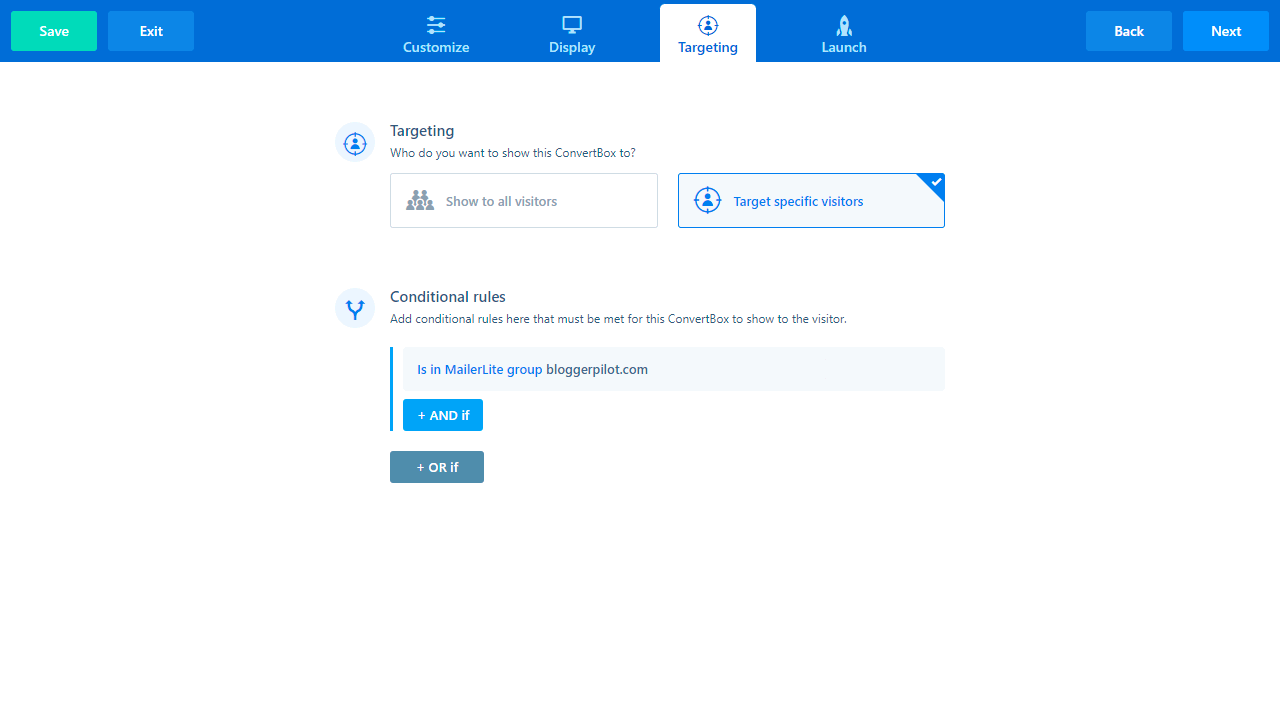
The last step before your ConvertBox is ready for use is the targeting settings. Here you can choose whether the ConvertBox will be displayed for every user, or only for specific users.
In a dropdown menu under “Add conditional rule” you will find a variety of possible conditions that must be met for the ConvertBox to be displayed. This allows you to add custom elements to your site, e.g. to market a product, service or newsletter to your chosen audience of visitors.
Launch and duration
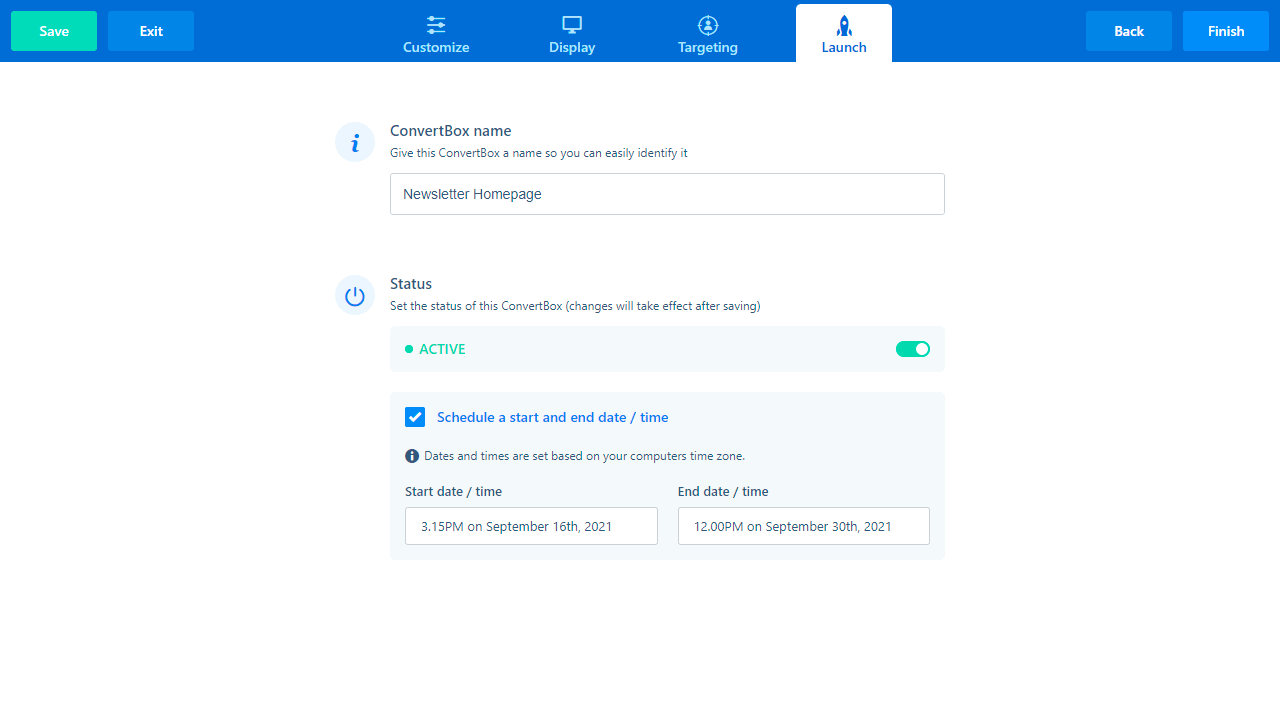
The last step is called “Launch”. Here you can change the name of the lead box.
Below that you have to change the switch from “INACTIVE” to “ACTIVE” so that the part is delivered.
The third point is a very practical feature. Schedule the box to fade in with start and end time. Really cool feature for scheduled promotions and sold ads!
Finally click on “Finish”!
How to implement a ConvertBox on your project:
When you are done with the settings for your new ConvertBox, the last step is to implement it on your site. For this you can download the script directly from the ConvertBox. There are 3 options:
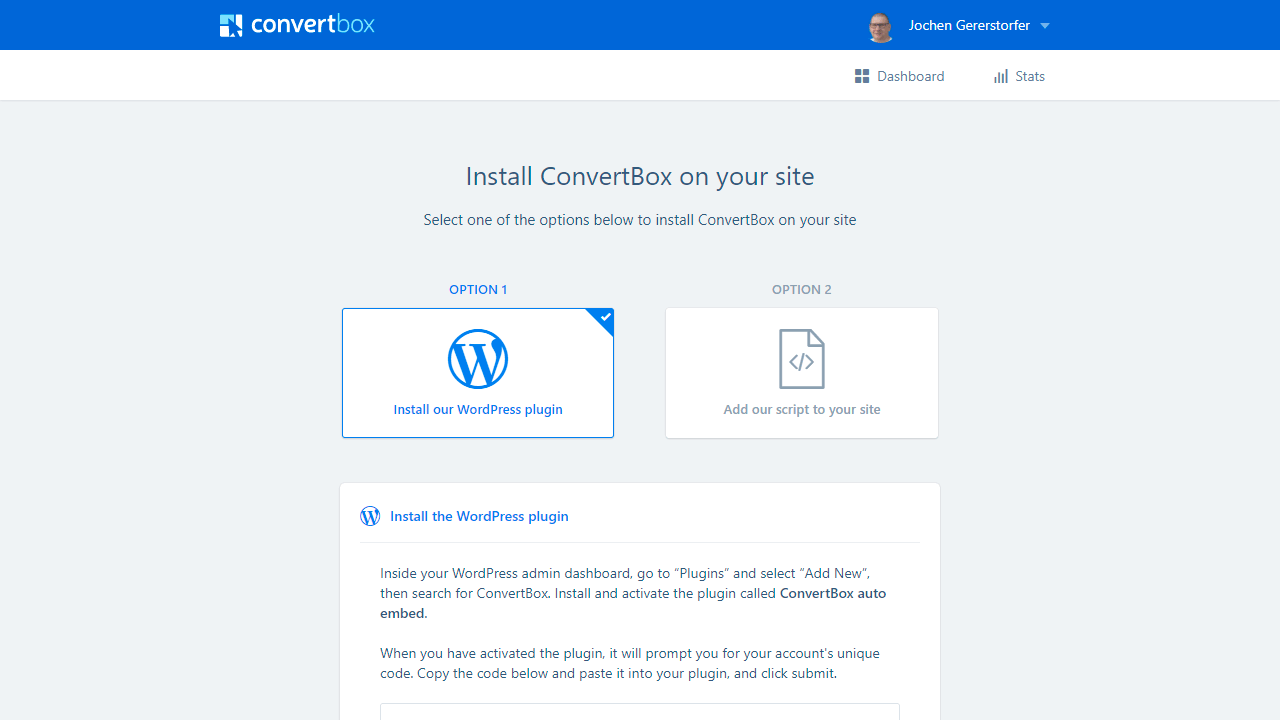
Option 1: Install WordPress-Plugin
For your WordPress pages you just have to click on “Add Plugin” under Plugins on WordPress and search for ConvertBox. The plugin is called “ConvertBox auto embed”. After installing the plugin, you just need to paste the embed code from ConvertBox in the WP plugin.
Option 2: Add script to your pages
In this option you will find the necessary steps to implement ConvertBox on e.g. HTML pages. For this you have to add the script for ConvertBox to your page and insert the embed key under ConvertBox, just like for WP pages.
Option 3: Send instructions to your developer
If you employ a developer, this option will send him a compact tutorial on how to embed ConvertBox on your pages via email.
Multistep forms
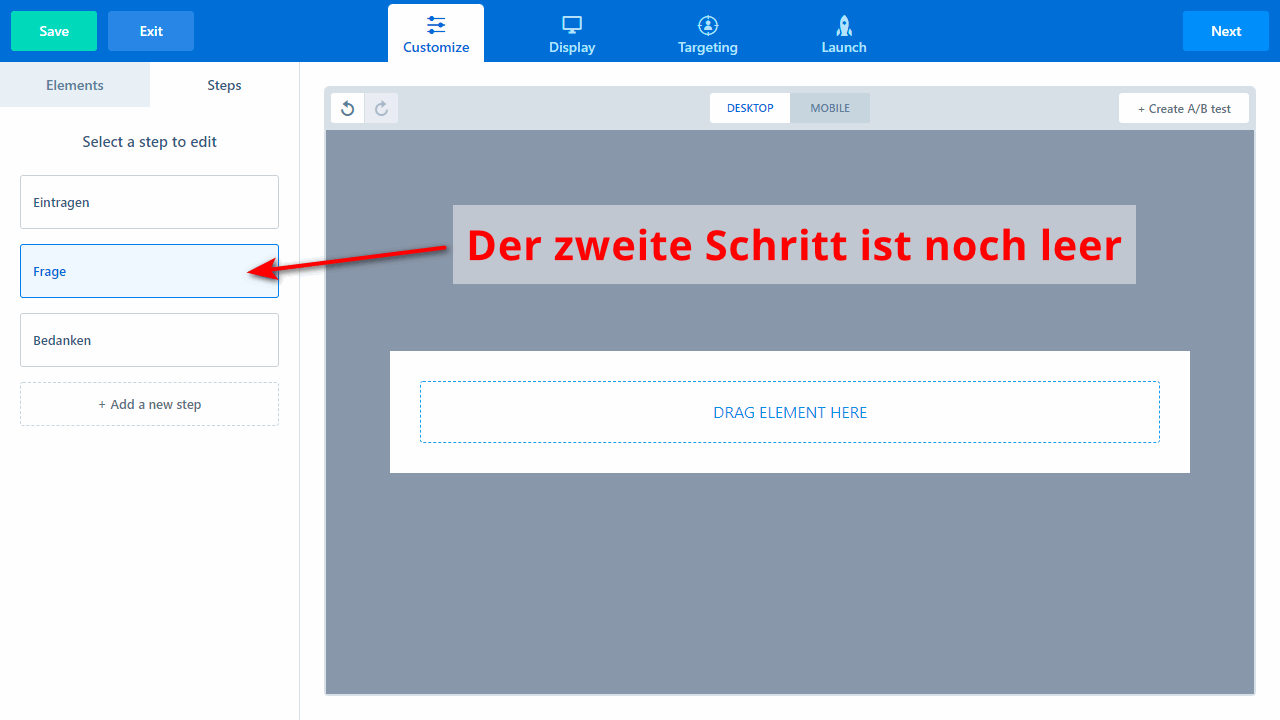
ConvertBox also supports multistep forms. Just like you are used to from Typeform. The advantage is better entry rates than with one-page, long forms.
In this example I have created three steps. The second step is selected and still empty. Here you can use the smooth editor as you have seen before.
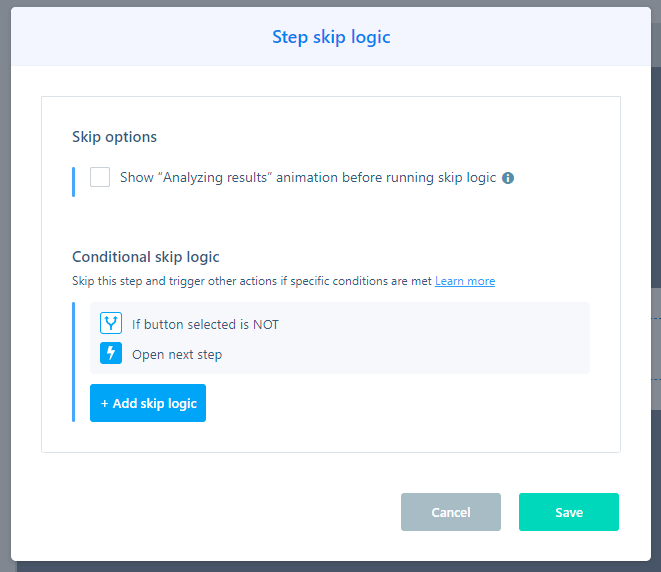
Of course you have the possibility to add logic for the steps. You can also define your own code, e.g. for a pixel.
If you run a store or have digital products, you can generate more sales with a sales funnel and sense of urgency.
A/B Split Testing
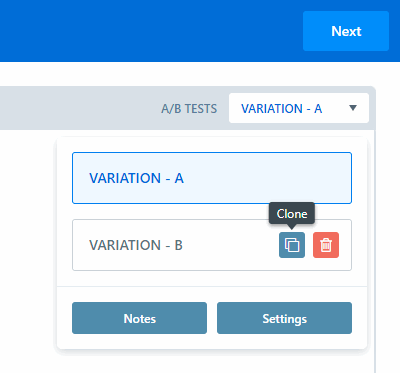
What I want to mention extra is A/B testing for your forms!
With most tools, this is very time-consuming and tedious, so you don’t even do it. Not so with ConvertBox.
In the editor you will find the button“Create A/B Test” in the upper right corner. In the popup you click on“Create new variation“, whereupon a copy of the existing opt-in is created.
Now simply select “Variation B” and make small changes. You have already created your first split test.
You can clone or delete any variation. Under Notes you should store your thoughts about the variations, so you know later what and why you changed it. At least that’s how I always do it.
Under Setting you still have the option to choose between a regular and a cookie-driven test.
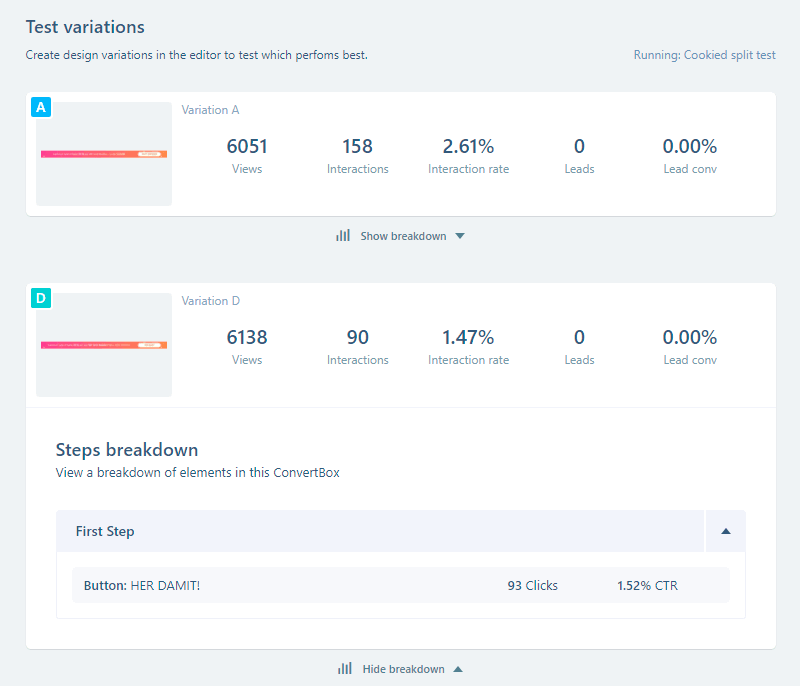
ConvertBox then automatically determines the best variant and plays it out more. In the statistics for each opt-in box you can also find the collected data from the split test.
Integrations
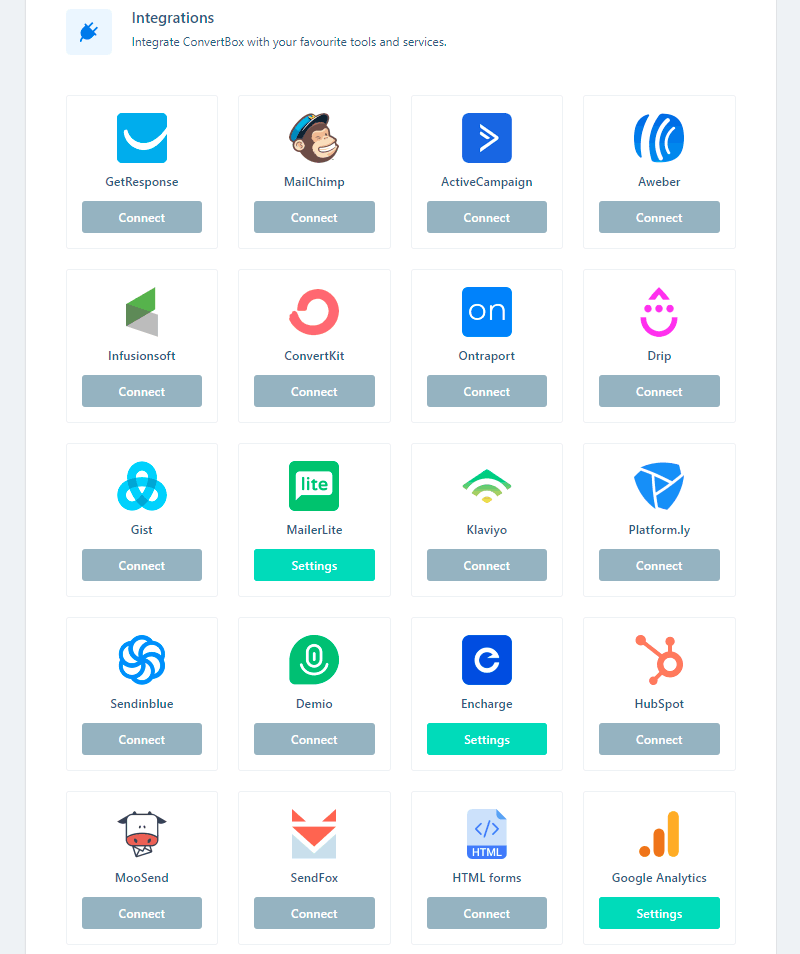
- ActiveCampaign
- AWeber
- ConvertKit
- Demio (webinar platform)
- Drip
- Encharge
- GetResponse
- Gist
- Hubspot
- Infusionsoft
- Klaviyo
- Mail Chimp
- MailerLite
- MooSend
- OntraPort
- Platformly
- Brevo
- SendFox
All other platforms can be connected via Webhooks and Zapier. HTML forms can always be read as well.
Finally, you should connect Google Analytics with ConvertBox. Then you will have more accurate data.
Learn more about my perfect ConvertBox to Encharge integration.
Example – My form
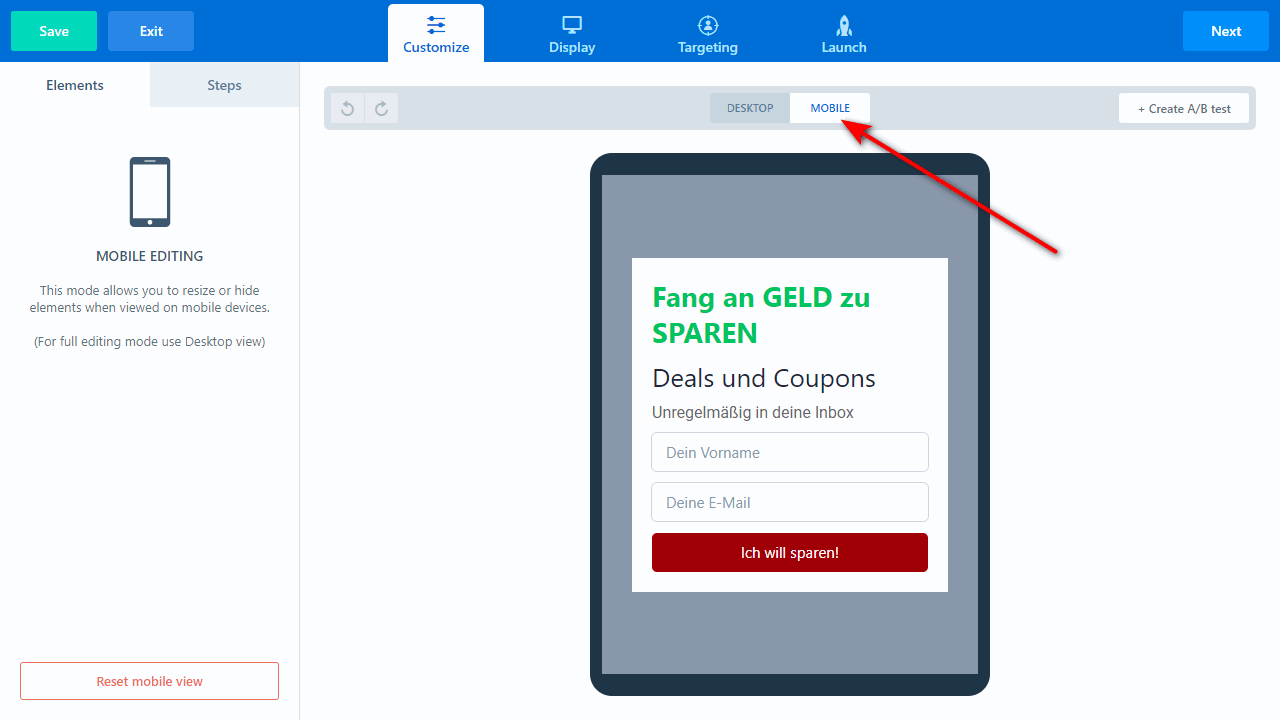
As an example for a custom designed box I would like to show you my newsletter form for coupons and deals:
Deals und Coupons
Cyber Monday
Black Friday
Coupons
Aktionen
SaaS Angebote
Meine Black Friday Deals.
Something like this is quite easy to design with ConvertBox. With prefabricated reusable blocks I insert the form here in WordPress. Super easy!
ConvertBox vs Thrive Leads
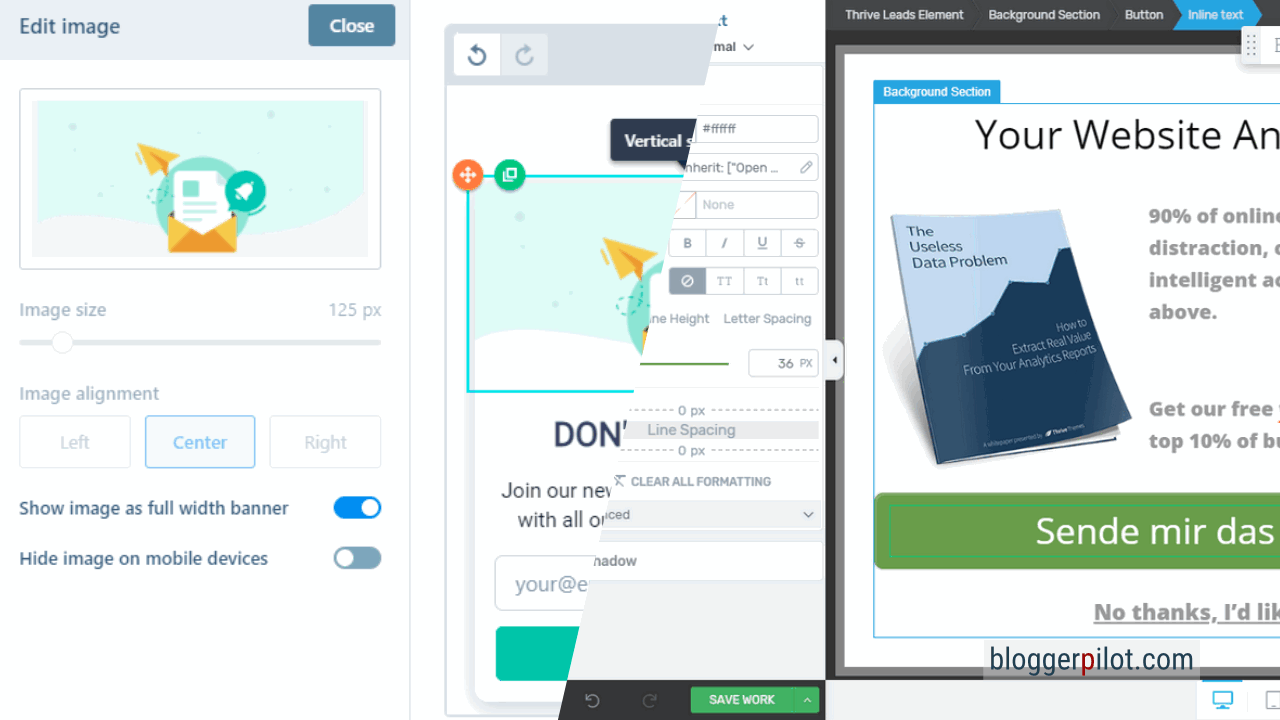
All the tools from Thrive Themes are also recommended. I use Thrive Leads myself as well.
However, I prefer to use ConvertBox for lead generation because it’s simpler and more targeted.
I also love the centralized management of my lead boxes. When I start a new campaign, I simply copy the sticky bar I created and paste it on several of my websites.
ConvertBox vs OptionMonster
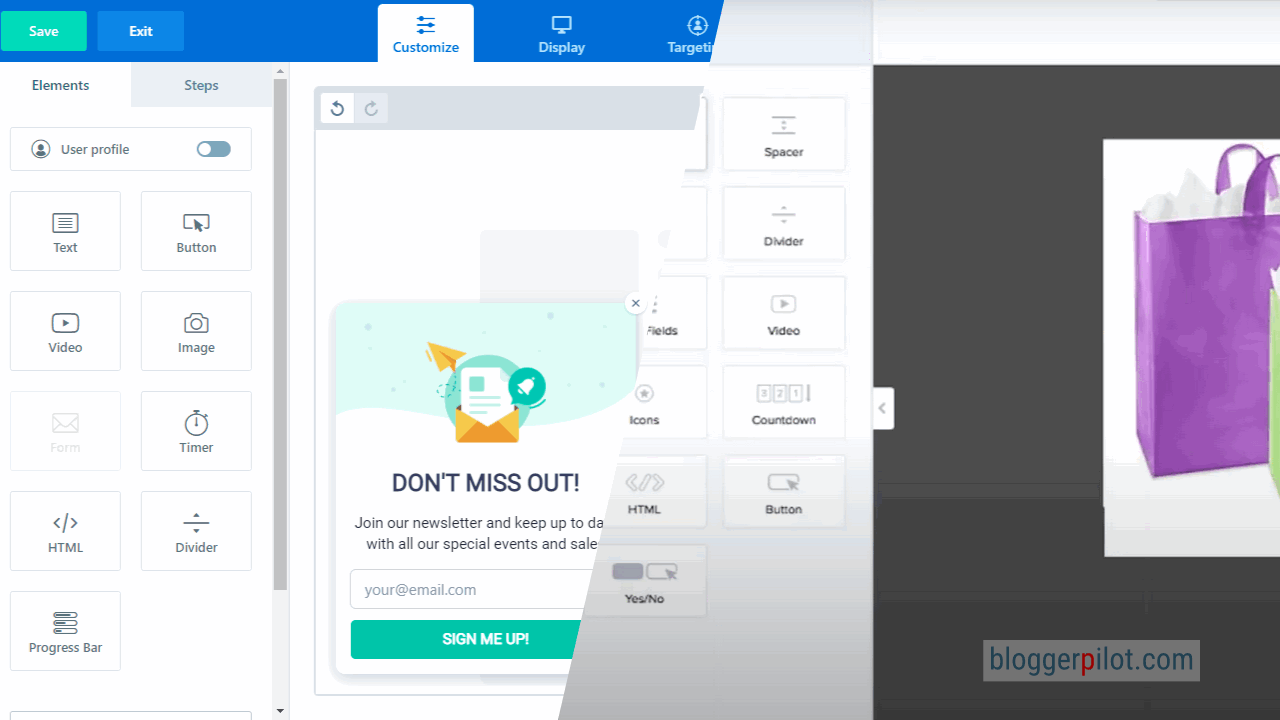
OptionMonster is the top dog among lead generation services. I had used the tool once, but the price is really steep.
In fact, ConvertBox and OptionMonster are very similar.
ConvertBox – Questions and answers
Our experience with ConvertBox + conclusion
ConvertBox has strongly convinced me as an all-round SaaS solution for lead generation. The tool delivers what it promises in every case and enables solutions even with little technical know-how, which you can otherwise only get with much more expensive software.
A clear user interface, instructions for each individual menu item, easily visible data on performance, as well as easy embedding of the created ConvertBoxes are some of the most decisive plus points for the tool. Convert your visitors into leads and customers.
The price/performance of ConvertBox is also very convincing, with a one-time price of under $500 you get an almost complete solution for lead magnets, element embedding and many other features. Thus, the lead generation tool is suitable for plain projects to geeky creations without limits.
The perfect support for your sales funnels.
As a final conclusion, I can only report positive things about ConvertBox and recommend you to buy it with a clear conscience. The right tool for form creators!
