OptinMonster - Improve your email marketing
With OptinMonster, you have all the tools for email marketing and lead generation at your hand. You want to attract more visitors to your website for newsletters – or generally for all types of marketing that require an opt-in form?
OptinMonster Review
USD 9.00
With OptinMonster, you can convert and monetize your website traffic effortlessly. Stop losing visitors! Instantly grow your email list, get more leads and increase sales with one of the most powerful conversion optimization tools in the world.
Then your solution is ready in the form of OptinMonster: You get the software that allows you to convince visitors of your qualities through individual designs, A/B tests for your forms, analyses and a problem-free integration into WordPress.
The most successful bloggers worldwide use the WordPress plugin OptinMonster. A very well-known example is Brian Dean with Backlinko. This is my OptinMonster review.
Pricing of OptinMonster
OptinMonster offers a 14-day money-back guarantee.
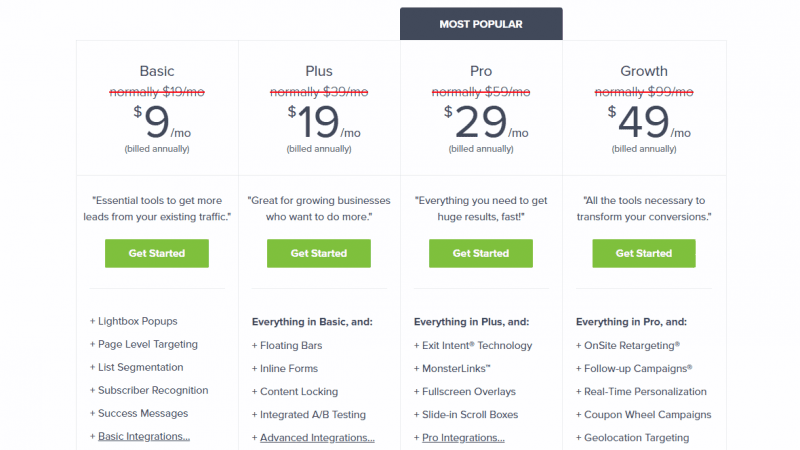
| Basic | Plus | Per | Growth |
| $9/month | $19/month | $29/month | $49/month |
| 1 page | 2 pages | 3 pages | 5 pages |
| 3 Campaigns | Unlimited | Unlimited | Unlimited |
| 5,000 page views | 15,000 page views | 50,000 page views | 250,000 page views |
| Lightbox Popups, Page Level Targeting, List Segmentation, Branding Cannot Be Removed | + Floating Bars, Inline Forms, Content Locking, A/B Testing | + Exit Intent, MonsterLinks, Fullscreen Overlays, Slide-in Boxes, Smart Tags, No Branding | + Retargeting, Follow-ups, Real-Time Personalization, Coupon Wheel, Geolocation Targeting, Custom Branding. |
| Basic Integration: Active Campaign, Campaign Monitor, Constant Contact, Custom HTML, Feedblitz, iContact, Mad Mimi, MailChimp, Mailpoet, MailerLite, Brevo, TotalSend | + Advanced Integrations: AWeber, Conversio, ConvertKit, Customer.io, Emma, GetResponse, Klaviyo, iPost, Drip, SendLoop, SendPulse, Email Octopus | + Pro Integrations: Eloqua, HubSpot, Infusionsoft, Marketo, Ontraport, Pardot, SharpSpring, Webhook | All integrations like Pro! |
We have only one negative message for you: Due to the extreme range of functions, OptinMonster is not a free service. You therefore have to pay an annual amount in order for the email marketing tool to be available to you. Currently, the developer staggers the cost of OptinMonster into four segments:
- For $9 a month, you get permission to use OptinMonster Basic on a single website. This already includes most of the features mentioned, but some special features are reserved for the more expensive versions.
- You can equip up to two websites with OptinMonster Plus for $19 a month. The number of functions is increasing, so you can now use in-line forms, for example.
- You can play three sides with the Pro version, for 29 US dollarsa month.
- The non-plus ultra is available for $49 a month. This allows you to use OptinMonster Growth on five websites and get access to all functions without exception.
Mind you, this pricing applies to a 12-month subscription to OptinMonster. Since the new pricing, there is no longer a monthly booking.
The optional WordPress plugin is available for free.
What is OptinMonster?
OptinMonster is a Software as a Service (SaaS) online service. So you create the campaigns and all popups and forms with the service provider. With a small JavaScript code or a WordPress plugin you implement the services on your site.
A SaaS service has two major advantages:
- You can use OptinMonster on all websites: e.B: WordPress and any shop software
- Your Page’s load time won’t be affected.
Through the visually very appealing Optin forms, popups, slide-ins and floating bars, you increase your leads, subscribers and sales significantly.
State-of-the-art technologies such as A/B testing, targeting, exit intent triggers and analytics allow you to constantly optimize your campaigns.
According to their own statements, 300,000 customers already use the software to catch more subscribers on their website.
What do I need for OptinMonster?
Fortunately: nothing at all. You only need one website, which can be blogs or online shops such as Shopify (14 days free trial),but news portals or other sites are also conceivable targets. The software does not require a fast desktop PC and is not tied to Plugins or external applications. Buy, install, use – and this is even possible on mobile devices such as smartphones.
Installation
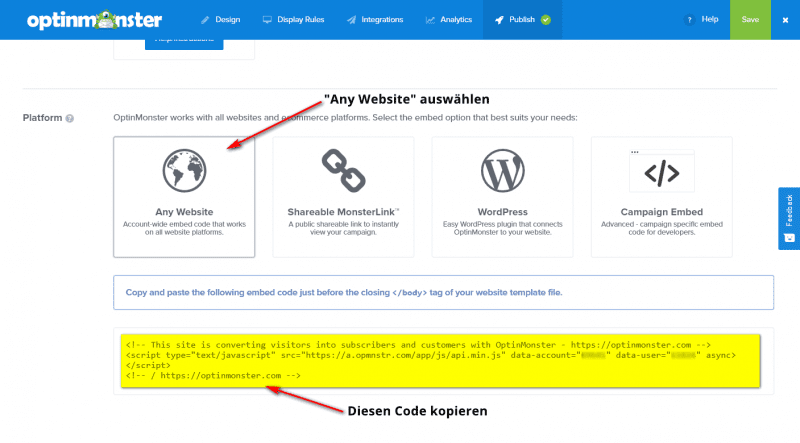
For many platforms you need the generated JavaScript code.
In the OptinMonster dashboard, select your desired campaign.
In the last step “Publish” “Any Website” is already selected. Just below is the JS code (marked in yellow in the screenshot). You have to mark and copy this code.
HTML pages
On all HTML web pages you only need to insert the JavaScript code before the closing body </body> tag.

Google Tag Manager
Very practically, the integration also works with the Google Tag Manager. No matter on which website or CMS.
For the instructions, I assume that you have already integrated Google Tag Manager on your website. You should also be able to perform simple steps in GTM.
- Create a new tag
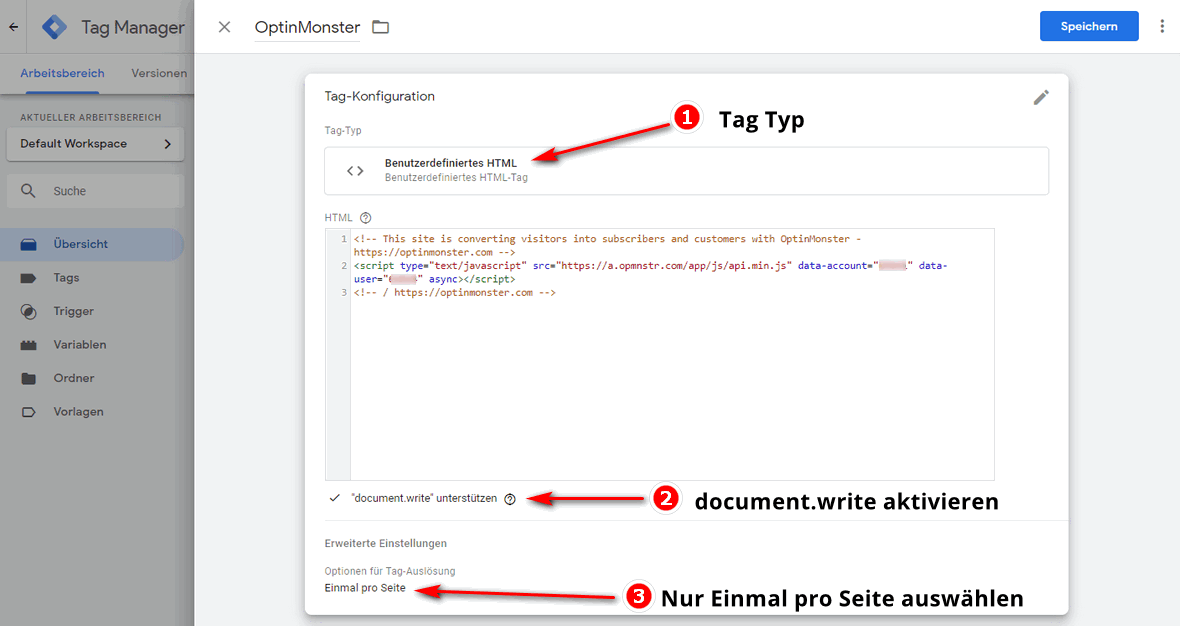
In Tag Manager you create a new day. You can simply call it OptinMonster. - Tag Type
As tag type you select “Custom HTML” and insert your JavaScript code. - Tag Settings
Turn on Support document.write. Under “Advanced Settings” –> select “Tag Triggering Options” then “Once per page”. - Select Trigger
Below you select the trigger “All Pages”. - Save and Publish tag
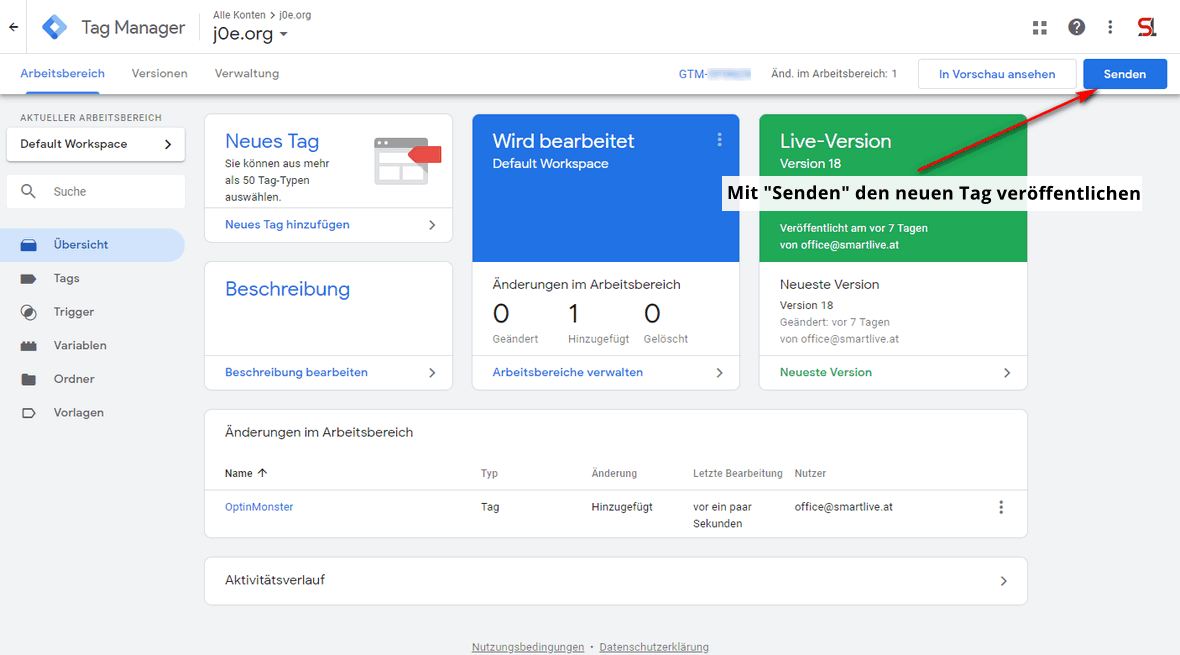
After you’ve configured the tag and triggers, you’ll need to save it.
Then publish the changes by clicking on “Send”.
The steps are explained very precisely in the following video:
Integration with WordPress
For easy WordPress integration, OptinMonster provides a plugin ready.
First, search for “optinmonster” in the WordPress dashboard –> plugins –> install. Then click on “Install now” and then on “Activate”.
In the next step, you will be prompted to connect to your OptinMonster account. Click Connect Your Account.
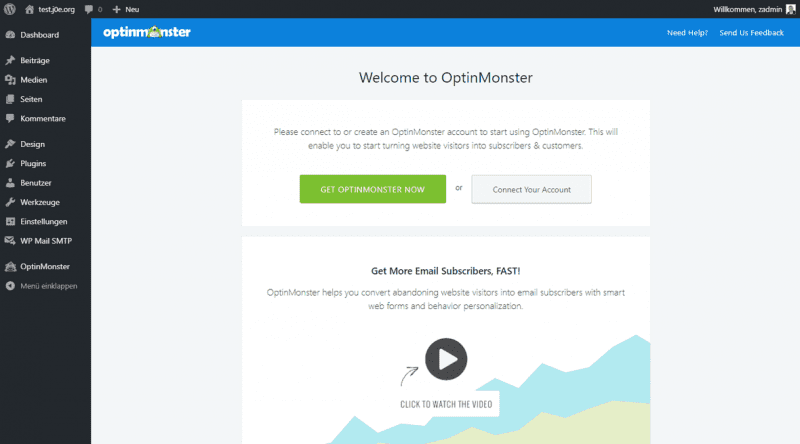
You must first create your API Key in your OptinMonster dashboard –> My Account –> API –> “Create New Key”.
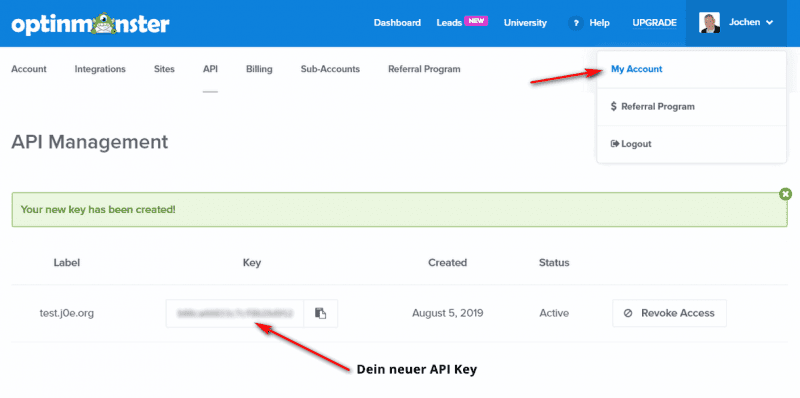
Back in WordPress, insert your API Key in the field of the same name and click on “Connect to OptinMonster”.
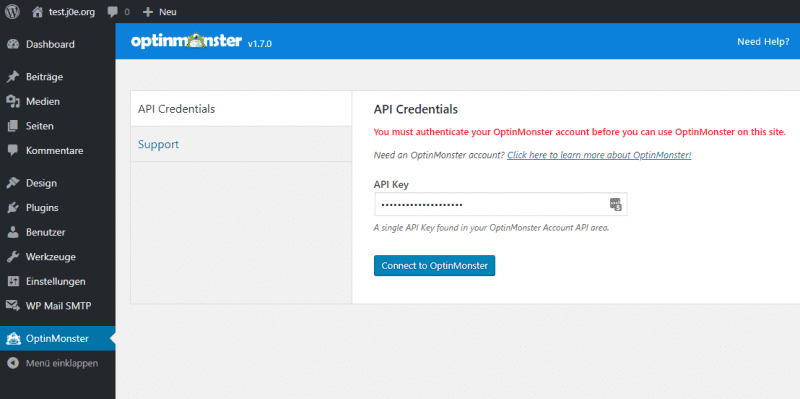
With this you have successfully connected your WordPress site to OptinMonster.
Don’t forget: activate in WordPress
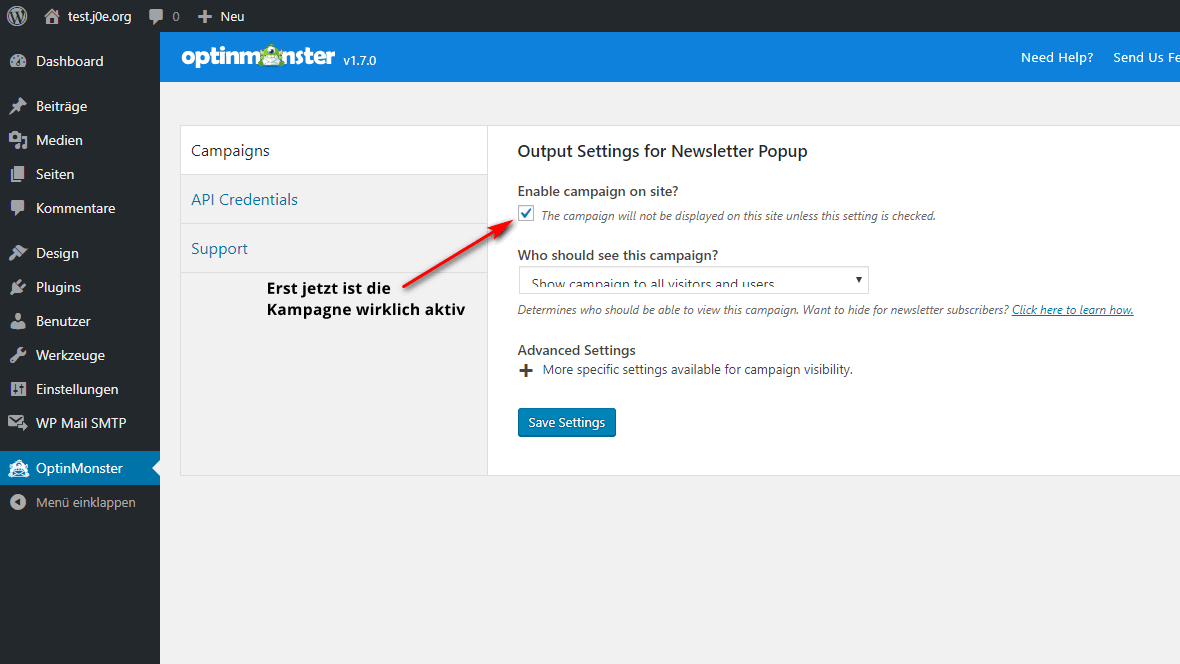
If you have created your campaigns in the OptinMonster dashboard and set the status to “Live”, you have to activate your popup in WordPress in one last step.
Other OptinMonster Platforms
There is a plugin or direct integration for the following platforms:
- WordPress
- Shopify
- Magentro
- Squarespace
- Bigcommerce
- Weebly
- Drupal
- blogger
- WooCommerce
- 3dcart
- Joomla
- Volusion
- tumblr
- PrestaShop
- Jimdo
I have already described the installation for HTML pages, WordPress or the Google Tag Manager.
For all other platforms, OptinMonster itself offers detailed instructions.
Getting Started with OptinMonster
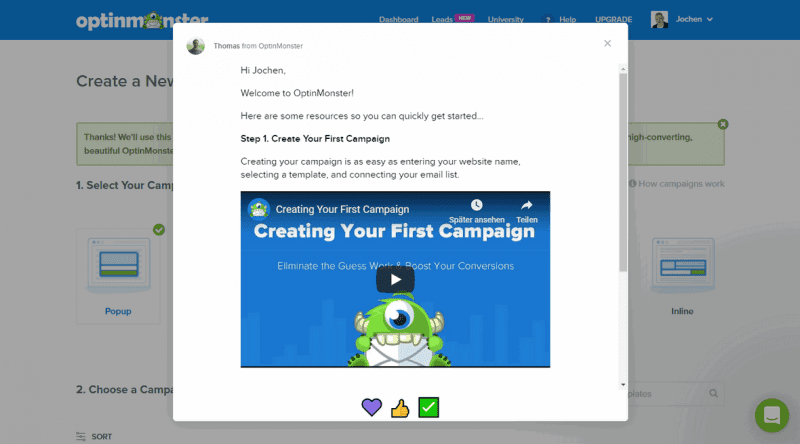
The first time you visit the OptinMonster backend, you’ll be warmly greeted with support for your first campaign.
We do that right away and create the first campaign.
Create a new campaign
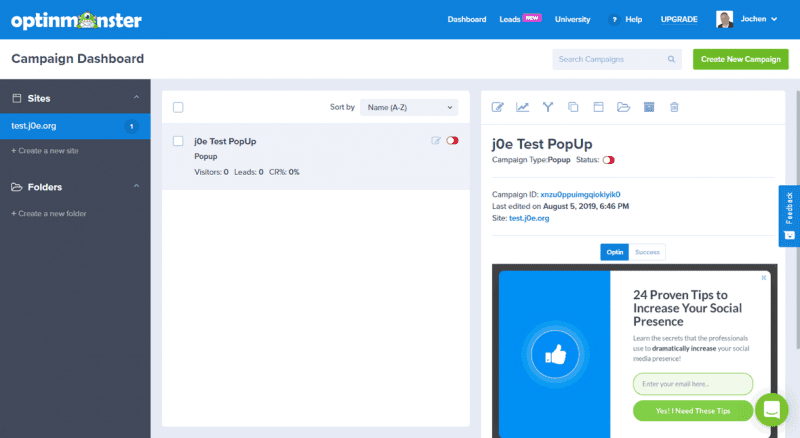
A campaign includes the type of lead form, the design, and future leads and statistics. A campaign is always associated with a website.
Campaign Type
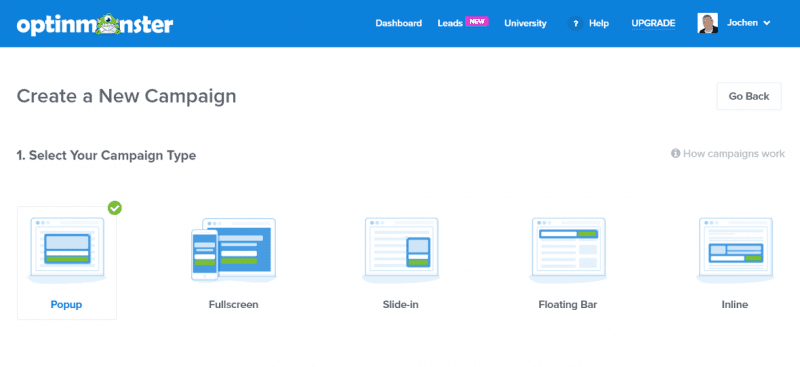
To create a new campaign, click on the green button “Create New Campaign” in the dashboard.
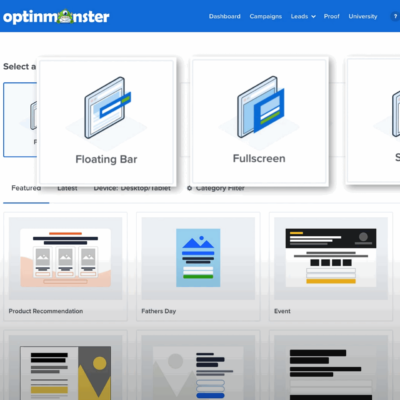
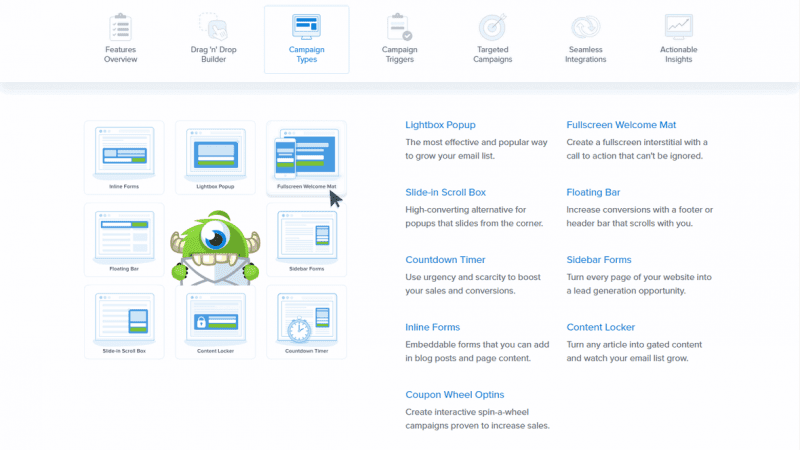
The next step is to decide on a campaign type. You have the choice between five overlay types:
- Popup
- Fullscreen
- Slide-in
- Floating Bar
- Inline
Of course, the best known is the classic popup. That’s how I’m going to start now.
Later I explained all campaign types in detail.
Campaign Template
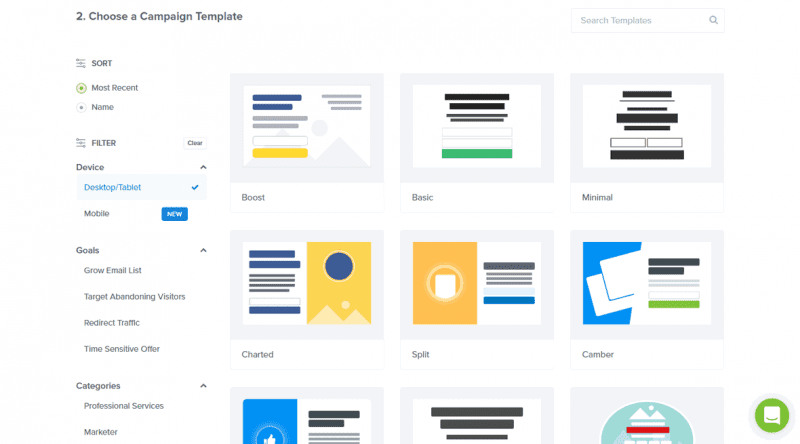
Visually, you can really let off steam with OptinMonster. There are countless templates for every type.
On the left side you will find the possibility to filter by device and destination. If you are looking for something specific, you may reach your destination faster via the search slot.
Once you have found a suitable template, click on “Use Template” in the Hoover menu.
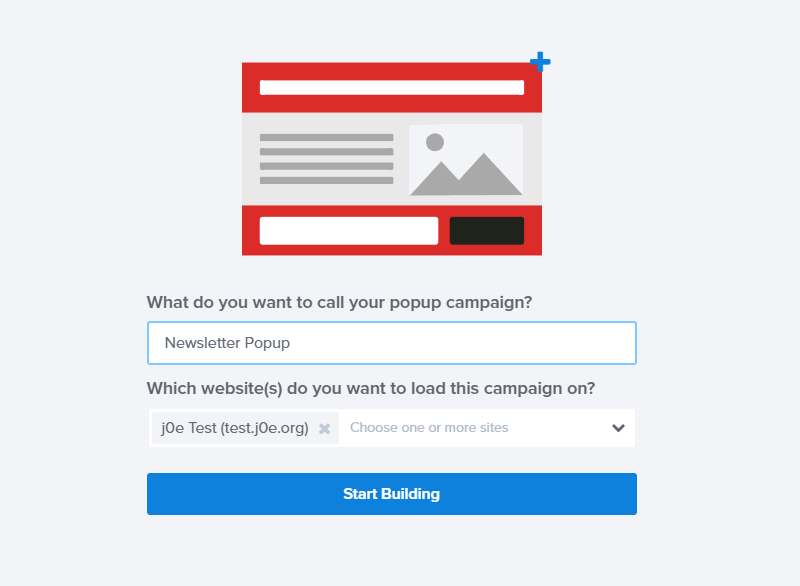
On the next screen, you’ll give your campaign/popup a name and select the Landing-Page(s). With a click on “Start Building” it starts.
It is worth watching the following video. It explains the most important steps for getting started. Even if your English isn’t the best, you can take advantage of it.
OptinMonster Campaign Editor
The centerpiece is the campaign editor, formerly called the design editor. Here you determine what your new lead generator looks like, how it behaves and with which external mail services it communicates.
When you create a new campaign, you will be taken directly to the editor after the last step. With existing campaigns, you can always get to the campaign editor via the small pencil icon (Edit Campaign).
The editor is divided into five sections, which you can always switch between without saving.
After changes, don’t forget to click on “Save”!
Design
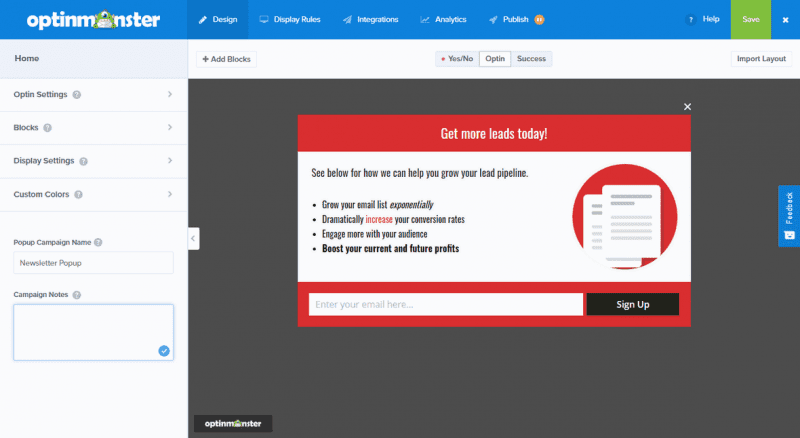
In the Design section, you determine the most important adjustments for your lead form. All optical settings, such as color, background, buttons, spacing and blocks, can be found here.
In addition to the visual settings, you will also find technical options, such as how long the cookies should last.
The “Custom Colors” are also very practical. Here you can store your project colors, which you then use again and again in the design.
Display Rules
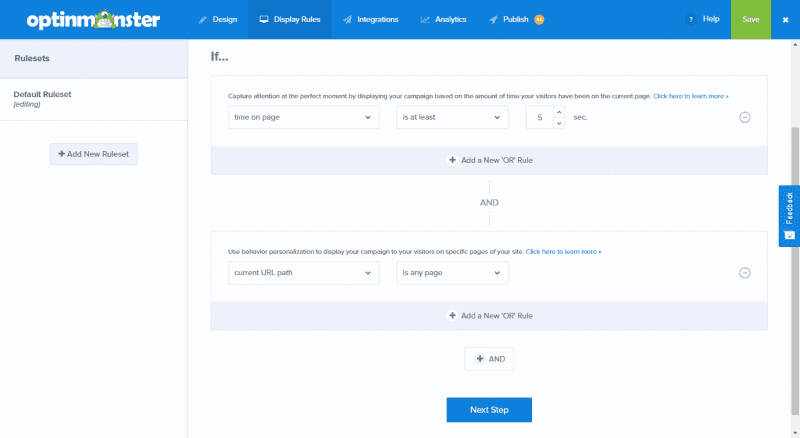
In the Display Rules, you can determine when a form should be displayed.
Display Rules = Trigger = Auslöser
The default setting shows the form after five seconds of dwell time and on each page. You can leave it that way for the time being, if you want to test more features first.
Very powerful is the possibility to create several rulesets for a campaign at the same time. The rules or triggers go from exit intent to referrer URL.
Integration
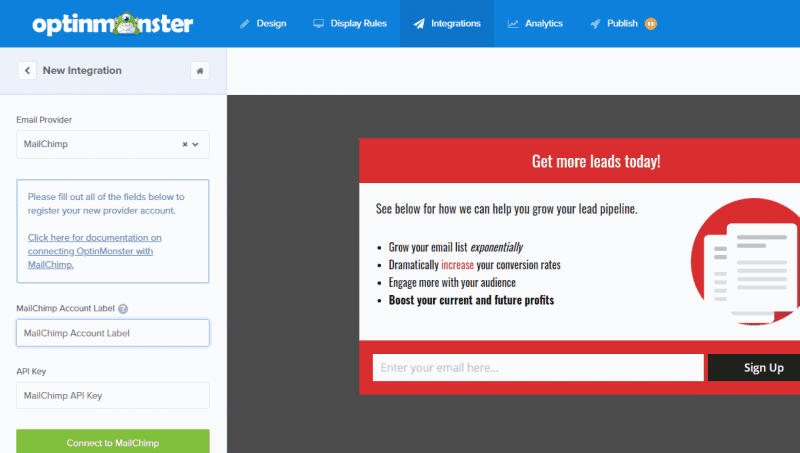
The integrations are about where you want your collected email addresses to be stored.
The default is Monster Leads. The collected contact data is stored in this e-mail list. However, it is not possible to send a newsletter with Monster Leads. This free way to save contacts is especially handy if you don’t already use an external newsletter service.
You can create multiple integrations per campaign. OptinMonster recommends always leaving Monster Leads active and also connecting a newsletter service. Mailchimp, for example, is an email service that also stores your email list.
Through webhooks, you can connect to Zapier or any other service. This allows you to approach the Lead Generation project without restrictions.
Analytics
There is not much to do here. Connect your campaign to Google Analytics.
Publish
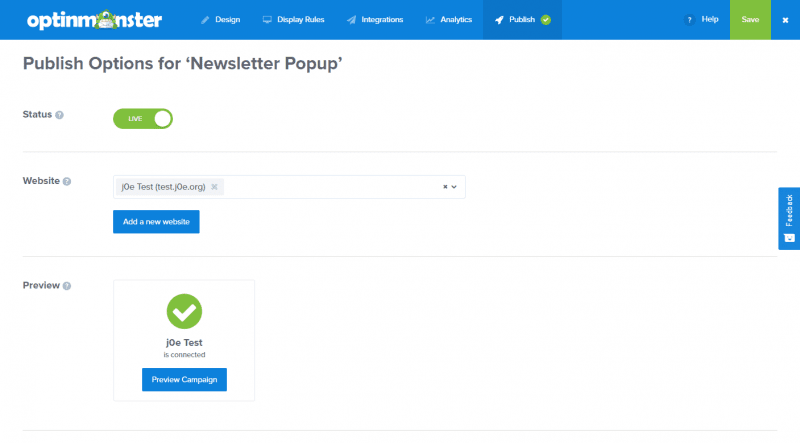
Under Publish, you must not forget to set the lead campaign to “Live”, otherwise it will not be delivered on your page.
With “Website” you can select several of your web pages on which the popup should be played.
Preview shows you all connected websites with a handy “Preview Campaign” button. Clicking on it points directly to the Landing-Page and runs the OptinMonster form.
Campaign types explained

By using OptinMonster, you are no longer necessarily bound to offer Optin forms separately, outside of the actual content.
Popup
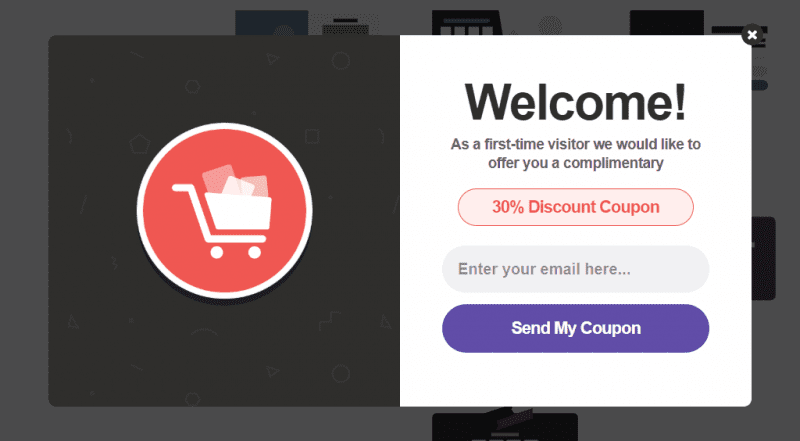
You know popups. Have you clicked away countless times. That’s why use this Campaign Type wisely.
Popups can still be used effectively. Especially with the Exit Intent Trigger you can address your visitor again before the jump.
Fullscreen
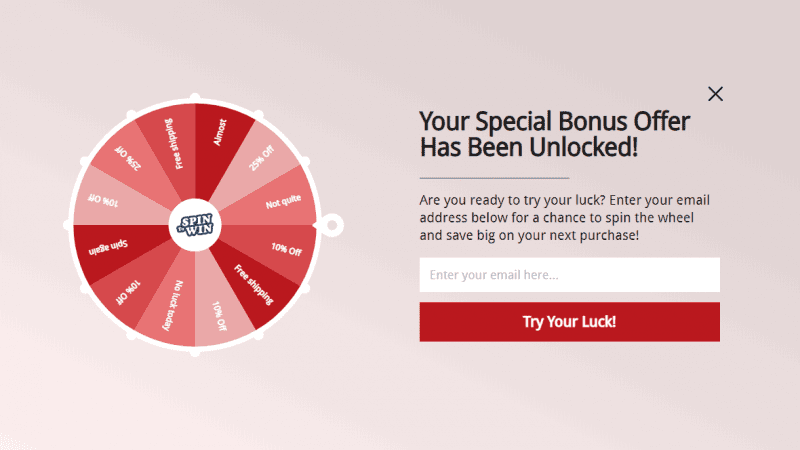
A small highlight in the range of functions of OptinMonster are the full-screen welcome and exit screens.
For example, the welcome screen appears when your blog registers a new visitor. This page then fills the entire screen and displays offers, prompts for a newsletter entry, or virtually any other message that makes sense to you.
In OptinMonster, this screen is a part of the original web page that the reader wanted to reach. If the person is interested, they enter their e-mail address – and if not, they immediately land on the actual page they are looking for.
The advantage of this method is that the reader’s attention is fully drawn to your offer. There is no other content, menu bars or banner ads that could distract the visitor.
Slide-in
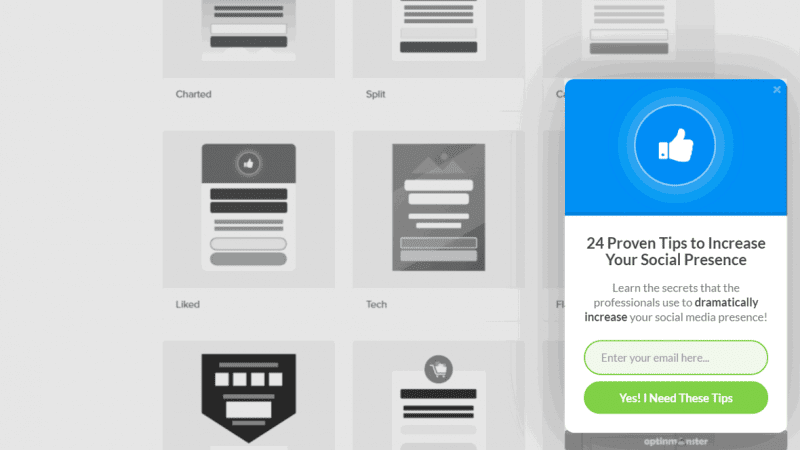
And last but not least: movement creates attention! Animated email opt-in forms fly from the page to your blog, jump to the screen from the bottom, or wiggle a little to draw attention to yourself.
A lightbox popup is effective, but it may be annoying by some visitors to your website. Of course, this stands in the way of your goal of professionalizing email marketing on your websites. OptinMonster offers you a way out in the form of slide-ins that can be integrated inconspicuously and still generate new customers and subscribers.
Floating Bar – Floating Forms
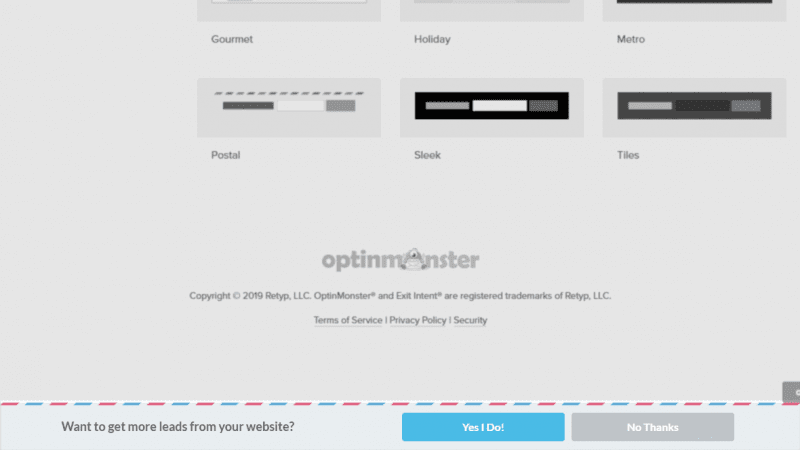
You can also pin opt-in forms to the top or bottom of the website with OptinMonster and thus get them to scroll along. These banners do not take up much space and therefore hardly disturb the reading flow for the visitor.
At the same time, however, you can make them visually very eye-catching – as perhaps as a strong contrast compared to the rest of the website – in order to draw the visitor’s eyes to this area. As was to wait, you can also adapt these banners visually and in terms of content to your needs.
In-Line Forms
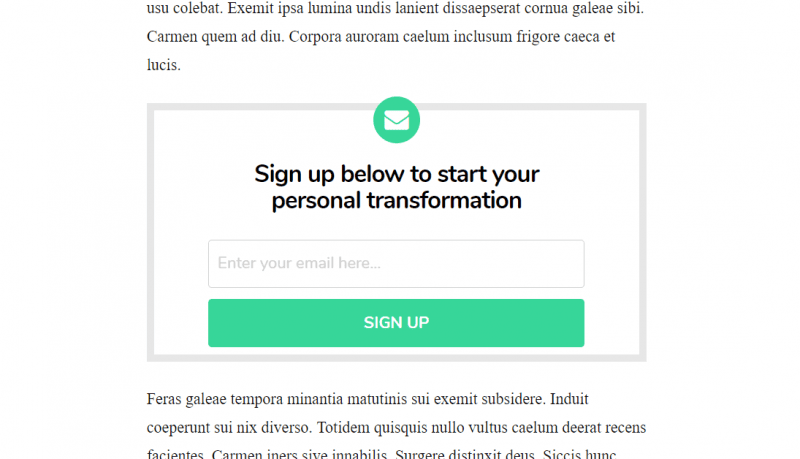
You simply place these opt-in forms directly in the text on your page. Visually, they hardly differ from the rest of the content, which means that readers do not feel disturbed by it.
The inline forms are particularly suitable for content-rich websites that present several pages of texts.
If the visitor is not interested, the inconspicuous presentation helps to simply skip the form. It’s therefore a very unobtrusive way to improve your email marketing with a tiny form.
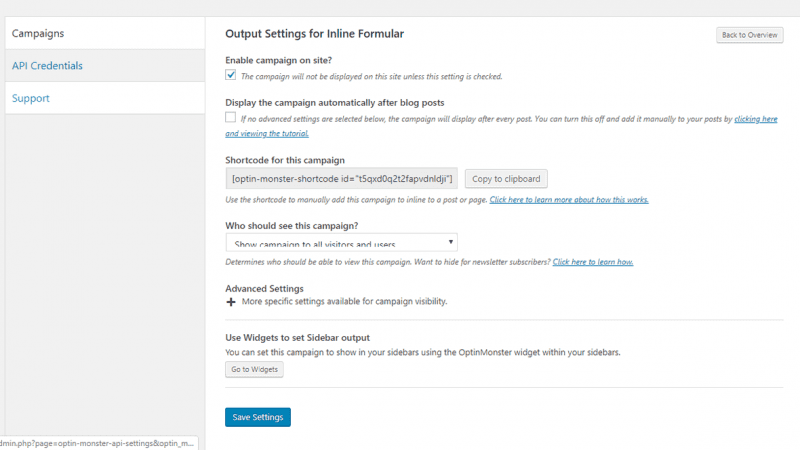
You can place the inline forms wherever you want using a shortcode. The shortcode can be found in WordPress in the campaign settings.
At the same time, you can also use this form type as widgets.
Technical implementation and analysis methods with OptinMonster
You’ve now learned many ways, forms, and popups to ultimately get into email marketing more effectively. So far, however, you do not have an instrument to test the efficiency of these methods. However, OptinMonster also includes various means to save money by simply filtering out the best marketing campaigns.
The money is in the list
Analytics and Insights
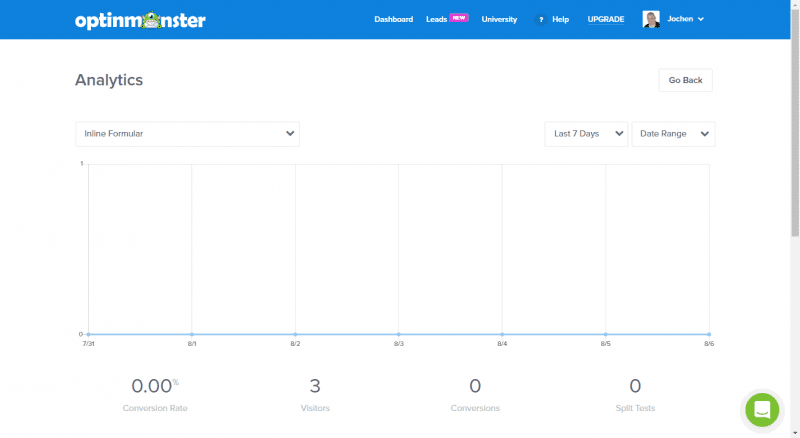
In modern online and email marketing, data analysis is the be-all and end-all of successful campaigns. You can use OptinMonster together with Google Analytics to see the performance of your advertising elements at a glance.
This is effective with the opt-in forms mentioned: For example, you can see how many people click on it or at least look at the form, and how many readers decide to sign up. This gives you an accurate overview of the conversion rate for each individual form on your website.
A/B test for all campaigns
An A/B test will help you find out which marketing methods work best for you. In OptinMonster, creating a split test is easy.
The tool automatically creates a copy of your form. You make small changes to this copy. The program then makes these different variants of your marketing available to your visitors. Inevitably, one of these variants will perform better and lead to a higher conversion rate.
Through the A/B test, often also called split test, you can find out which form of advertising is better received by your target group on the basis of hard facts. There are no gut decisions and you can clearly see which newsletter forms work better.
Page Level Targeting
Different visitors jump on different opt-in forms. Depending on nationality, time or the way a visitor uses your website, you should also design the opt-in form accordingly. Manually this would be a lot of work, but OptinMonster takes over a large part of these tasks automatically.
Through page-level targeting, OptinMonster allows you to present offers and popups in a way that is tailored to the respective user. Specifically, this could look something like this:
- A guest visits your WordPress blog for the first time. You may now be able to present a welcome popup to this customer group, but you won’t get to see it.
- Members who shop monthly in your online shop are granted access to interesting bonus codes that give a discount on the next purchase.
- On international WordPress blogs, you could greet English-speaking visitors differently than guests from the German-speaking world. Page level targeting also allows filtering by nationality.
- High-value customers who like to shop with you often and gladly are informed about new products or offers, while new visitors do not get to see this message.
Targeting increases your conversion rates – because emotions are best achieved through a personalized approach.
Exit Intent Trigger
One big problem unites all website operators: 70% of visitors who are on the page for the first time will leave and never visit you again. This is a big problem because it only allows you to convey a fraction of the ads you place on your website to your target audience.
OptinMonster notices when a visitor wants to leave your website – for example, he moves the mouse in the direction of the close button. At that moment, OptinMonster then presents an exit intent formthat has been designed by yourself and is tailored to your target audience. There you may be able to present interesting offers that still make the guest rethink. Maybe you’re just using the window to let the customer know about important content that the person hasn’t seen yet.
Ultimately, you can persuade another 2 to 4% of users to sign the form and maybe subscribe to your newsletter. OptinMonster is therefore an important part of your email marketing – which, by the way, also works in online shops. For example, adjust the software so that a customer who empties his shopping cart at the last moment is asked about it again. Through the popup, perhaps offer him support via chat or a discount on his favorite products. The possibilities are almost limitless!
The exit-intent form helps you to increase your conversion rate.
WordPress Gutenberg Block Editor
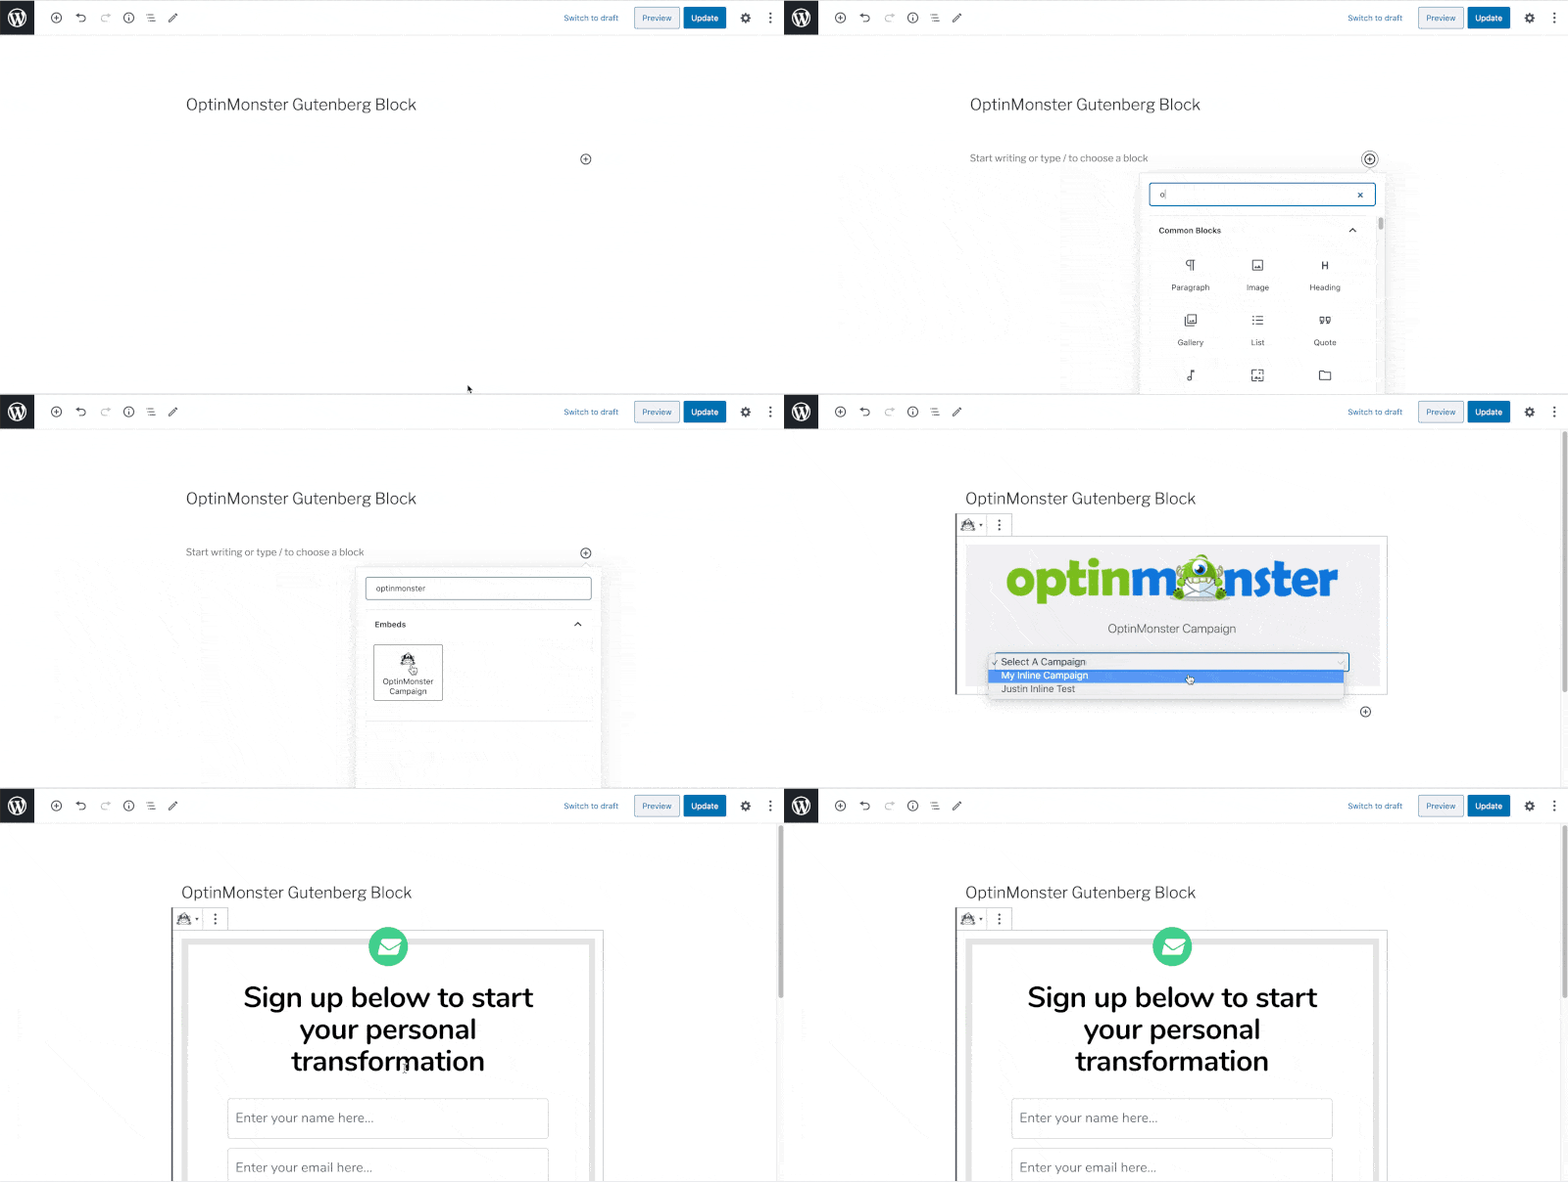
Since the OptinMonster WordPress plugin version 1.9.10 you can easily insert your inline campaigns via a block. I know many have been waiting for this.
After inserting the block, all you need to do is select the desired campaign in the drop-down box.
The OptinMonster Block:
If you prefer to use the Classic Editor, the three options of integration still remain:
- Campaign-specific embed code
- Inline DIV from the Publish tab
- Shortcode from the WordPress plugin
By default, the inline form is inserted exactly where you place the block. Just like you are used to from other blocks.
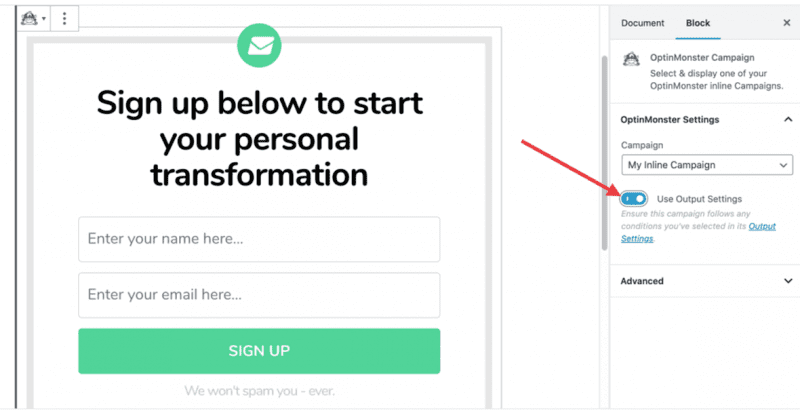
If you want to transfer the campaign settings from the OptinMonster output settings, you can do so via the “Use Output Settings” switch in the block settings.
OptinMonster FAQ
More about popups:
- The best email opt-in plugins
- OptionMonster – The industry leader as a SaaS service.
- ConvertPro – Good plugin from Astra developer.
- Elementor Popup Builder – You use Elementor, then this is a good solution.
- Thrive Leads – For all Thrive Suite users.
- ConvertBox – Extremely powerful SaaS service for popups.
- Bloom – The engagement plugin from Elegant Themes.
- Hello-Bar – Not so well known today, once the talk of the town.
Conclusion: Email marketing with OptinMonster
No simple WordPress popup plugin comes with the powerful OptinMonster Suite. My review certainly made that clear.
The comprehensive extent of individualization is the highlight of the tool. From the design of Email Optin forms to the smallest popups and overlays, you can set everything exactly as you imagine.
Best WordPress Hosting
Hosting recommendations are usually garbage.
Often extremely cheap hosting packages for $ 3 are recommended, others advertise a $ 100 VPS, because they earn the most as an affiliate thereby. In the end, we all just want the fastest possible web space for as little money as possible.
And optimized for WordPress!
What else is important? The server should be a fast backbone for your website and the support should answer as fast as possible, and preferably in your language.
You can get all this at Cloudways from $ 10,00 / month.
OptinMonster works seamlessly with WordPress and takes into account desktop PCs and notebooks, as well as mobile devices such as smartphones or tablets. Alternatives can be found in the Email Optin comparison.
Ultimately, you get a program that will have a significant positive impact on your conversion rate – almost automatically. You don’t have to deal with sensitive HTML or PHP code, but adapt OptinMonster to your needs in its own user interface. Within a few minutes, you can already see results and welcome new subscribers.
Every lead counts!
Updates
- 05/14/2022 – Version 2.7.0: introduced revenue mapping support for EDD and WooCommerce and added revenue mapping settings.
- 02/18/2021 – Version 2.2.0: Added Elementor Block and other integration. Added WooCommerce integration. Added functions for onboarding flow.
- 01/14/2021 – Version 2.1.0: Introduces Subscribers page so you can manage Monster Leads on your WordPress site. Includes helpful analytics data, graphs, management and export features.
- 11/20/20 – Version 2.0.0: Revision of the plugin to make managing your popup campaigns easier than ever!
- 08/25/2020: Completely new inline editing of text blocks in the builder. Webhooks have been significantly improved.
- 08/04/2020: Automatic sync between the OptinMonster app and the WordPress plugin without having to press the refresh button.
There’s a new Gutenberg block to embed inline campaigns on your posts and pages. - 06/11/2020: Support for Google reCAPTCHA (free API key required) and Custom JavaScript. reCAPTCHA helps you to ward off spam.
- 05/05/2020: The Exit Intent Trigger is now also available on mobile devices. A whole new template collection for donations, as donations.
